Recommended resources
The freely available resources this lesson will direct you to.
In our previous lesson, you successfully created a database project in the cloud, choosing between the structured world of Supabase and the flexible environment of Firebase. That database is now sitting on a server, ready and waiting. But how does the app code on your computer actually talk to it? This is a fundamental step your AI coding assistant will always prompt you to take, and today, we're demystifying it.
This lesson is all about building the bridge between your local project and your new cloud database. You will learn how to install the necessary "toolkit"—the SDK—and write the initialization code that uses secret keys to establish a secure connection. By the end, your app will be officially hooked up to its backend brain.
What is an SDK, and Why Do You Need It?
Before we write any code, let's clarify what your AI assistant means when it tells you to "install the Firebase SDK" or "add the Supabase client."
You've already learned about APIs as a way for different software components to communicate. You can think of the API for your database as a very detailed menu for a restaurant; it lists all the possible orders you can place (like "fetch data," "create a new record," "delete a user"). However, using that menu directly requires you to format your order in a very specific, raw format, which can be tedious and error-prone.
This is where an SDK (Software Development Kit) comes in. An SDK is a package of pre-written code that acts like a helpful waiter. Instead of you shouting a complex order at the kitchen, you just tell the waiter, "I'd like the steak, please." The waiter handles all the complex communication with the kitchen for you. In the same way, an SDK gives you simple, clean functions to use in your code, while it handles the messy, low-level API communication behind the scenes.
To get a clear picture of this crucial distinction, the following video from IBM Technology offers a great explanation.
API vs. SDK: What's the difference?
This video explains the relationship between APIs and SDKs using a simple analogy.
Watch the segment from this point, where the presenter explains how an SDK acts as a "toolbox" or a wrapper around an API. Notice how the SDK simplifies the process from dealing with raw data (JSON) to using native code objects and simple functions.
In short, when you run npm install firebase or npm install @supabase/supabase-js, you're adding this "waiter" or "toolbox" to your project.
Connecting Securely with Environment Variables
To connect to your database, your app needs two pieces of information: its address (a URL) and a password (an API Key). As we covered in Module 3, these credentials are sensitive and should never be written directly into your source code. If you were to share your project on GitHub, anyone could see your keys and access your database.
This is why we use environment variables stored in a .env file. This file lives locally on your computer but is typically excluded from version control (via .gitignore), ensuring your secrets stay secret.
Now, let's get our hands dirty. Depending on which service you set up in the last lesson, follow the appropriate path below.
Path 1: Connecting Your App to Supabase
If you chose Supabase for its structured, table-based approach, here’s how to connect your app to the posts table you created.
Step 1: Find Your API Keys
First, you need to get your project's unique URL and a special "anon" key.
- Go to your Supabase project dashboard.
- In the left sidebar, click the Settings icon (the gear).
- Select API from the list.
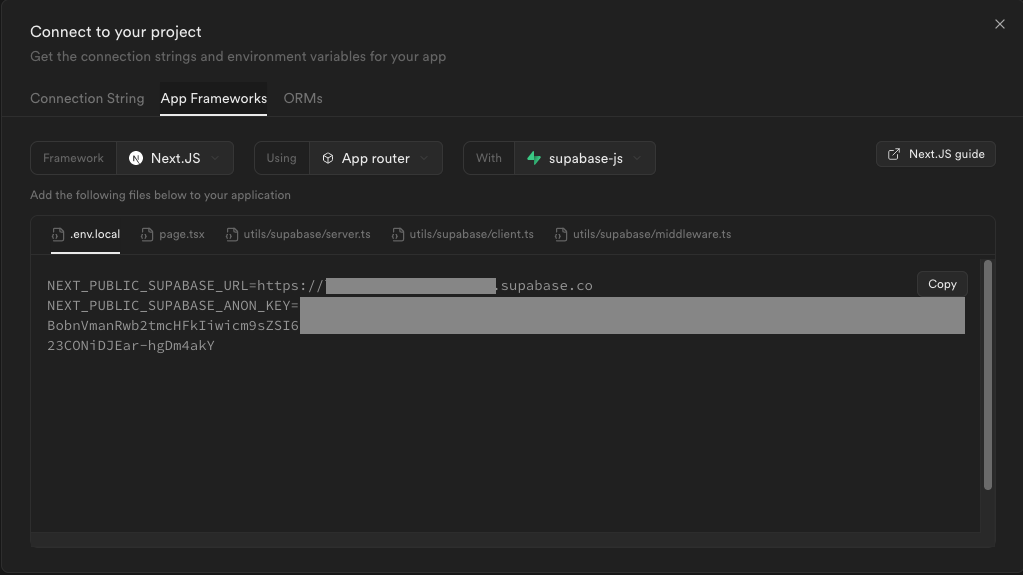
- In the "Project API keys" section, you will find your URL and your
anon(public) key. Theanonkey is safe to use in a client-side application because your data's security is enforced by Row Level Security policies (which we'll cover later), not by hiding this key.
This screen in the Supabase console provides exactly what you need.
Step 2: Install the Supabase SDK
Now, let's add the Supabase "toolbox" to your project. Open the terminal in your project's root folder (or use the built-in terminal in VS Code) and run the npm install command you learned about in Module 2.
npm install @supabase/supabase-js
This command downloads the Supabase JavaScript library and adds it to your node_modules folder and package.json file.
Step 3: Initialize the Connection
It's time to write the code that builds the bridge. We will use a helpful guide from JSTopics to see how this is done.
Initialize Next.js App with Supabase Database - Part 1 | JSTopics
This article provides a clear, step-by-step walkthrough for connecting a web app to a Supabase backend.
First, follow the instructions in the section Connect to Supabase. This shows you how to find your keys (which you just did) and create a .env.local file to store them. Use the variable names it suggests: NEXT_PUBLIC_SUPABASE_URL and NEXT_PUBLIC_SUPABASE_ANON_KEY. Next, jump to the section Read from Supabase. Focus on the first few lines of the code example:
import { createClient } from '@supabase/supabase-js'

const supabase = createClient(
  process.env.NEXT_PUBLIC_SUPABASE_URL!,
  process.env.NEXT_PUBLIC_SUPABASE_ANON_KEY!
)
This is the initialization code. You can create a new file in your project, perhaps src/supabaseClient.js, and place this code there. It imports the createClient function from the SDK you installed and immediately uses it, passing in the secret keys from your .env.local file. The resulting supabase object is your gateway to interacting with the database.
And that's it! Your application is now configured to communicate securely with your Supabase project.
Path 2: Connecting Your App to Firebase
If you chose Firebase for its flexible, document-based data model, here’s how to connect your app to the Firestore database you created.
Step 1: Find Your Config Keys
Firebase bundles all your connection details into a single JavaScript object called firebaseConfig.
- Go to your Firebase console.
- Click the gear icon next to "Project Overview" in the top-left and select Project settings.
- In the "General" tab, scroll down to the "Your apps" section.
- Find the web app you registered in the previous lesson and look for the SDK setup and configuration section.
- Select the Config option. You will see a
firebaseConfigobject containing your keys (apiKey,authDomain, etc.).
Step 2: Install the Firebase SDK
Let's add the core Firebase library to your project. Open your terminal in the project's root folder and run the following command:
npm install firebase
This downloads the necessary Firebase modules into your project, allowing you to interact with services like Firestore and Authentication.
Step 3: Initialize the Connection
Now, you'll use your config keys to initialize your Firebase app. The goal is to create a configuration file that reads your secret keys from a .env file and uses them to connect.
The following image shows exactly what this looks like in a typical project setup.
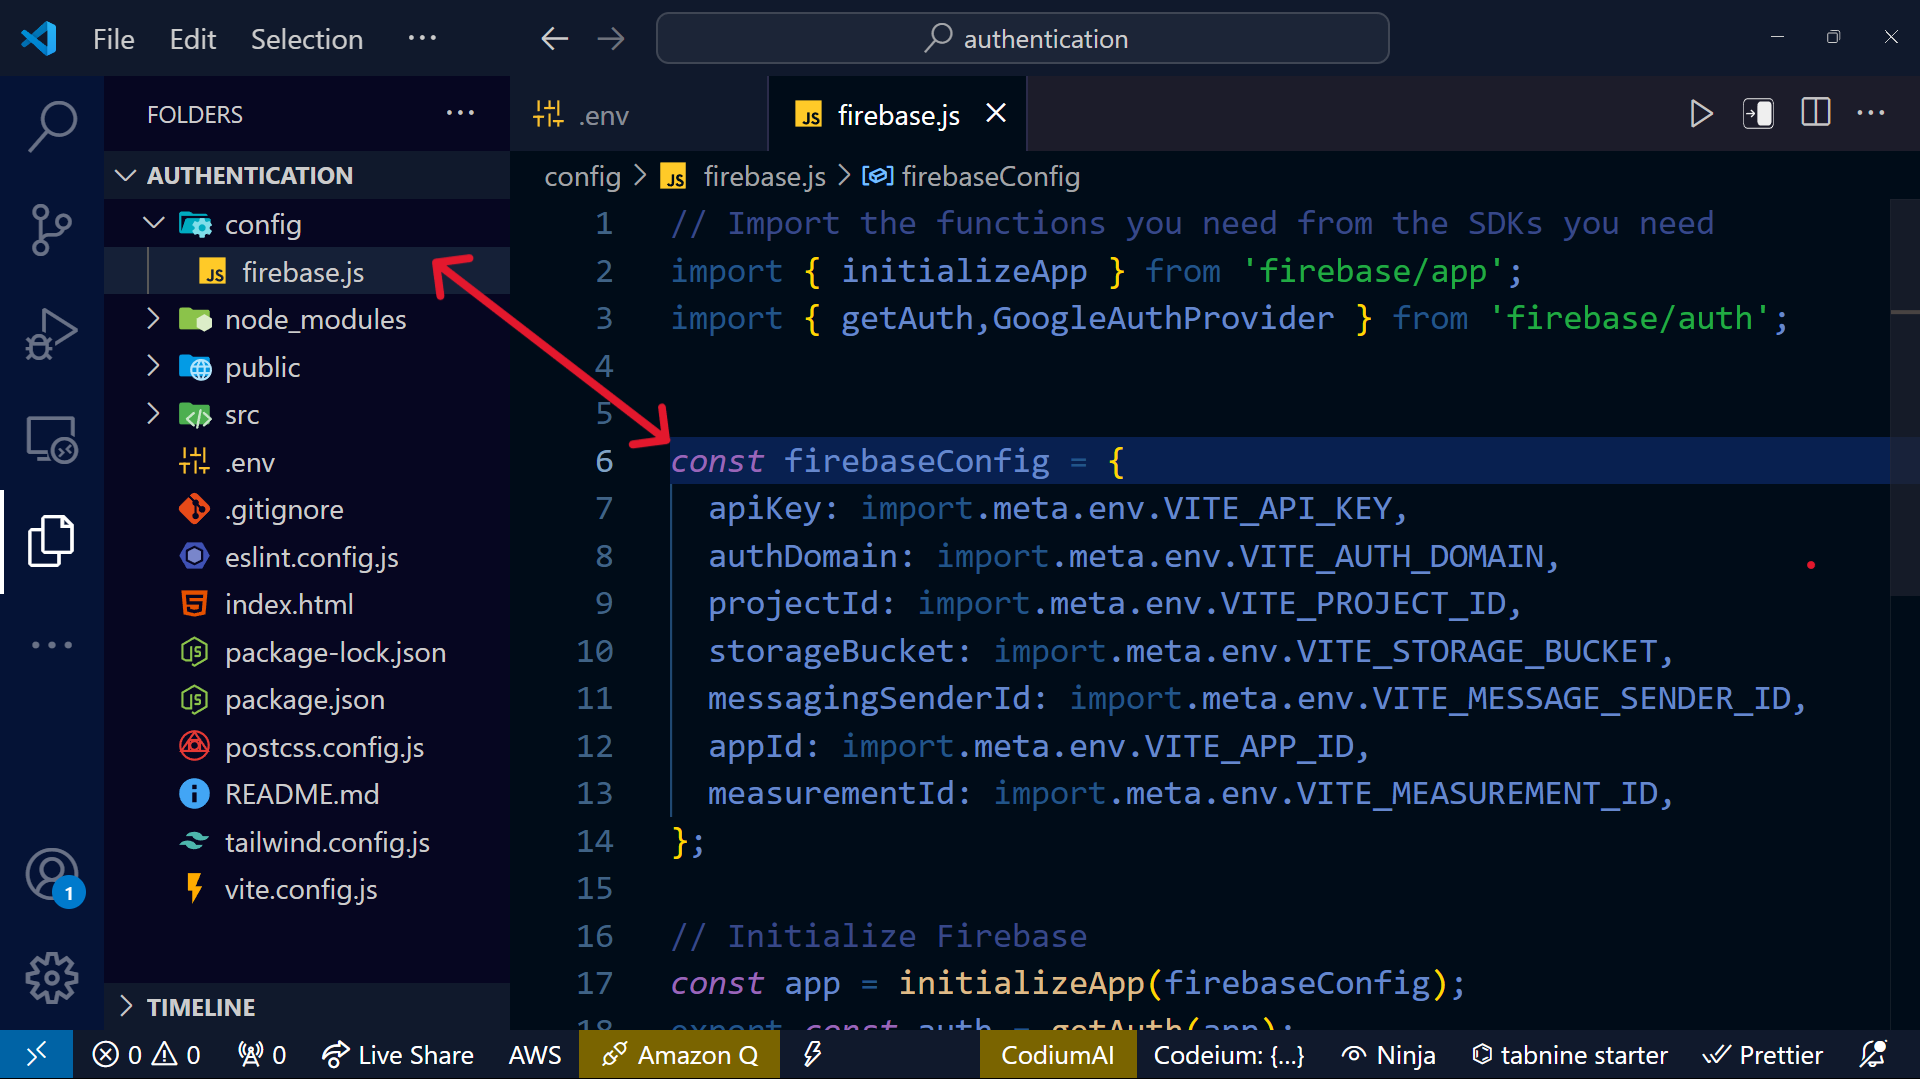
Let's replicate this process.
The Expo documentation provides a clear template for the Firebase initialization file, which we will adapt to use environment variables.
Find the section titled Initialize the SDK. You'll see a code block for a firebaseConfig.js file. Now, follow these steps to implement this securely: Create a .env file in the root of your project. Copy your keys from the Firebase console into this file. For modern web projects (using tools like Vite), you should prefix them with VITE_.
Now, follow these steps to implement this securely:
-
Create a
.envfile in the root of your project. -
Copy your keys from the Firebase console into this file. For modern web projects (using tools like Vite), you should prefix them with
VITE_.VITE_API_KEY="your-api-key" VITE_AUTH_DOMAIN="your-project-id.firebaseapp.com" VITE_PROJECT_ID="your-project-id" VITE_STORAGE_BUCKET="your-project-id.appspot.com" VITE_MESSAGING_SENDER_ID="your-sender-id" VITE_APP_ID="your-app-id" -
Create a
firebase.jsfile (or similar) in yoursrcfolder. -
Add the initialization code, but instead of hardcoding the keys, read them from
import.meta.env, just as shown in the image above.import { initializeApp } from "firebase/app"; const firebaseConfig = { apiKey: import.meta.env.VITE_API_KEY, authDomain: import.meta.env.VITE_AUTH_DOMAIN, projectId: import.meta.env.VITE_PROJECT_ID, storageBucket: import.meta.env.VITE_STORAGE_BUCKET, messagingSenderId: import.meta.env.VITE_MESSAGING_SENDER_ID, appId: import.meta.env.VITE_APP_ID }; // Initialize Firebase const app = initializeApp(firebaseConfig); // You'll export this 'app' or other services to use elsewhere export default app;
With this file in place, your application now has a secure, reusable connection to your Firebase project.
Conclusion
Congratulations! You have just completed a crucial, and often confusing, step in app development. You've installed an SDK and written the configuration code to securely connect your local project to a cloud database. This is the "plumbing" that enables your app to become truly dynamic.
Key Takeaways:
- An SDK (Software Development Kit) is a package you install (
npm install) that provides a simplified "toolbox" for interacting with a service's API. - API Keys and project credentials are the secrets your app uses to prove it has permission to connect to your database.
- These secrets must always be stored in an environment file (
.env) and loaded into your configuration, never written directly in your shareable code. - The initialization code (
initializeAppfor Firebase,createClientfor Supabase) runs once to establish a persistent connection object that your app can use everywhere.
In our next lesson, we will finally use this connection. You'll learn how to write the code to create new data and read it back from your database, completing the loop and bringing your application to life.