Recommended resources
The freely available resources this lesson will direct you to.
Hello! In our last few lessons, we've established a solid foundation for tracking our work. You've learned how to initialize a repository (git init), select changes for saving (git add), and create permanent snapshots of your project with descriptive messages (git commit). Your my-first-repo project now has a clean, single timeline of history on its default main branch.
This is great for linear progress, but what happens when you have a new idea that's experimental? Maybe you want to try a complete redesign of a page, add a complex new feature, or just play around with some code an LLM generated. Doing this directly on your main branch is risky; if things go wrong, you could break the working version of your project.
In this lesson, we'll tackle that exact problem by exploring one of Git's most powerful features: branches. You will learn how to create and switch between branches to work on features in isolation, effectively creating a safety net for your creativity without ever risking your stable, main codebase.
What is a Branch? Your Creative Sandbox
As a designer, you've likely done this a thousand times without calling it "branching." When you want to experiment with a new layout in Figma, you don't just start moving things around on your final frame. You duplicate it. That duplicate becomes your sandbox. You can change colors, move elements, or even scrap the whole thing, and your original design remains untouched.
A Git branch is exactly that: a duplicate of your project's timeline, ready for you to experiment on.
Git Branching for Designers - Builder.io
This article from Builder.io is written specifically for designers and uses an excellent analogy to demystify branching.
Start at the beginning and read the introduction. Then, focus on the section "Branching" is like duplicating a Figma frame. This will ground the concept in a workflow you're already very familiar with.
The main branch is considered the definitive, stable version of your project—the one that works. Any new feature or risky experiment should happen on a separate branch. This keeps your main codebase clean and always in a usable state.
This image provides a great visual summary of the concept.
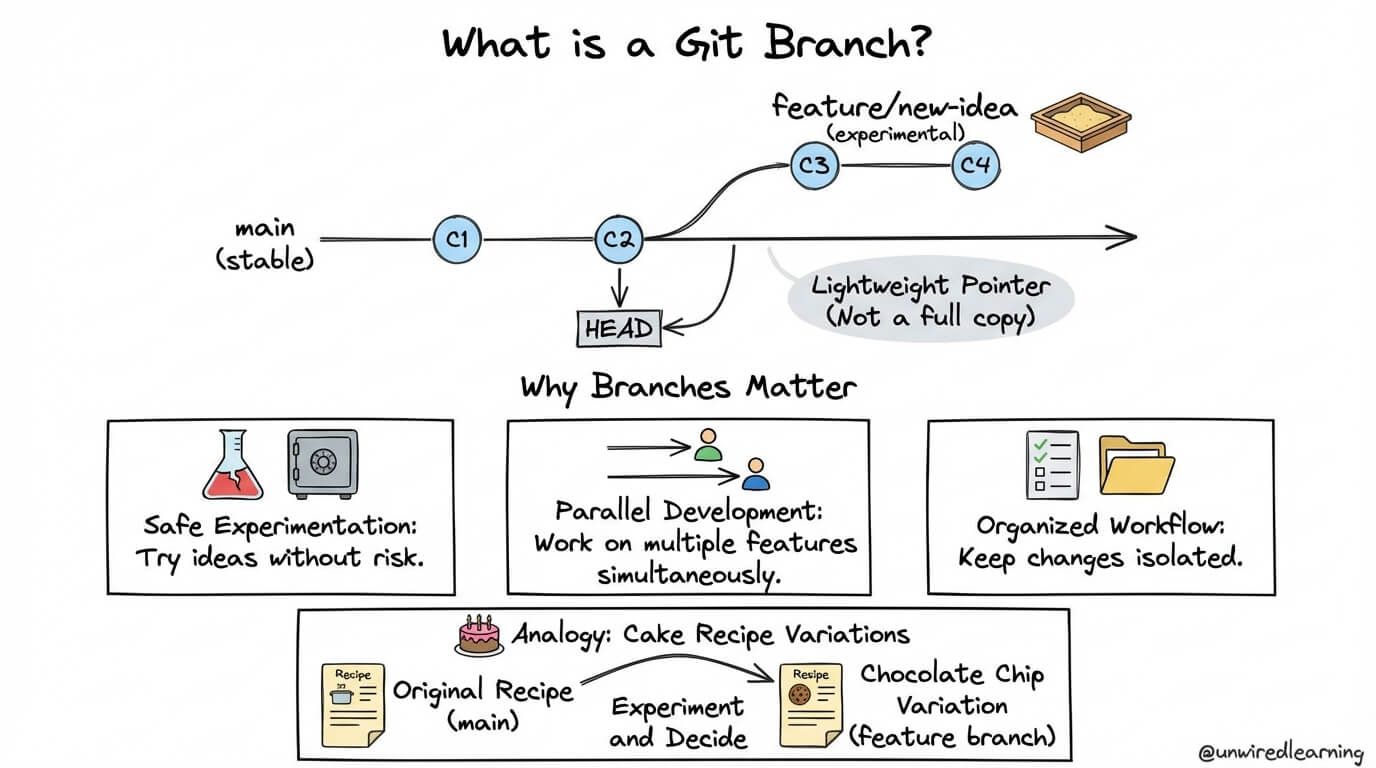
Creating and Switching Branches in Practice
So how do we actually create and use these branches? Let's get hands-on in your my-first-repo project.
By default, your repository has one branch named main. You can see all the branches in your project and find out which one you're currently on by using the git branch command.
- Open your terminal and navigate to your
my-first-repodirectory. - Type
git branchand press Enter.
You'll see something like this:
* main
The asterisk * indicates the branch you are currently "checked out" on. Any commits you make will be added to this branch's history.
Now, let's say you want to experiment with adding a dark mode to your simple webpage. Instead of changing index.html on the main branch, we'll create a new branch for this feature. The command to both create a new branch and immediately switch to it is git checkout -b <branch-name>.
-
Let's create a branch called
feature/dark-mode-button. It's a common convention to group branches by type (feature,bugfix,experiment) followed by a short description. This is like naming your Figma framesExperiment - New NavvsFeature - User Profile.In your terminal, run:
git checkout -b feature/dark-mode-buttonGit will respond with:
Switched to a new branch 'feature/dark-mode-button'. -
Now, run
git branchagain. The output will have changed:* feature/dark-mode-button mainYou now have two branches, and the asterisk shows you are actively working on
feature/dark-mode-button. You've successfully stepped into your new sandbox.
Working in Isolation: The Magic of Branches
Your new branch, feature/dark-mode-button, is an exact copy of main at the moment you created it. Now, let's make a change here and see how it remains isolated.
- Modify your file. Open
index.htmlin your code editor and add a button for the dark mode toggle. You can add this line inside the<body>tag:<button>Toggle Dark Mode</button> - Save the file and return to your terminal.
- Commit the change to your new branch. Go through the standard workflow you've already learned:
Your new commit, containing the button, now exists only on the# Check the status to see your changes git status # Add the file to the staging area git add index.html # Commit the change with a descriptive message git commit -m "✨ Add dark mode toggle button"feature/dark-mode-buttonbranch. You can verify this withgit log.
Now for the "aha!" moment. Let's switch back to the main branch. The command to switch to an existing branch is git checkout <branch-name>.
-
Switch back to main. In your terminal, run:
git checkout mainGit will confirm:
Switched to branch 'main'. -
Check your code. Now, open
index.htmlin your editor again, or simply view its contents in the terminal by runningcat index.html. The<button>you added is gone! It's as if it never happened. If you rungit log, you'll see the commit for the button isn't in this branch's history.
This is the power of branching. You safely experimented with a new feature in a contained environment. The main branch, your source of truth, was completely unaffected.
To get back to your experiment, you just need to switch back to the other branch:
git checkout feature/dark-mode-button
And poof! Your button code reappears. You can now freely switch between these two parallel universes of your project.
Best Practices for Your Vibe Coding Workflow
This workflow isn't just a "nice-to-have"; it's fundamental to how developers—and now you—work with LLMs. An AI might generate a huge chunk of code for a new feature. Instead of dumping it straight into your main project, the correct workflow is to:
- Create a new branch (e.g.,
git checkout -b feature/new-ai-idea). - Let the agent make its changes.
- Review, test, and commit the changes on that branch.
- If it works, you can merge it back. If it's a disaster, you can just delete the branch, and your main project is unharmed.
This practice is so important that it's worth seeing it stated plainly.
Git Basics – Happy Git for Vibe Coders
This guide is tailored for workflows involving AI coding agents, making its advice highly relevant.
Read the two short sections under "Best Practices Specific to Vibe Coding": "Use Experimental Branches" and "Keep Main Clean". These sections explicitly reinforce the workflow we just practiced.
Conclusion
In this lesson, you've unlocked a crucial capability for any creator: the power to experiment without fear. By using branches, you can explore new ideas, add features, or fix bugs in a dedicated, isolated environment, all while keeping your main project stable and clean.
Key Takeaways:
- Branches are like parallel timelines or sandboxes for your code.
- For designers, branching is analogous to duplicating a Figma frame to experiment safely.
- The
mainbranch should always represent the stable, working version of your project. - Use
git checkout -b <branch-name>to create a new branch and switch to it. - Use
git checkout <branch-name>to switch between existing branches. - Commits made on one branch do not affect any other branches, giving you complete isolation.
You now have a feature—your dark mode button—living on its own branch. But how do you get that finished feature back into your main branch? And how does this process work when you're collaborating with others? In our next lesson, we'll cover pushing your branches to GitHub and introduce the concept of Pull Requests, the cornerstone of collaborative coding.