Recommended resources
The freely available resources this lesson will direct you to.
Welcome back! In our last lesson, you mastered one of Git's most powerful features: branching. You learned how to create a safe, experimental sandbox (feature/dark-mode-button) to work on new ideas without affecting your stable main branch. So far, all this activity—every commit and every branch—has happened exclusively on your computer. Your project's history lives in a hidden .git folder, and nowhere else.
This lesson bridges the gap between your local project and the cloud. We'll take your my-first-repo and publish it to GitHub, the platform where developers and designers share code, collaborate on projects, and back up their work. You will learn how to connect your local repository to a remote one on GitHub and "push" your code for the world (or just your team) to see.
Git vs. GitHub: The Tool and The Hub
Before we start, let's clarify a crucial distinction.
- Git is the version control tool running on your computer. It's what creates commits and manages branches locally.
- GitHub is the platform on the internet that hosts Git repositories. Think of it like this: if Git is the software you use to write a document (like Microsoft Word), GitHub is the cloud service where you store and share that document (like Google Docs).
You've been using Git. Now, we're going to use GitHub to share and back up the work Git has been tracking. This is essential for collaborating with others, getting feedback from an LLM assistant, or deploying your app with services like Vercel.
This diagram gives a great high-level overview of the entire workflow, from local setup to publishing on the web. Today, we're focusing on the steps that get your local project onto GitHub.

Why Push to GitHub?
As a designer moving into code, understanding this step is key. When Claude or another AI asks you to create a GitHub repo and push your code, it's for three main reasons:
- Collaboration: It’s how you’ll share your project with an engineer for review. Just like sharing a Figma link is better than emailing a
.figfile, sharing a GitHub link is the standard for code. - Backup & History: Your laptop could get lost or damaged. Pushing to GitHub means your project and its entire history are safely stored in the cloud.
- Deployment: Services like Vercel (which we'll cover soon) can connect to your GitHub repository and automatically publish your website every time you push an update. This creates a seamless workflow from idea to live app.
GitHub for designers: The complete guide to repos, branches, and pull requests - TDP
This article from The Design Project does a fantastic job of explaining GitHub from a designer's perspective. It clearly separates the local and cloud parts of the workflow.
Read the section "What is GitHub (actually)?" to solidify your understanding of the Git vs. GitHub distinction. Then, read the section on "Commits" and pay close attention to this key sentence: committing saves locally. This highlights exactly why the "push" step we're learning today is so important.
A Quick, One-Time Setup: Your Digital "Key"
To push code from your computer to your GitHub account securely, you need to establish a trusted connection. The best way to do this is with an SSH key. Think of it as a digital key that proves your computer is authorized to make changes to your GitHub repositories, saving you from having to type your password every single time.
Setting this up involves a few terminal commands, but you only have to do it once per computer. This video provides a very clear, step-by-step guide for Mac, Windows, and Linux. Investing 10 minutes now will save you a lot of friction later.
Master GitHub: From Beginner to Expert in 46 min
In "The Only GitHub Guide You’ll Ever Need," Corbin explains why SSH keys are the preferred way to connect to GitHub and walks you through the setup.
Watch the segment from why you need an SSH key. The video also links to a document with the exact commands you'll need. It's highly recommended you pause here and complete this setup before proceeding.
Publishing Your Project: Step-by-Step
Ready to push? We'll follow a simple three-step process:
- Create an empty repository on GitHub.com.
- Tell your local repository the URL of this new, empty remote repository.
- Push your local
mainbranch and its history to the remote repository.
This article provides an excellent, detailed walkthrough of the entire process. We will follow its steps using your my-first-repo project.
How to Push an Existing Local Project to GitHub: A Beginner's Guide
This guide by Ravi Patel on Medium clearly outlines the commands needed to take a local project and publish it.
We will follow this guide together. You don't need to read it all at once, but keep it handy as we go through the steps. We'll be focusing on Step 1, Step 6, and Step 7.
Step 1: Create a New Repository on GitHub
First, we need to create the "box" on GitHub that will hold our code.
- Go to GitHub.com and sign in.
- Click the + icon in the top-right corner and select New repository.
- Repository name: Give it a name, like
my-first-repo. - Description: (Optional) Add a brief description.
- Visibility: Choose Public.
- IMPORTANT: Do not check any of the boxes to "Initialize this repository with a README," "Add .gitignore," or "Choose a license." Your local project already has commits, and we want to push them into a completely empty repository to avoid conflicts.
- Click Create repository.
You will be taken to a page with a URL and some command-line instructions. We're about to use those.
Step 2: Connect Your Local Repo to the Remote
Now, open your terminal and navigate to your my-first-repo project folder. We need to tell your local Git about the remote GitHub URL.
The command for this is git remote add origin <URL>. Let's break it down:
git remote add: You're adding a reference to a remote URL.origin: This is the standard nickname for your main remote repository. You could call it anything, butoriginis the convention.<URL>: This is the URL for the repository you just created. On the GitHub page, make sure you've selected the SSH option (not HTTPS), and copy the URL. It should look likegit@github.com:YourUsername/my-first-repo.git.
Run this command in your terminal, replacing the URL with your own:
git remote add origin git@github.com:YourUsername/my-first-repo.git
Your local repo now knows where origin is.
Step 3: Push Your main Branch
Finally, it's time to send your code to GitHub. The command for the very first push is:
git push -u origin main
Let's dissect this:
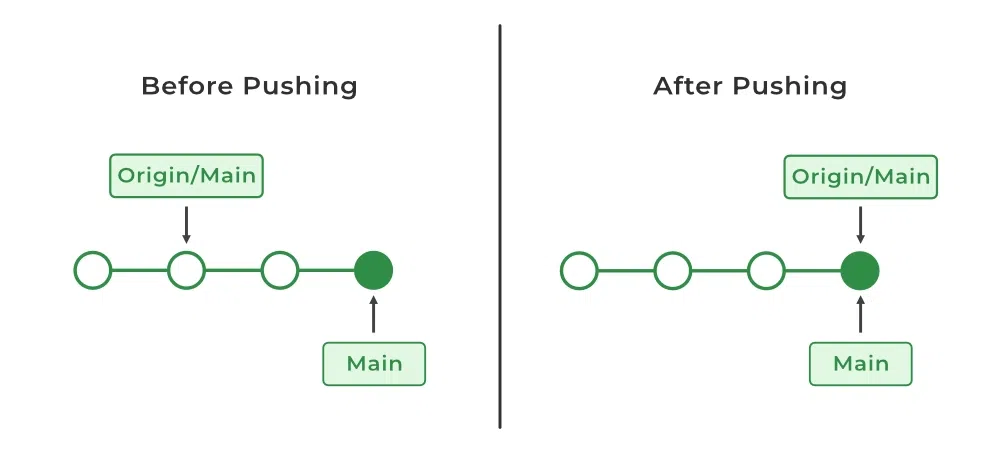
git push: The command to send committed changes.origin: Where to push (the remote nickname we just set up).main: What to push (the name of the local branch you want to send).-uor--set-upstream: This is a one-time flag for the first push of a branch. It links your localmainbranch to themainbranch onorigin. For all future pushes on this branch, you'll only need to typegit push.
After you run this, refresh your GitHub repository page. You should see your index.html file and see your commit history!
This is what just happened visually:
What About Your Feature Branch?
Congratulations, your main branch is now on GitHub! But if you look at your branches on GitHub, you'll only see main. Your feature/dark-mode-button branch still exists only on your computer.
To share it, you need to push it too. The command is very similar:
git push origin feature/dark-mode-button
Notice we don't need the -u flag if we don't intend to set up a permanent tracking relationship yet (though it wouldn't hurt). Now, if you refresh GitHub, you'll see your new branch available in the branches dropdown.
Using a GUI: The VS Code Alternative
While the terminal is powerful, you can also manage all of this visually right inside VS Code. The Source Control panel lets you publish a repository to GitHub with a few button clicks, handling the remote connection and initial push for you.
How To Use Git In VS Code Like A Pro!
The video "How To Use Git In VS Code Like A Pro!" demonstrates the visual workflow for publishing a project.
If you prefer a GUI approach, watch the segment on publishing a branch to GitHub directly from VS Code. It achieves the same result as the commands we just learned. After that, the section on syncing changes shows how you push subsequent commits.
Conclusion
You've just taken a massive step from being a local creator to a networked collaborator. You now understand the critical difference between saving work locally with git commit and sharing it with the world using git push. This is the fundamental workflow for backing up your projects, working with a team, and deploying your vibe-coded apps.
Key Takeaways:
- Git is the local tool; GitHub is the cloud platform for hosting repositories.
- You must first create an empty repository on GitHub before you can push an existing local project.
- A remote (usually named
origin) is a nickname for the URL of your GitHub repository. You connect it usinggit remote add origin <URL>. git push -u origin mainsends yourmainbranch to GitHub for the first time and links them.- Each branch you want to share or back up must be pushed individually (e.g.,
git push origin feature/dark-mode-button).
Your main code is safe, and your experimental feature branch is now also on GitHub. So how do you get the cool new dark mode button from the feature branch into the main codebase? The answer is a Pull Request, the heart of collaboration on GitHub. We'll dive into that in our next lesson.