Recommended resources
The freely available resources this lesson will direct you to.
Welcome back! In our last lesson, you successfully pushed your local project, including both your stable main branch and your experimental feature/dark-mode-button branch, to a new repository on GitHub. This was a huge step, moving your work from your computer to the cloud for backup, sharing, and collaboration.
However, your cool new dark mode button still only exists in its own branch. The main branch—the one that represents your primary, stable code—knows nothing about it. How do you propose merging your finished feature into the main project?
This lesson introduces the single most important concept for collaboration on GitHub: the Pull Request. You will learn what a pull request is, why it's the modern-day equivalent of a design review for code, and how to create one to merge your feature branch. For you, as a designer stepping into code, mastering this is how you'll "ship" your work and collaborate effectively with engineers.
What is a Pull Request? The Design Review for Code
At its core, a Pull Request (PR) is a formal request to pull changes from one branch and merge them into another. You're saying, "I've finished my work on this feature branch, and I believe it's ready to be added to the main project. Please review it."
Think of it like this: in Figma, you might create a new version of a screen, share a link, and ask your team for feedback before making it the new "official" version. A pull request is the exact same idea, but for code. It creates a dedicated space where you and your collaborators can discuss proposed changes, review the code line-by-line, and ensure everything is perfect before it's merged.
This workflow is becoming central to how modern product teams operate, blurring the lines between design and development. The following article from Builder.io is a must-read, as it perfectly captures this shift.
Your Next Design Review Should Be a Pull Request
This article explains why the traditional handoff from designer to developer is being replaced by a more collaborative, review-based workflow.
Start by reading the introduction and the section on new team patterns to understand the context. Then, jump to the section "Where we go from here". Pay close attention to the advice: "Get comfortable with git workflows... The designer who ships beats the designer who hands off." This is exactly what we're learning to do.
The Pull Request Lifecycle
Before we create one, let's visualize the entire process. A pull request isn't a single action, but a collaborative loop.
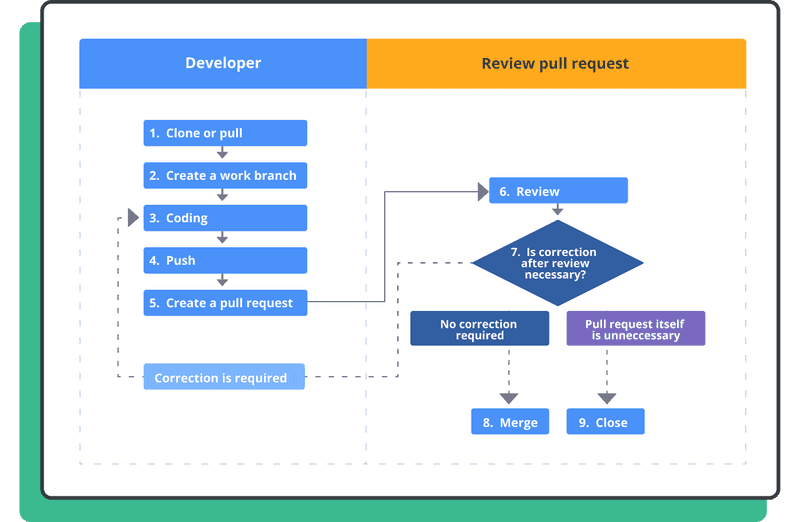
This loop consists of a few key stages:
- Open: You create the PR, proposing your changes.
- Review: Team members review the code, ask questions, and suggest improvements by leaving comments.
- Update: Based on feedback, you make further commits on your feature branch and push them. The PR updates automatically.
- Merge: Once the changes are approved, a project maintainer merges your feature branch into the
mainbranch. Your work is now officially part of the project!
Creating Your First Pull Request
Let's make this concrete. We'll create a pull request to merge the feature/dark-mode-button branch into your main branch for the my-first-repo project you pushed to GitHub in the last lesson.
The GitHub blog provides a great step-by-step guide. While it uses a different example, the process is identical.
Beginner's guide to GitHub: Creating a pull request
This guide from GitHub's official blog walks through the definition and creation of a pull request. We will follow these exact steps on the GitHub website.
First, read the section "What is a pull request?" for a solid definition. Then, follow along with the steps in "Creating your pull request." We'll be doing this visually in the browser, so you can focus on the UI parts of their guide.
Here's how to do it:
- Navigate to your repository on GitHub.com (e.g.,
https://github.com/YourUsername/my-first-repo). - Because you recently pushed a new branch, GitHub will likely display a yellow banner prompting you: "
feature/dark-mode-buttonhad recent pushes. Compare & pull request". Click that green "Compare & pull request" button.- If you don't see the banner, no worries. Click on the "Pull requests" tab, then click the green "New pull request" button.
- You'll land on the "Open a pull request" screen. This is where you define your proposal.
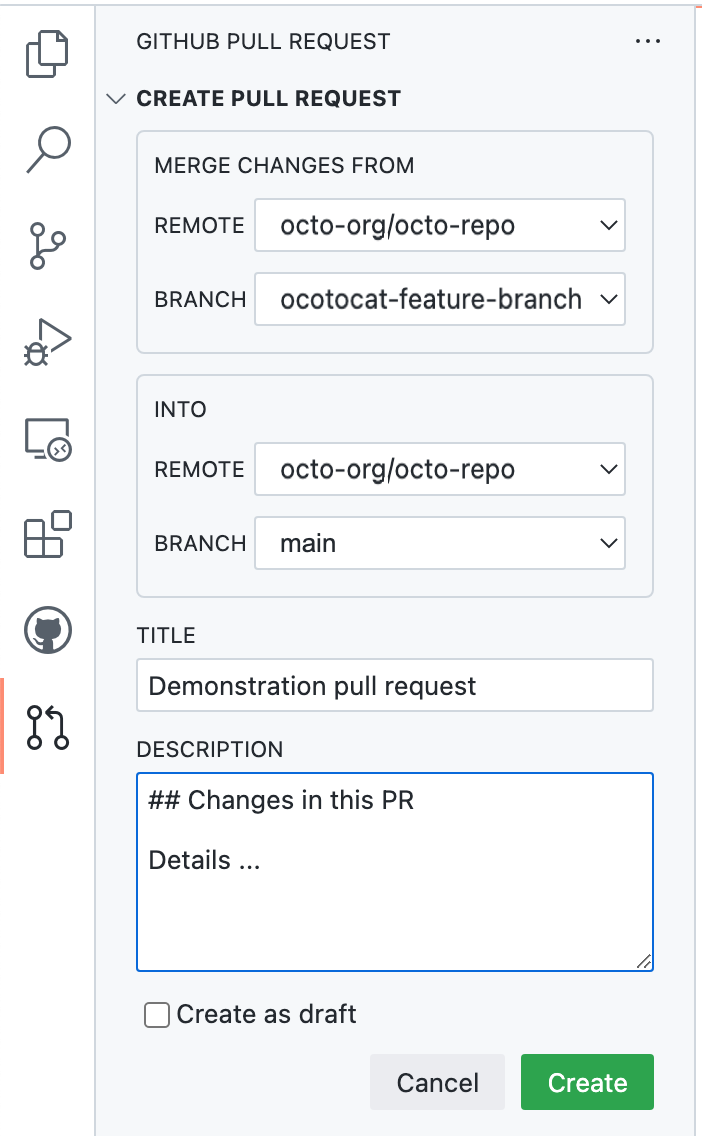
- Choose your branches:
base: main: This is the branch you want to merge into. It should be yourmainbranch.compare: feature/dark-mode-button: This is the branch containing your changes.
- Write a Title and Description: This is your moment to communicate! Don't just leave it blank.
- Title: A short, descriptive summary. E.g.,
Feature: Add Dark Mode Toggle Button. - Description: Explain what you did and why. This is where your design background is a superpower. Provide context. You can use Markdown, add images, and even link to your Figma mockups. A good description might look like:
## What's new?
This PR introduces a new toggle button in the header that allows users to switch between light and dark mode.

## Why this change?
This aligns with modern UX practices and was a highly requested feature.

## Related Design
[Link to Figma Prototype](https://www.figma.com/...)
- Title: A short, descriptive summary. E.g.,
- Click the green "Create pull request" button.
Congratulations! You've just opened your first pull request. You've officially proposed a change to the project in a professional, reviewable format.
The Art of the Review
Now that your PR is open, the collaborative part begins. Other developers (or you, practicing) can now go to the pull request, see your description, and click on the "Files changed" tab to see a "diff"—a visual, line-by-line comparison of what you added (green) and removed (red).
This video from The Design Project is made for you. The presenter, a designer, walks through her GitHub workflow, paying special attention to the collaborative nature of pull requests.
GitHub for Designers: Everything You Need to Know
In "GitHub for Designers," the presenter explains the entire PR process from a designer's perspective.
Watch from the explanation of a PR to understand why keeping PRs small and focused is a best practice. Then, watch the walkthrough from submitting and reviewing a PR, where she demonstrates adding screenshots for context, how engineers leave comments, and what it means to "merge" the changes.
If a reviewer requests changes, you would simply:
- Make the edits in your code editor locally on the
feature/dark-mode-buttonbranch. - Commit your changes:
git commit -m "Updated button icon based on feedback". - Push the changes:
git push.
The pull request on GitHub will automatically update with your new commit, ready for a second look.
Why This Process Exists
This might seem like a lot of steps just to add a button. Why not just push directly to main? In a collaborative or professional setting, main is sacred—it represents the working, stable version of your app. Pushing directly to it is risky.
Pull requests provide a crucial safety net and quality control checkpoint. This is explained brilliantly in the following video.
This video visually explains the fundamental reason for pull requests: protecting a central repository while still allowing contributions from many people.
Watch the entire video. It's short and to the point. It explains how repository permissions work (write protection), how contributors use copies called "forks" (the fork-and-PR model), and how the PR serves as the formal code review stage (the review process).
Conclusion
You have now completed the core Git and GitHub workflow for a feature: branch, commit, push, and create a pull request. This is the rhythm of modern software development. By understanding pull requests, you've unlocked the ability to not just write code, but to participate in the collaborative process of building and refining software. It's the bridge between your local "vibe coding" experiments and contributing to a real-world project.
Key Takeaways:
- A Pull Request (PR) is a formal proposal to merge code from one branch into another.
- It's the primary mechanism for code review and collaboration on GitHub.
- A good PR has a clear title and a detailed description that provides context for reviewers.
- The PR workflow (open, review, update, merge) protects the
mainbranch and improves code quality.
In our next lesson, we'll answer the final question: Now that our code is approved and merged on GitHub, how do we get it live on the internet for everyone to see? We'll explore the world of deployment using a service called Vercel.