Recommended resources
The freely available resources this lesson will direct you to.
- Shadcn UI React Tutorial: Build Stunning UIs in Minutes!www.youtube.com
- How to Build Authentication with Supabase Auth + Next.js 16 (Full Step-by-Step Tutorial)www.youtube.com
- Building a Modern Next.js App with Supabase Authenticationwww.brianchitester.com
- Next.js Course: Authentication with Supabase Auth - MakerKitmakerkit.dev
Hello again! In our last lesson, we built a sign-up form, connecting our app's frontend to a backend service like Supabase to create new users. We saw how state, event handlers, and SDKs work together to make this happen.
Today, we'll build the other essential piece of the puzzle: a login form to authenticate an existing user. You'll discover that the process is a mirror image of the sign-up flow, reinforcing the core patterns you've already learned. By understanding this, you'll be able to confidently guide your AI assistant to build and debug the entire user entry experience, from the first click to a successful login.
The Login Journey: A Visual Overview
Before we dive into code, let's zoom out and look at the entire login process from a user's perspective. When a user enters their email and password and clicks "Sign In," a sequence of events is set in motion.
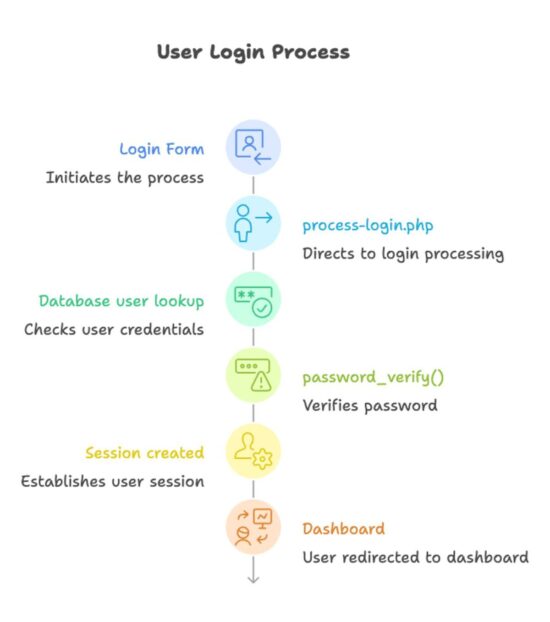
Here's a breakdown of that journey:
- Login Form: The user provides their credentials.
- Processing: The app securely sends these credentials to the backend service (like Supabase or Firebase).
- Database Lookup: The backend finds the user's account based on their email.
- Password Verification: It compares the provided password with the securely stored hash. It never stores or sees the plain-text password.
- Session Created: If the passwords match, the backend creates a temporary "session," which is like a digital access card that proves the user is logged in.
- Dashboard: The app, now knowing the user is authenticated, redirects them to a protected area.
This entire sequence happens in a fraction of a second, and our goal today is to understand the code that powers it.
Familiar Patterns: Building the Login Form
The great news is that the code for a login form reuses almost all the concepts from the sign-up form. When your LLM generates a login UI, you'll see the same building blocks.

Let's look at the AuthForm component we examined in the last lesson. It was cleverly designed to handle both signing up and signing in. The UI components (<Input>, <Button>) and the state management (useState for email and password) are identical for both actions.
The crucial difference is the function that gets called when the user clicks the final button. For sign-up, it was handleSignUp. For login, it's handleSignIn.
The handleSignIn Function: The Moment of Truth
Let's examine the handleSignIn function. This is where the app asks the backend to verify the user's credentials.
Building a Modern Next.js App with Supabase Authentication
We'll return to the auth-form.tsx component from the "Building a Modern Next.js App" article. This time, focus on the handleSignIn function and how it differs from handleSignUp.
Find the function defined as the handleSignIn function. Compare it to the handleSignUp function right above it. Notice the similarities and the one key difference: It still starts with e.preventDefault(), setLoading(true), and setError(null). The user feedback pattern is the same. The core of the function is await supabase.auth.signInWithPassword({...}). This is the direct counterpart to signUp. It sends the email and password to Supabase for verification. If Supabase returns an error (e.g., "Invalid login credentials"), the if (error) block displays it to the user. If the login is successful (else if (data.user)), it triggers the final step of our flowchart: router.push("/dashboard"). This redirects the user to the main part of the application.
This single function encapsulates the entire verification and redirection logic. The signInWithPassword call is the digital handshake with the backend. If it's firm, the user is let in.
Wiring Up the UI
Just like before, the UI needs to be connected to this logic. The form element in the HTML is what ties the user's click to the handleSignIn function.
Building a Modern Next.js App with Supabase Authentication
Now, let's see how the form itself is configured to use this function.
In the same auth-form.tsx file, scroll down to the JSX part of the component. Find the section that begins with <TabsContent value="signin">. Inside it, you'll see a <form> element. Notice its onSubmit property: <form onSubmit={handleSignIn} ...>. This attribute tells the browser, "When this form is submitted, run the handleSignIn function."
This onSubmit attribute is the simple but powerful glue between your visual design and the complex authentication logic.
Keeping the UI in Sync
Once a user logs in, the app's UI should change. The "Sign In" button should disappear, perhaps replaced by a user profile icon. How does the app know to do this? It needs to "listen" for changes in the authentication state.
This video demonstrates this crucial concept. The presenter sets up a listener that automatically updates the component's state whenever a user logs in or out, forcing the UI to re-render with the correct information.
How to Build Authentication with Supabase Auth + Next.js 16 (Full Step-by-Step Tutorial)
This video on building with Supabase and Next.js provides a clear explanation of how to make your UI "reactive" to authentication events.
Watch the segment from state listeners. The key is the onAuthStateChange function. It's a listener that fires whenever the user's session changes (like after a successful sign-in). Inside its callback, the code calls setCurrentUser, which updates the component's state and triggers a UI update.
This listener is what makes the app feel alive and responsive. When you log in on a website and instantly see your name appear in the corner, a mechanism like onAuthStateChange is almost certainly at work.
An Alternative Structure: Custom Hooks
As you vibe code more, you might notice the AI structuring authentication logic differently. One common and elegant pattern is to extract the logic into a "custom hook." This is like creating your own specialized tool for a specific job.
The MakerKit tutorial demonstrates this by creating a useSignInWithPassword hook.
Next.js Course: Authentication with Supabase Auth - MakerKit
This article shows a different way to organize the same logic, making the UI component code even cleaner.
First, read the section that introduces the hook. The code inside useSignInWithPassword is essentially the same logic we saw in handleSignIn, but it's now wrapped in its own reusable function. Next, look at how this hook is used in the EmailPasswordSignInForm component. Notice how clean the handleSubmit function is. All the complex Supabase logic is hidden away inside the mutateAsync call, which comes from our new hook.
The benefit here is separation of concerns. The form component can focus on layout and presentation (the HTML/JSX), while the hook handles the complex job of talking to the backend. This makes the code easier to read and maintain, a principle that's valuable even when an AI is doing the writing.
Conclusion
Today, you've completed the loop on user authentication. By building a login form, you've seen how the patterns from the sign-up process are mirrored and reinforced. You now understand the full journey a user takes, from typing their password to landing on their dashboard.
Key Takeaways:
- A login form's structure (UI components, state) is nearly identical to a sign-up form.
- The core of the login logic is a call to the SDK's
signInWithPasswordfunction, which handles the secure verification. - A successful login isn't just about verification; it's also about creating a session and redirecting the user to a protected part of the app.
- Apps use listeners like
onAuthStateChangeto react to login/logout events and update the UI accordingly. - Code can be structured in different ways, such as using custom hooks, to make it cleaner and more reusable.
In our next lesson, we'll complete the authentication lifecycle by implementing a logout function and exploring how to dynamically change the UI based on whether a user is logged in or out.