Recommended resources
The freely available resources this lesson will direct you to.
- How to Build Authentication with Supabase Auth + Next.js 16 (Full Step-by-Step Tutorial)www.youtube.com
- Setting Up Firebase Auth with React: Step-by-Step Tutorialwww.youtube.com
- Implementing Conditional Rendering in React Applicationswww.angularminds.com
- Authentication in React with Supabaseblog.openreplay.com
Welcome back! In our last lesson, we walked through the process of authenticating a user with a login form, seeing how our app communicates with a service like Supabase to verify credentials and grant access. You now understand how a user gets in.
Today, we'll complete the authentication lifecycle by exploring how to get them out. We'll implement a logout function and, crucially for your work as a designer, focus on how the user interface updates automatically based on the user's login status. By the end of this lesson, you'll understand how an app can intelligently show a "Login" button to a visitor but a "Profile" and "Sign Out" button to a registered user, empowering you to direct your AI assistant to create these dynamic experiences.
The Logout Flow: Closing the Session
Just as with logging in, the logout process follows a clear, logical sequence. The "React Authentication Flow" diagram provides a great visual summary.
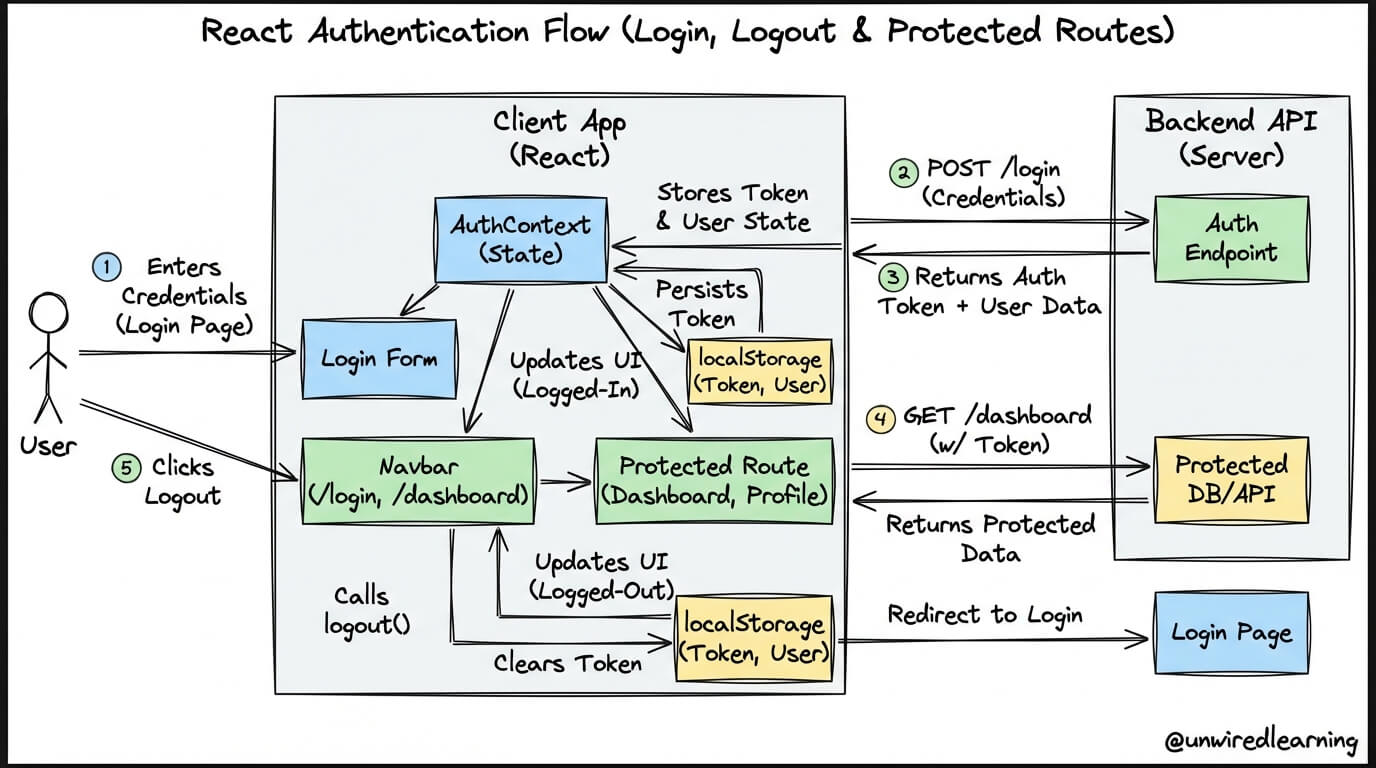
When a user clicks a "Logout" button, two main things happen:
- The app sends a command to the backend (like Supabase or Firebase) to end the user's session.
- The app updates its own internal state to reflect that no user is logged in, causing the UI to change.
Let's see how this is done in code.
The signOut Command
The great news is that telling the backend to log a user out is usually a single, simple command. The complexity doesn't lie in the action itself, but in how the app reacts to it.
Authentication in React with Supabase
The article "Authentication in React with Supabase" shows just how straightforward the logout command is.
In the section titled "Handling User Logout," find the code snippet that defines the signOut function. It's just one line: supabase.auth.signOut(). This function tells Supabase to invalidate the current user's session, effectively logging them out on the server. Notice how this function is then wrapped in a handleLogout function inside the NavBar component. This follows the exact same pattern we saw with handleSignIn—an event handler that gets attached to a button's onClick event.
This pattern is consistent across different services. Whether you're using Supabase, Firebase, or another "backend-as-a-service," your LLM will almost always generate a simple auth.signOut() command to handle logging out.
Making the UI React: Conditional Rendering
Once the user is logged out, the "Sign Out" button should probably disappear and be replaced by "Sign In" and "Register" links. How does the app know to do this? The answer is a core React concept called Conditional Rendering.
At its heart, conditional rendering is just using simple if...then logic to decide what to show on the screen. It allows you to create dynamic interfaces that adapt to the current state of your application.

To implement this, you need two things:
- A piece of state that tracks whether a user is logged in (e.g., a boolean
isLoggedInor auserobject that's either populated ornull). - A way to write the
if...thenlogic in your UI code.
The article "Implementing Conditional Rendering in React Applications" provides a great overview of the techniques your LLM will use.
Implementing Conditional Rendering in React Applications
This article breaks down the common JavaScript patterns used inside React components to show and hide elements.
First, read the brief overview in Common Techniques. This introduces the three main tools you'll see constantly: if-else statements, the ternary operator, and the logical && operator. For UI toggles, the most common patterns you'll encounter are the ternary and && operators because they can be used directly inside your component's visual structure (the JSX). Ternary Operator (? :): This is a compact if-else. It's perfect for choosing between two options. Glance at the example under Using Ternary Operators. The syntax is condition ? showThisIfTrue : showThisIfFalse. Logical AND (&&): This is for when you want to show an element only if a condition is true, and show nothing otherwise. Look at the example under Logical && Operator. The syntax is condition && showThisIfTrue. Finally, see a perfect, real-world example in the section on Inline Conditional Rendering, which suggests the exact logic we need: {user ? <SignOutButton /> : <SignInButton />}.
Let's see this in action in a video tutorial.
Setting Up Firebase Auth with React: Step-by-Step Tutorial
This video on Firebase Auth demonstrates exactly how to use these conditional rendering techniques in a real app's header.
Watch the section from displaying buttons. The presenter uses the userLoggedIn state variable with a ternary operator to decide whether to show the "Logout" button or the "Login/Register" links. Then, watch the next segment from displaying user info. Here, the currentUser object is used to conditionally display the user's name or email, just like the "Hi, Michael Zalla" text in the image we saw earlier.
The Magic Glue: onAuthStateChange Revisited
So, we have a signOut function that tells the backend to log the user out, and we have conditional rendering logic that changes the UI based on a user state variable. But what connects the two? How does the user state variable get updated automatically after signOut is called?
This is where the onAuthStateChange listener, which we introduced in the last lesson, comes back into play. It's the central nervous system for your app's authentication state.
- You click the "Logout" button, which calls
supabase.auth.signOut(). - The Supabase SDK communicates with the backend, the session is destroyed, and the SDK fires a
SIGNED_OUTevent internally. - Your
onAuthStateChangelistener, which is always active, hears thisSIGNED_OUTevent. - The code inside your listener runs. As we'll see below, this code is responsible for updating your app's state (e.g.,
setUser(null)). - Because the
userstate has changed, React automatically re-renders the UI. - Your conditional rendering logic kicks in, sees that
useris nownull, and displays the "Login" button instead of the "Logout" button.
This automated flow is what makes the UI feel so responsive.
Authentication in React with Supabase
Let's revisit the "Authentication in React with Supabase" article to see the onAuthStateChange listener in action for logging out.
Find the code block for the full AuthProvider.jsx file. Inside the useEffect, look at the onAuthStateChange listener. You'll see an else if block that handles the SIGNED_OUT event: <tf start="else if (event === "SIGNED_OUT")" end="setAuth(false);">the SIGNED OUT handler. This is the code that runs when the logout is complete. It sets the user to null and an auth flag to false, triggering the UI update.
Conclusion
You have now completed the full circle of user authentication. You understand not just how to sign a user up and log them in, but also how to log them out and, most importantly, how to make your application's design react intelligently to their status. This knowledge is key to moving beyond static mockups and directing an AI to build truly interactive and personalized applications.
Key Takeaways:
- Logging a user out involves calling a simple command like
supabase.auth.signOut(). - The UI updates using Conditional Rendering, which uses JavaScript logic (like the ternary operator
? :or logical AND&&) to decide what to display. - The central piece of this puzzle is a state variable (e.g.,
user) that tracks the current authentication status. - The
onAuthStateChangelistener acts as the automatic link between the logout action and the UI update by setting the state variable tonullwhen aSIGNED_OUTevent occurs.
In the past few lessons, we've focused on what happens during a single visit. But what about when a user closes their browser and comes back the next day? In our next lesson, we'll answer the question: What keeps a user logged in between visits? We'll demystify the concepts of tokens and sessions.