Recommended resources
The freely available resources this lesson will direct you to.
Welcome back! In our last lesson, we demystified the classic email and password login system, looking at the crucial security steps like hashing and salting that happen behind the scenes. We now understand how an app can verify a user's identity and keep them logged in using tokens.
Today, we're turning our attention to a feature you've designed and used countless times: the "Sign in with Google," "Login with Facebook," or "Continue with GitHub" buttons. From a UX perspective, these are fantastic—they reduce friction, eliminate the need for users to create and remember yet another password, and often feel more trustworthy.
In this lesson, we'll explore the technology that powers this convenience. Our goal is to explain what OAuth is and how 'Sign in with Google' works for your app. You'll discover the elegant solution that allows apps to interact with each other on a user's behalf without ever compromising their primary password.
The Problem Before OAuth: The Password Anti-Pattern
To understand why OAuth is so important, let's step back in time. Imagine it's the mid-2000s. A new app wants to help you by importing your email contacts to find friends on its platform. How would it do that? It would literally ask you for your Gmail username and password.
This short video from OktaDev brilliantly explains the security nightmare this created.
What is OAuth and why does it matter? - OAuth in Five Minutes
This video, "What is OAuth and why does it matter?", sets the stage perfectly by showing why giving your password to third-party apps is a terrible idea.
Watch the first three minutes, focusing on these two key parts: The bad old days: See real examples of apps like Yelp and Facebook asking for users' email passwords. The core solution: Understand the fundamental shift OAuth introduced—forcing the password entry to happen only on the trusted service (e.g., Google), not the third-party app.
As you saw, this old method, called the "password anti-pattern," had huge flaws:
- The third-party app had to store your password, hopefully securely.
- That app gained full, unrestricted access to your entire account (it could read your emails, delete them, send them, etc.).
- There was no standard way to revoke access without changing your main password.
OAuth was created to solve this. It provides a way for users to grant one application limited, revocable access to their data in another application, without sharing their credentials.
The Core Concept: Delegated Authorization
OAuth is best understood through an analogy. Think of it as a valet key for your digital life. You wouldn't give a parking attendant the master key to your car, which opens the trunk and glove box. You give them a valet key that only allows them to perform a specific task: parking the car.
OAuth works the same way. It's a protocol for delegated authorization.
- Delegated: The user (you) delegates permission.
- Authorization: The permission is to do something (e.g., read contacts, post a tweet), not just to prove who you are.
This simple diagram illustrates the high-level flow. The third-party app asks for permission, the user grants it, and instead of a password, the app gets a temporary "token" that allows it to access a specific resource.
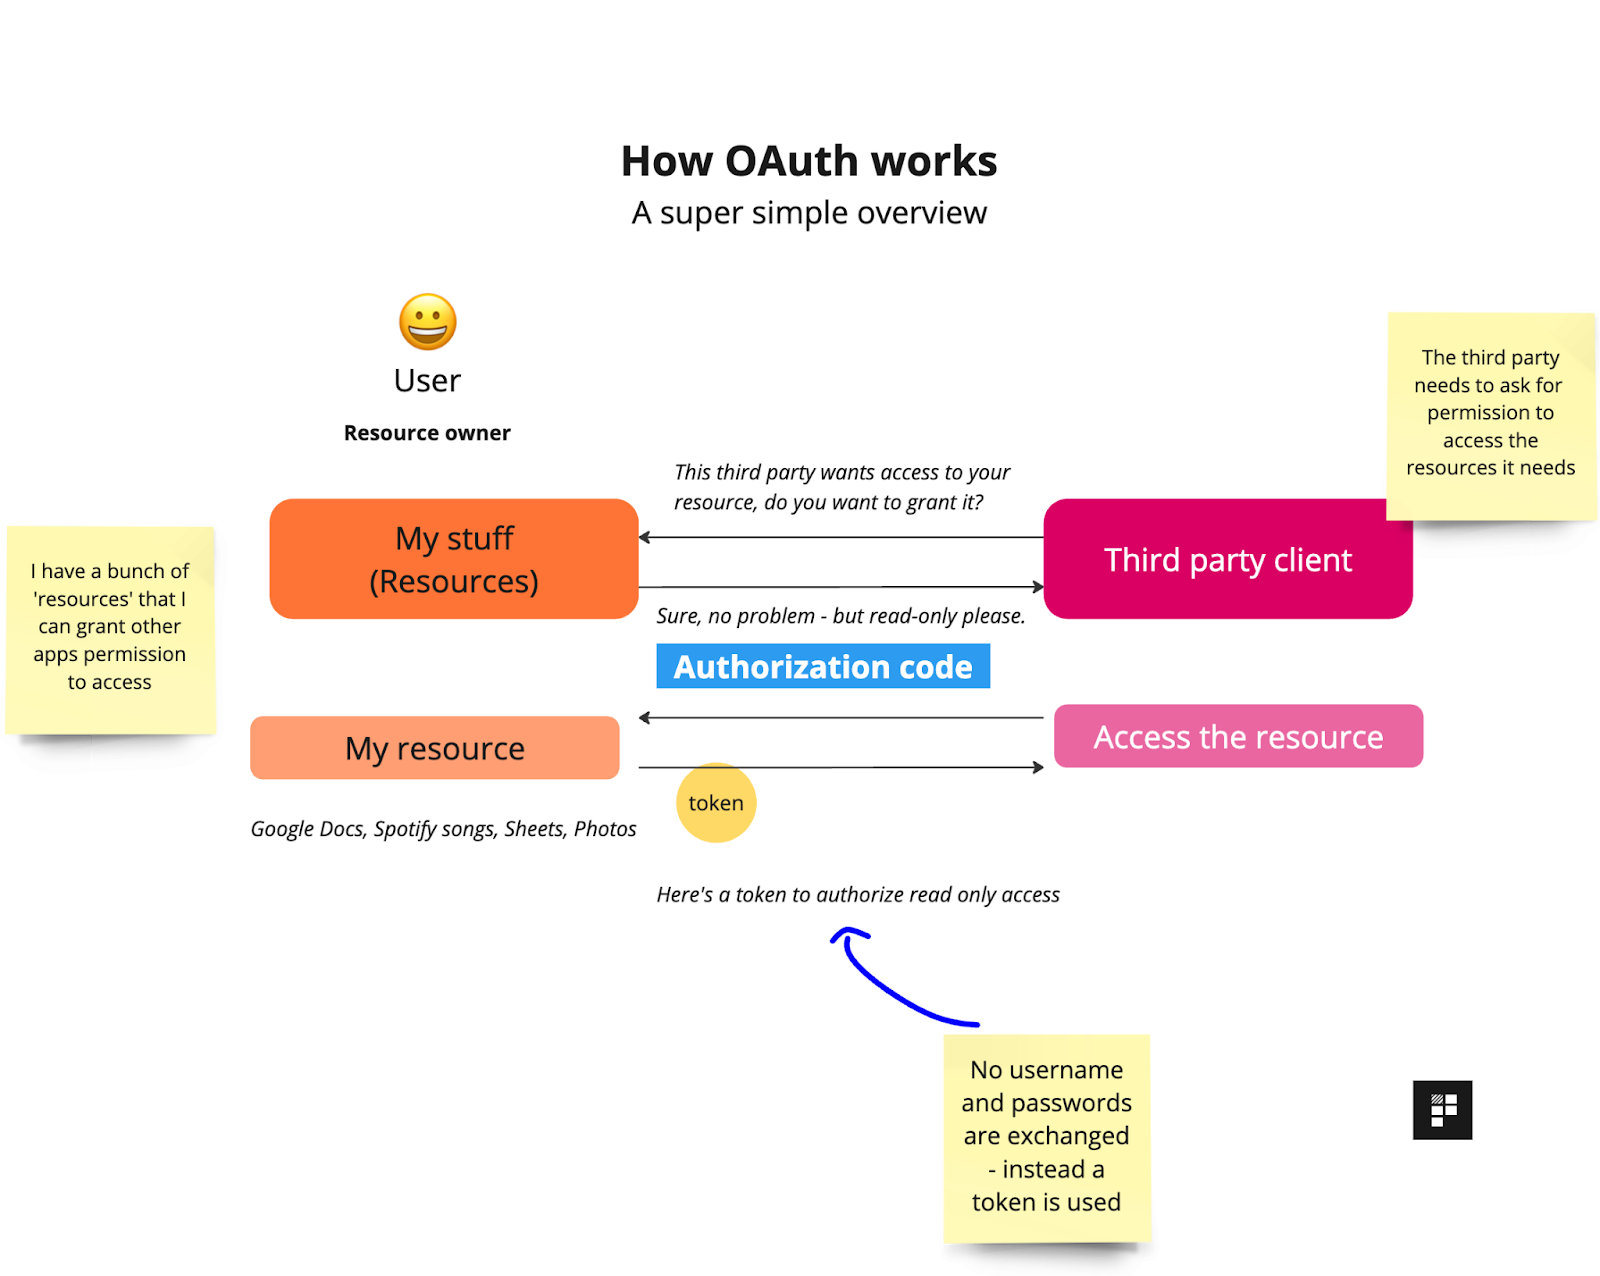
To make this more concrete, let's define the official roles in an OAuth flow.
This DigitalOcean article clearly defines the four main participants in any OAuth transaction.
Read the section OAuth 2 Roles Explained. As you read, think about our example of a to-do app that wants to save tasks to your Google Calendar.
To summarize those roles:
| Role | Description | Example (A "Smart Calendar" App) |
|---|---|---|
| Resource Owner | The user who owns the data. | You, the person using the app. |
| Client | The application requesting access. | The Smart Calendar app you're using. |
| Authorization Server | The service that authenticates the user and issues tokens. | Google's login service (accounts.google.com). |
| Resource Server | The API that hosts the protected data. | The Google Calendar API. |
The crucial idea is that the Client (your app) never gets the Resource Owner's password. It only ever talks to the Authorization Server to get a special key (the access token), which it then presents to the Resource Server.
How "Sign in with Google" Works: A Step-by-Step Flow
Now let's connect this theory to the real-world user experience of clicking "Sign in with Google." As a designer, you've crafted this flow many times. Here's a typical mobile view of the process.
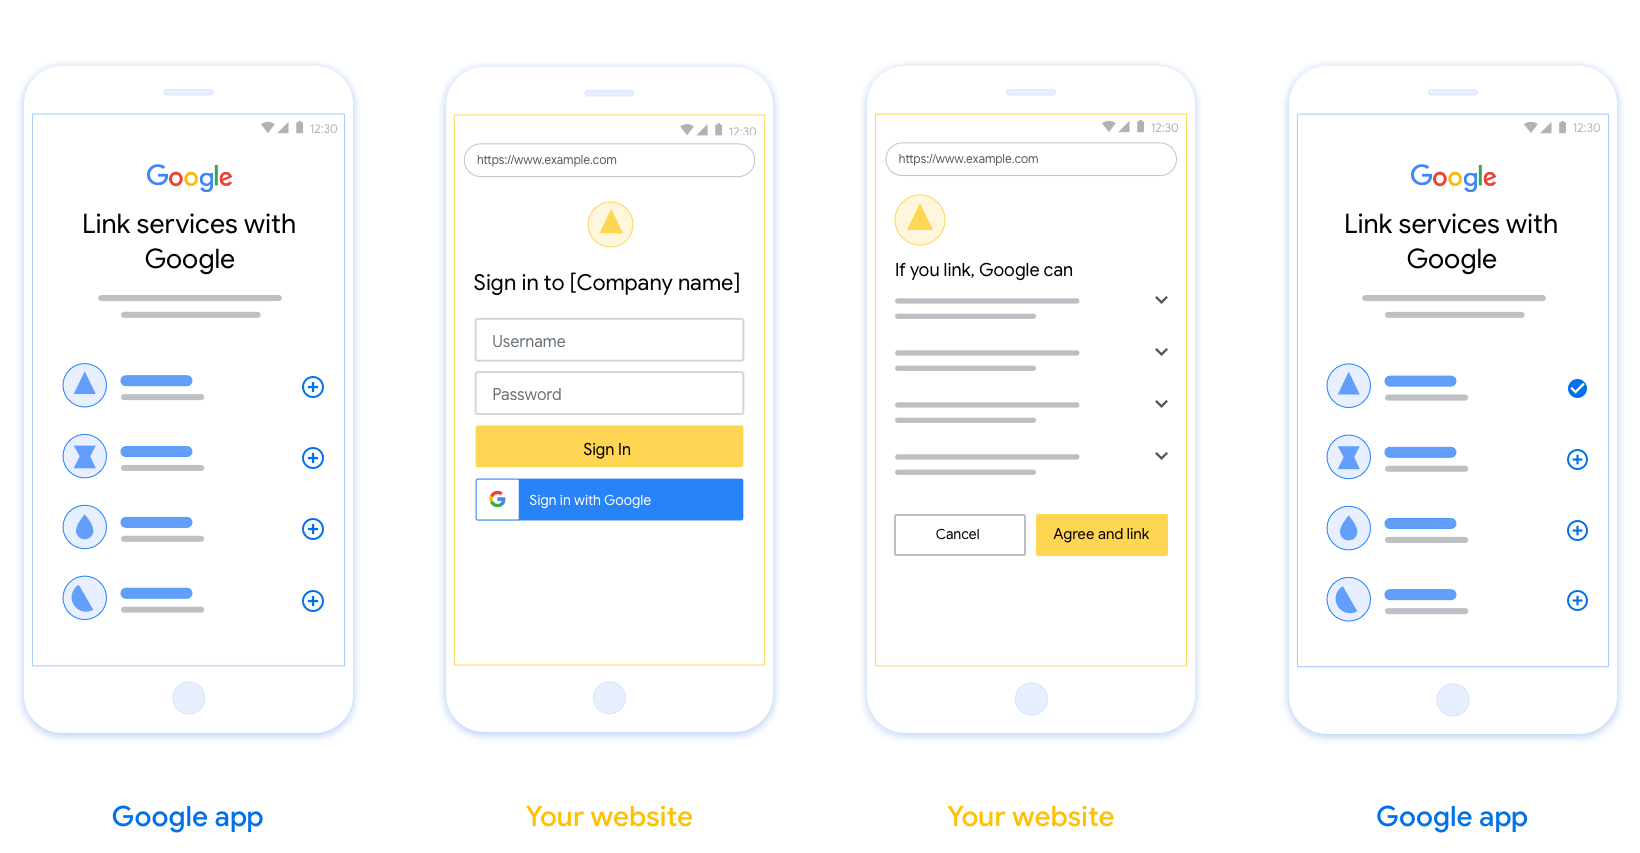
Behind this smooth UX is a detailed, secure process called the Authorization Code Flow. It's the most common and secure method used for web and mobile apps.
This illustrated guide from OktaDev provides a wonderful visual walkthrough of the entire process.
An Illustrated Guide to OAuth and OpenID Connect
This video, "An Illustrated Guide to OAuth and OpenID Connect," uses a simple example of a "terrible pun of the day" app to make the flow easy to follow.
Watch the section from the example. Pay close attention to the definition of the terms and how they map to the steps in the flow.
Let's break down that flow step-by-step:
-
Authorization Request: You click "Sign in with Google" in the Smart Calendar app. Your browser is redirected to
accounts.google.com. The URL contains information like the app'sclient_id(so Google knows who is asking) and thescope(what permissions the app wants, e.g., "read and write to your calendar"). -
User Authentication & Consent: Google asks you to log in (if you aren't already). Then, it shows you a consent screen: "Smart Calendar would like to: View and edit events on all your calendars." This is a critical UX moment where you, the Resource Owner, explicitly grant permission.
-
Authorization Code: You click "Allow." Google redirects your browser back to the Smart Calendar app. Appended to the URL is a temporary, one-time-use
authorization_code. -
Token Exchange: This is the most important "behind-the-scenes" step. The Smart Calendar app's backend server takes the
authorization_code. It then makes a direct, secure, server-to-server request to Google, sending theauthorization_codealong with itsclient_idand aclient_secret(a password that only the app and Google know). -
Access Token Issued: Google validates all the information. If everything is correct, it responds with an Access Token. This is the digital valet key.
-
Accessing the Resource: The Smart Calendar app can now make requests to the Google Calendar API. With each request, it includes the Access Token in the
Authorizationheader. The Google Calendar API sees the token, validates it, and if it's valid and has the right permissions, it returns the requested data (your calendar events).
The user's password was only ever entered on Google's domain. The Smart Calendar app never saw it. It only ever dealt with a temporary code and a revocable access token.
The Final Piece: Authentication with OpenID Connect
We've repeatedly said that OAuth is for authorization. But when you "Sign in with Google," you are clearly also authenticating—proving who you are to the Smart Calendar app. So what's going on?
This is where a second protocol, OpenID Connect (OIDC), comes in.
This section of the DigitalOcean article clarifies the relationship between the three concepts.
Read the section OAuth 2 vs Authentication vs OpenID Connect. The table is especially helpful.
In simple terms:
- OAuth 2.0 is the framework for getting an Access Token (the valet key to do things).
- OpenID Connect (OIDC) is a thin layer built on top of OAuth 2.0 that provides an ID Token (a verifiable ID card to prove who you are).
When you use a "Sign in with..." button, you are almost always using OIDC. The flow is nearly identical to the OAuth flow we just described, with two key differences:
- In the initial request (Step 1), the
scopeincludesopenid. - In the final response (Step 5), the Authorization Server sends back both an Access Token and an ID Token.
The ID Token is a JWT (JSON Web Token), just like we learned about in the previous lesson. Your app can decode and, most importantly, verify its digital signature to get trusted information about the user, such as their unique ID, email, and name.
So, "Sign in with Google" is really OIDC built on OAuth. It gives your app:
- An ID Token to authenticate the user and create their account.
- An Access Token to authorize future API calls on the user's behalf.
Conclusion
You now understand the magic behind social login buttons. It's not magic, but a well-thought-out system that prioritizes user security and experience. When your LLM assistant generates code for a "Sign in with Google" feature, you know it's implementing this secure and complex dance for you.
Key Takeaways:
- OAuth solves the password anti-pattern, preventing users from having to share their main password with third-party apps.
- It's a protocol for delegated authorization, where a user grants limited, revocable permissions (the "valet key" analogy).
- The Authorization Code Flow is the standard, secure process involving redirects and a secret, server-to-server exchange of a code for an access token.
- OpenID Connect (OIDC) is a layer on top of OAuth that provides authentication. It issues an ID Token (a JWT) that contains verified user identity information.
- "Sign in with Google" uses OIDC and OAuth together to both authenticate a user and authorize the app to access their data.
In the upcoming lessons, we'll move from theory to practice. We'll take what we've learned about authentication and use Firebase or Supabase to implement a sign-up form, a login form, and a social login button in a real application.