Recommended resources
The freely available resources this lesson will direct you to.
In our previous lessons, we explored the "what" and "how" of authentication, from the secure handling of passwords to the elegant dance of OAuth for social logins. We now have a solid conceptual foundation for understanding how an app can verify a user's identity.
Today, we shift from theory to practice. Your LLM assistant will often ask you to perform a series of setup tasks before you can even start building a login screen. This lesson demystifies that initial setup. Our goal is to enable email/password login in the Firebase or Supabase console and connect the auth SDK to your app. This is the crucial bridge between your app's code and the powerful backend services that handle user accounts for you.
Why Use a Service Like Firebase or Supabase?
As a designer building apps, your primary focus is on the user experience and functionality. Building a secure, scalable authentication system from scratch is a massive undertaking involving servers, databases, and complex security protocols.
This is where "Backend-as-a-Service" (BaaS) platforms like Firebase and Supabase are invaluable. They provide ready-made solutions for common backend needs, including:
- Authentication: User sign-up, login, password reset, social logins.
- Database: Storing and retrieving app data.
- File Storage: Saving user-uploaded images or other files.
By using these services, you can get a powerful and secure backend up and running with minimal code, allowing you to focus on what you do best: designing and building the frontend experience. This is a core part of the modern "vibe coding" workflow.
Step 1: Enabling Authentication in the Console
Before you can write any code to log a user in, you need to tell your chosen backend service that you want to use its authentication feature. This is typically done through a web-based dashboard or "console." It's a simple but essential configuration step.
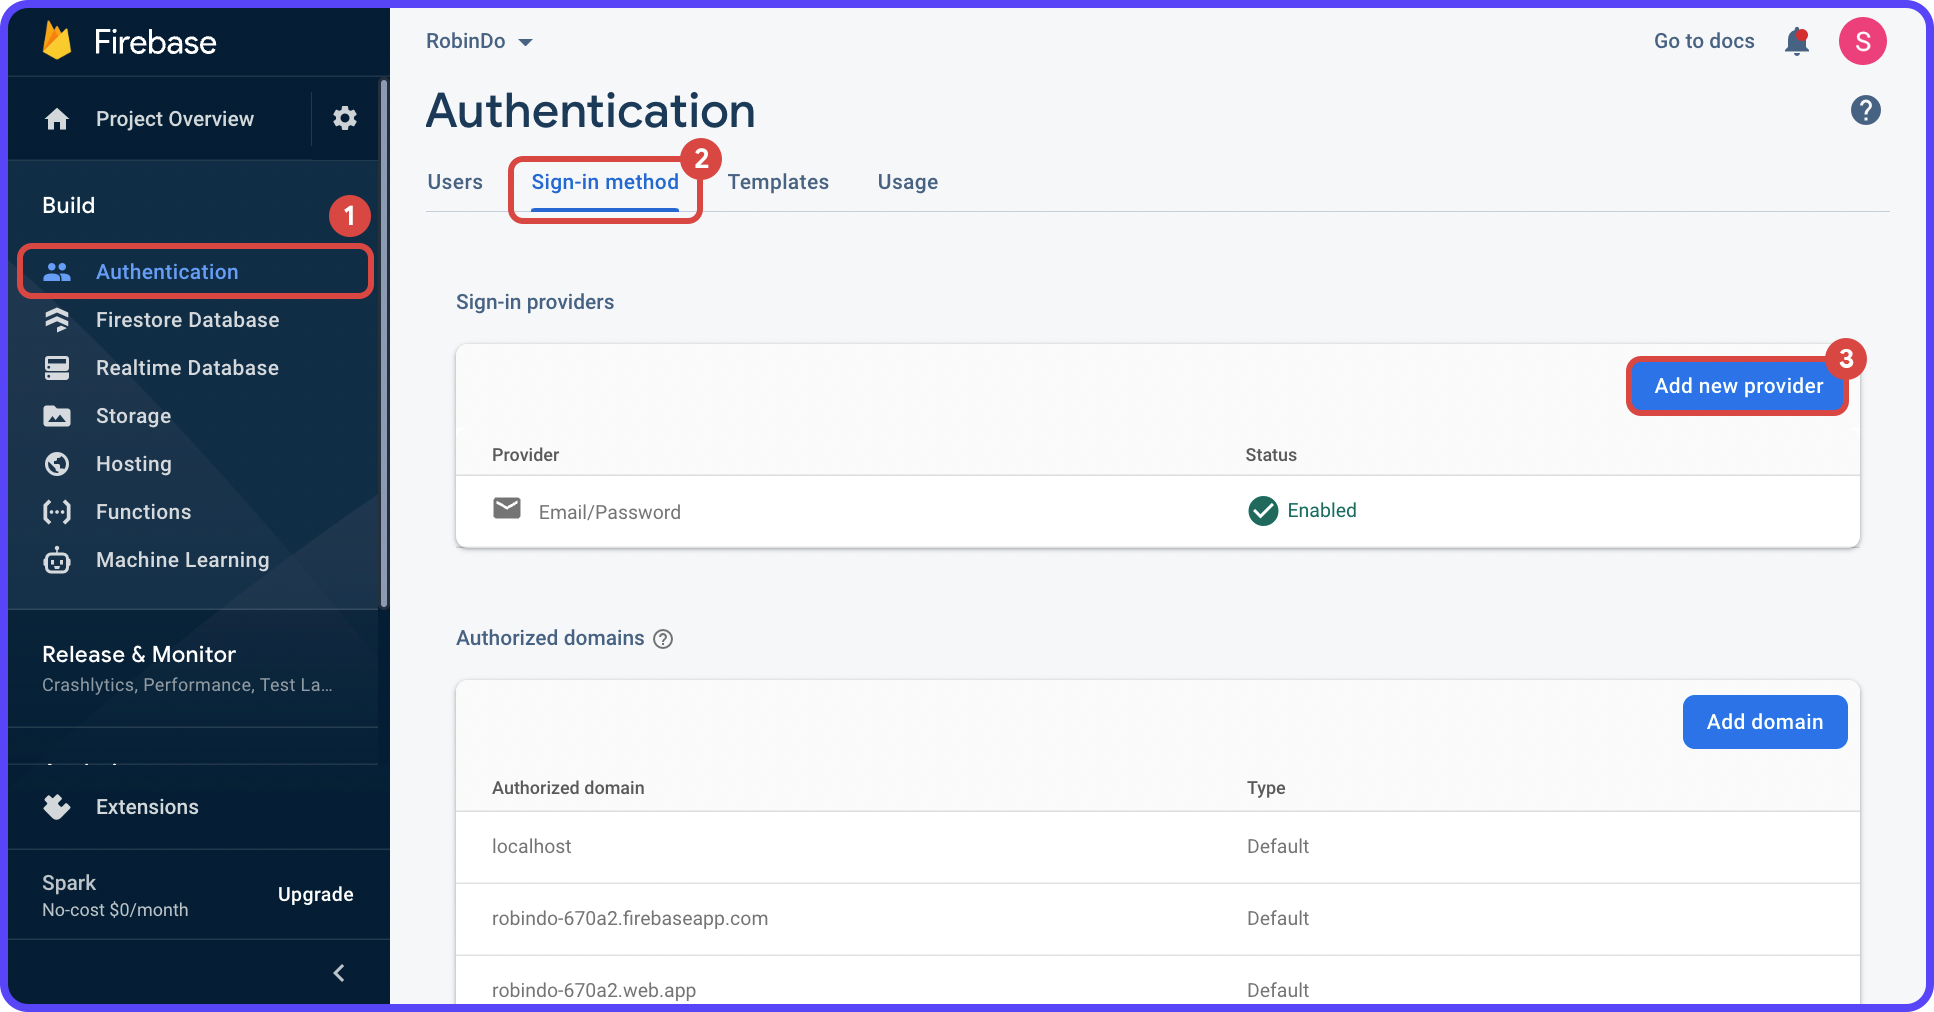
For Firebase, you would navigate to the "Authentication" section within your project, go to the "Sign-in method" tab, and enable the "Email/Password" provider. The interface makes this very clear.
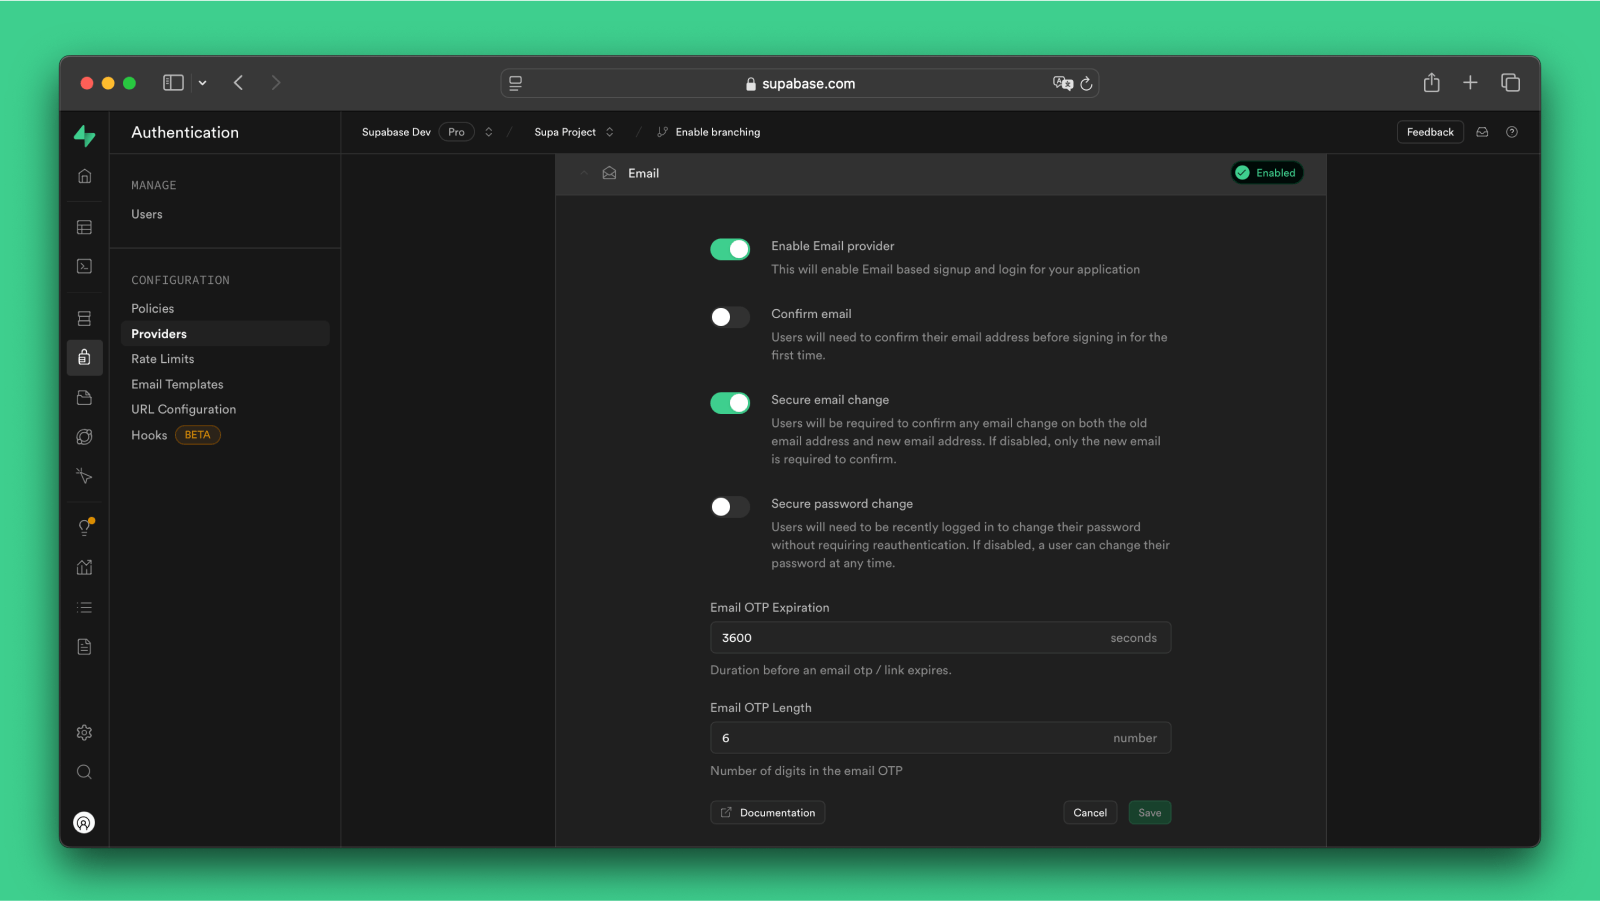
For Supabase, the process is just as straightforward. You find the "Authentication" section, click on "Providers," and toggle the "Email" provider to on.
This console-first approach is a common pattern. You're essentially flipping a switch on the server to activate a feature that your app will later connect to.
Step 2: Connecting Your App with an SDK
Once the feature is enabled on the backend, you need a way for your app's code (the frontend) to communicate with it. This is done using a Software Development Kit (SDK).
Think of an SDK as a specialized toolkit provided by the service (like Firebase or Supabase). It's a package of pre-written code that simplifies complex tasks. Instead of you having to manually construct API requests to sign a user up, the SDK gives you a simple function like auth.signUp(). It handles all the tricky communication behind the scenes.
Connecting an SDK to your app generally involves three parts:
- Installing the package: Using a terminal command like
npm install firebase. - Getting your credentials: Finding your project's unique API keys in the service's console. These act like a username and password for your app itself, proving it has permission to talk to your backend project.
- Initializing the SDK: Adding a small piece of code to your app that uses your credentials to establish a connection to the service.
Let's see how this works for both Firebase and Supabase.
Connecting the Firebase SDK
This short video provides an excellent visual walkthrough of the entire connection process for a React application.
Setting Up Firebase Auth with React: Step-by-Step Tutorial
The video "Setting Up Firebase Auth with React" clearly demonstrates the key steps of enabling auth in the console and then connecting the SDK in your code.
Watch these two key segments: Console Setup: This part visually confirms the steps for enabling authentication providers in the Firebase console. SDK Initialization: Pay close attention to how the firebase package is installed and how the firebase.js config file is created. This is the core of "connecting" the app.
As you saw in the video, the process boils down to:
- Running
npm install firebase. - Creating a configuration file (e.g.,
firebase.js). - Copying the
firebaseConfigobject from your Firebase project settings into that file. This object contains your unique API keys. - Using the
initializeAppfunction from the SDK to create the connection. - Exporting the
authobject so other parts of your app can use it to perform authentication tasks.
That firebaseConfig object is the secret handshake between your app and your Firebase project. This is why LLM assistants will instruct you to copy it carefully and, as we learned in a previous module, why these keys should be stored securely as environment variables.
With this setup complete, your app is now connected to Firebase Authentication.
Connecting the Supabase SDK
The process for Supabase is conceptually identical, though the specific code differs slightly. Let's look at a text-based guide that walks through setting up a Next.js app with Supabase.
Building a Modern Next.js App with Supabase Authentication
This article by Brian Chitester clearly lays out the steps for connecting a Next.js app to Supabase.
Focus on these two sections: First, read the project setup section. Note how you need to get your 'Project URL' and 'anon key'. These are the Supabase equivalent of Firebase's config object. Next, read the client creation section. This shows the code that uses the credentials to initialize the Supabase SDK, creating a "client" that your app will use to communicate with the service.
To summarize the Supabase workflow:
- Run
npm install @supabase/auth-helpers-nextjs. - Get your
Project URLandanon keyfrom your Supabase project's API settings. - Store these keys in an environment file (
.env.local). - Create a helper file that uses a function like
createClientComponentClientfrom the SDK to initialize a connection.
Just like with Firebase, you now have a "client" object (supabase in the examples) that acts as your gateway to all of Supabase's authentication functions, such as supabase.auth.signUp() and supabase.auth.signInWithPassword().
Conclusion
You've now demystified the critical first step in adding user logins to an app. When your LLM assistant asks you to create a project on Firebase, enable an authentication provider, copy API keys, and install an SDK, you understand the purpose behind each action. You're not just following a recipe; you're establishing the fundamental connection that allows your frontend design to leverage a powerful backend service.
Key Takeaways:
- Backend-as-a-Service (BaaS) platforms like Firebase and Supabase provide pre-built authentication systems, saving you immense development effort.
- Adding authentication is a two-step process: first, enable the feature in the service's console, and second, connect your app using the provided SDK.
- An SDK is a toolkit that simplifies communication between your app and the service's API.
- Connecting the SDK involves installing the package and initializing it with unique credentials (API keys) found in your project's console. This is the "handshake" that links your code to your specific backend project.
In our next lesson, we will build on this foundation. With the connection established, we'll create the user-facing sign-up form and use the SDK functions we've seen today to register our first user.