Recommended resources
The freely available resources this lesson will direct you to.
Hello! Welcome to your next lesson.
In our last session, we designed the validation logic for a SAML Service Provider, focusing on how to securely process a SAML assertion. We saw that ensuring trust in a federated identity system requires a rigorous, multi-step validation process, especially given the complexities of XML signatures.
While SAML remains a cornerstone of enterprise web single sign-on, the modern application landscape, dominated by APIs, mobile apps, and single-page applications (SPAs), often requires a more lightweight and flexible protocol. This is the world of OAuth 2.0.
Today, we will shift our focus from consuming assertions to issuing authorization. We'll architect the heart of a modern identity system: the OAuth 2.0 Authorization Server.
The learning outcome for this lesson is to:
Design the core architecture of an OAuth 2.0 authorization server, handling Authorization Code and Client Credentials grant flows.
We will break down what an Authorization Server does and design its key components, paying close attention to the security principles that underpin its most important workflows.
1. What is an OAuth 2.0 Authorization Server?
At its core, OAuth 2.0 is a framework for delegated authorization. It allows a user to grant a third-party application limited access to their resources (like photos or contacts) without giving away their password.
To understand the problem OAuth solves and the roles involved, let's start with a foundational video.
OAuth 2.0 and OpenID Connect (in plain English)
The video 'OAuth 2.0 and OpenID Connect (in plain English)' from OktaDev provides an excellent, clear introduction. The first two parts explain the core problem of delegated authorization and define the essential terminology we'll be using.
Please watch the following segments: Delegated Authorization Problem (08:56 - 13:11): This explains the 'password anti-pattern' and motivates the need for a protocol like OAuth. OAuth Terminology (15:47 - 18:51): This introduces the four key roles: Resource Owner, Client, Authorization Server, and Resource Server. Focus on understanding the distinct responsibilities of each.
As the video explains, our focus today is on designing the Authorization Server (AS). This is the central orchestrator in the OAuth 2.0 framework. Its primary responsibilities are:
- Authenticating the Resource Owner (the user).
- Obtaining consent from the user to grant access to a Client (the application).
- Issuing access tokens to the Client.
To fulfill these duties, an Authorization Server exposes two primary endpoints:
- /authorize: An interactive, browser-based endpoint used to handle user authentication and consent. This is a front-channel endpoint.
- /token: A non-interactive, API endpoint used by applications to exchange credentials for tokens. This is a back-channel endpoint.
The way a client interacts with these endpoints is defined by a grant type. Let's design our server to support the two most critical grant types.
2. Grant 1: The Authorization Code Grant
This is the most common and secure flow for applications that have a backend server, such as traditional web apps, as well as modern SPAs and mobile apps. It's designed to keep access tokens off the front-channel (i.e., out of the browser's URL and history).
The Flow
The flow involves a careful dance between the browser and a backend server. This diagram and the next video segment illustrate it perfectly.
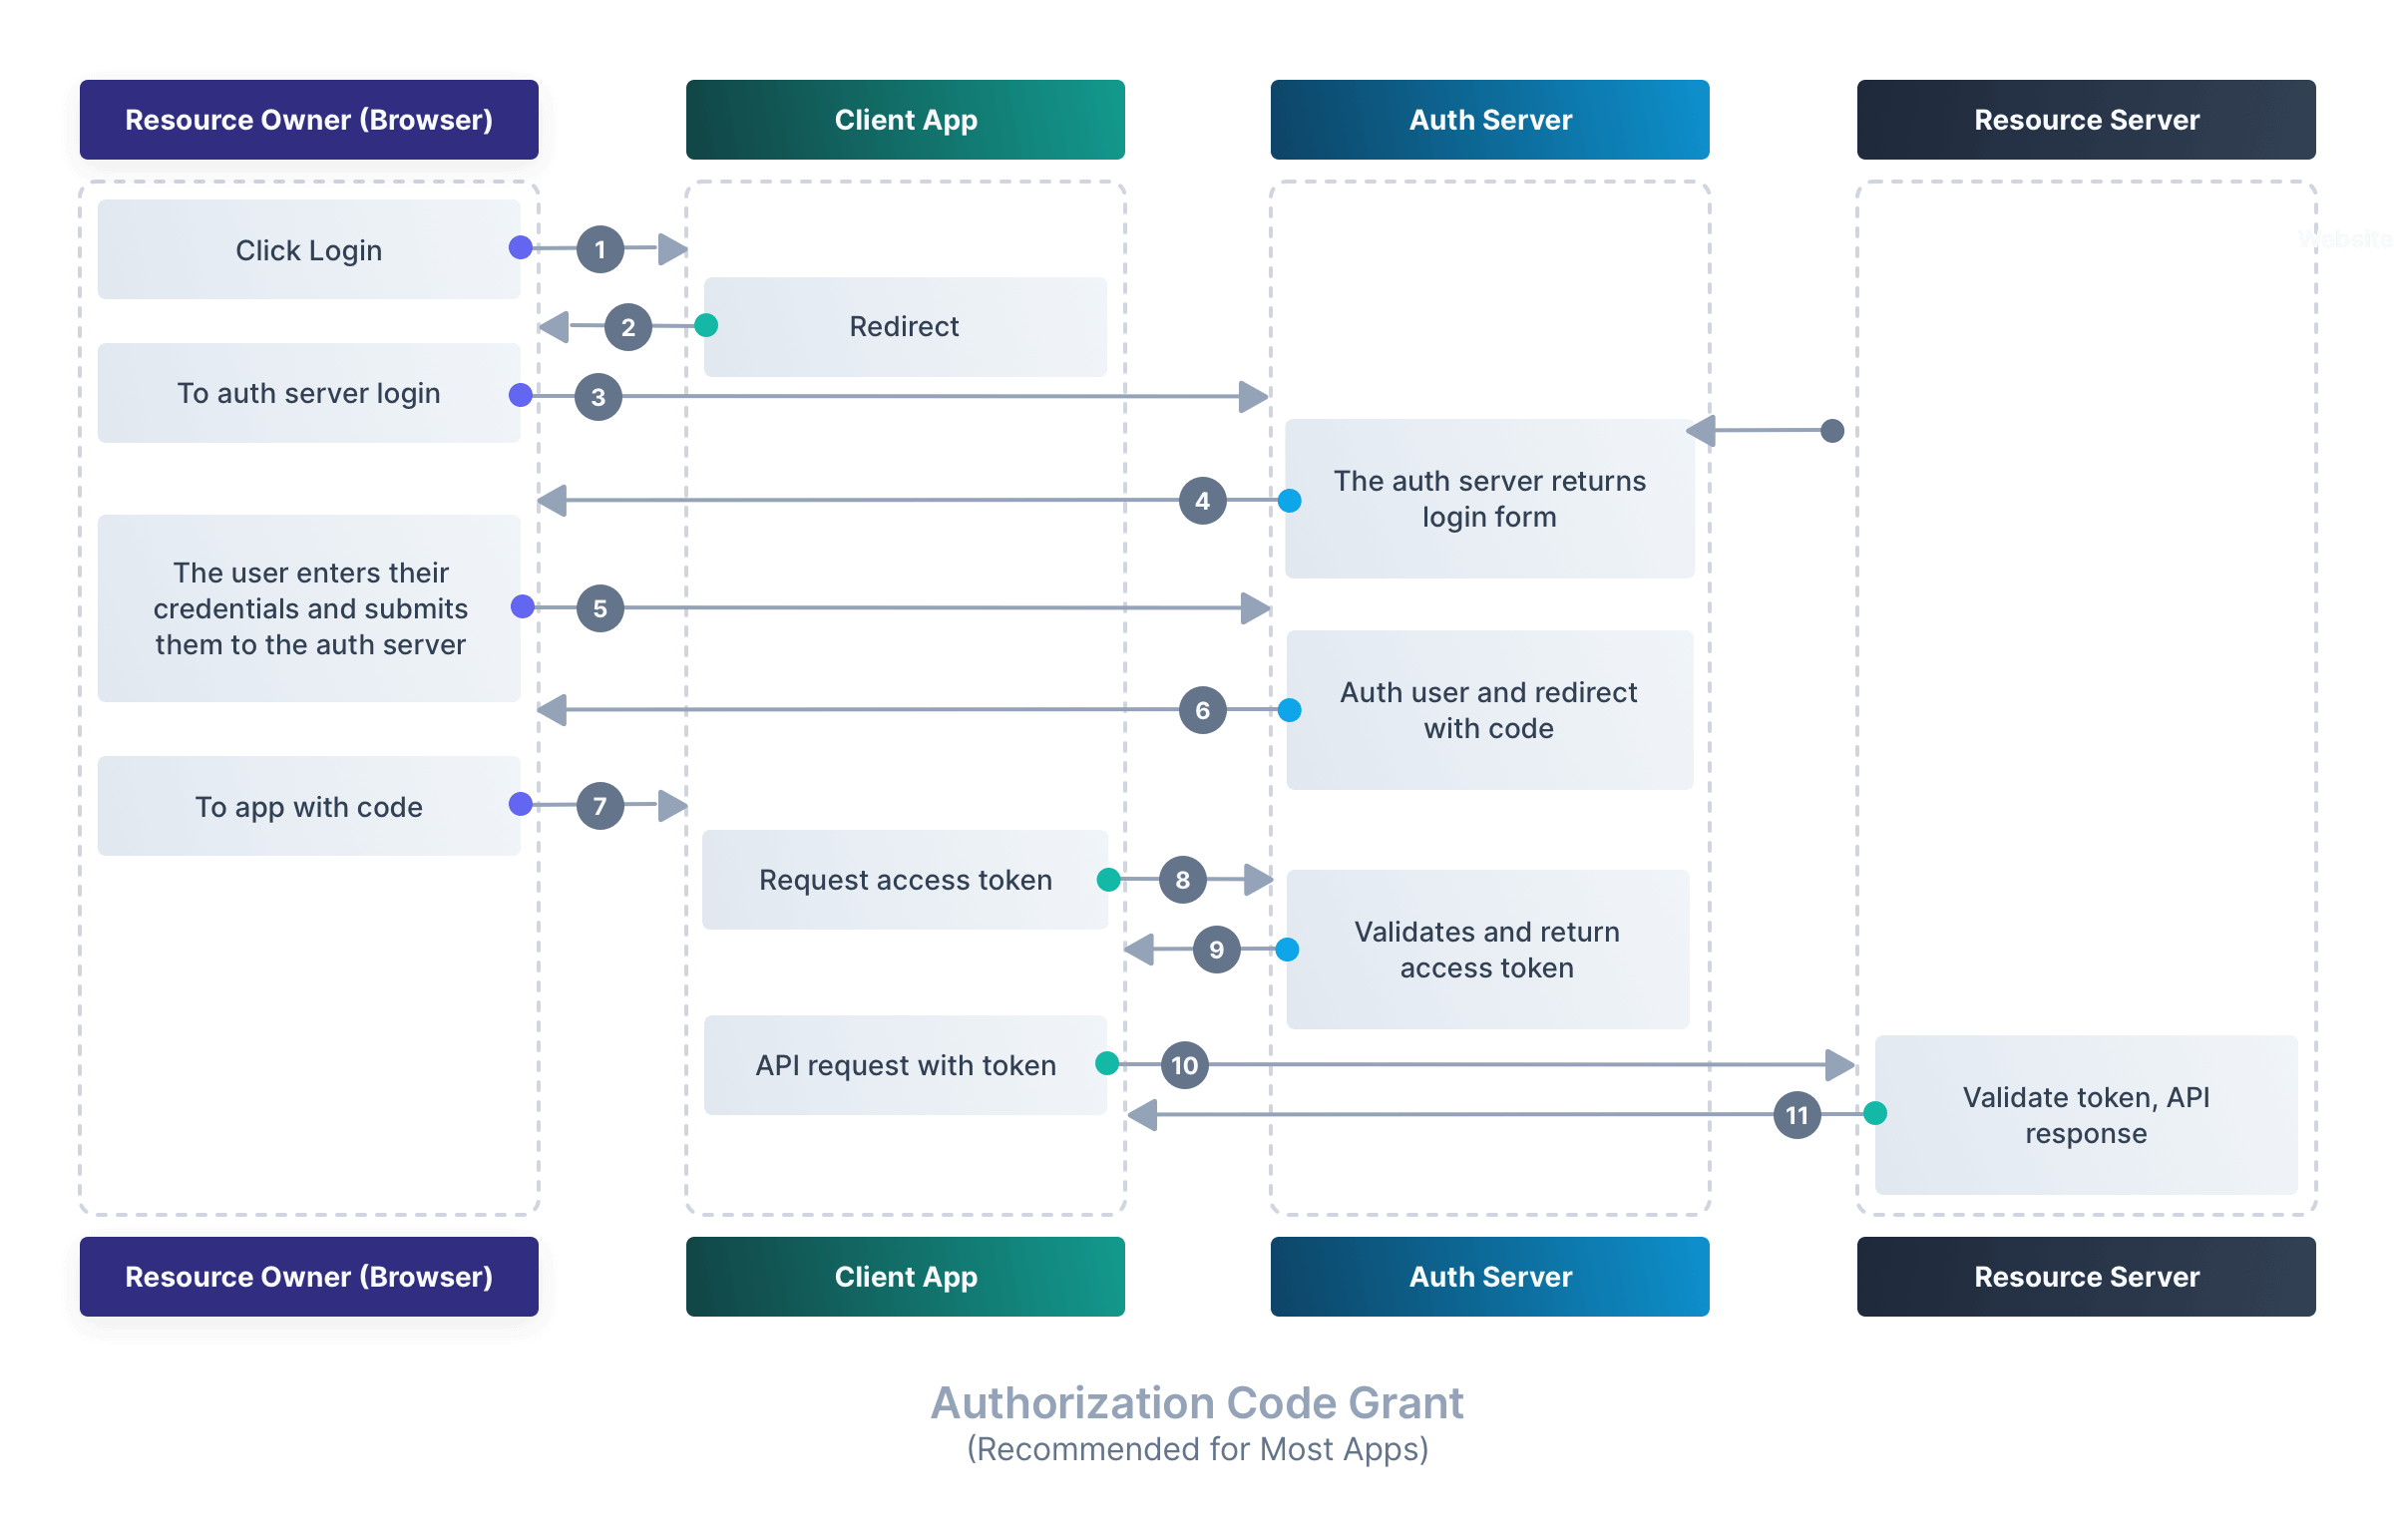
OAuth 2.0 and OpenID Connect (in plain English)
Let's return to the OktaDev video to see a walkthrough of this flow and, critically, understand the security rationale behind its two-step process.
Please watch these two key segments: Authorization Code Flow Walkthrough (18:55 - 26:18): This traces the entire flow, introducing the authorization code and the concept of scopes. Front-channel vs. Back-channel (26:47 - 33:04): This is a crucial section that explains why the flow is designed this way, highlighting the security benefits of the back-channel token exchange.
Architectural Design
Now, let's architect the components within our Authorization Server that make this flow possible.
A. Client Registry
Before any flow can begin, the client application must be registered with our Authorization Server. This requires a persistent store (e.g., a database table) to manage client information.
The clients table would need columns for:
client_id(public, unique identifier)client_secret_hash(for confidential clients, always store a hash, never plaintext)redirect_uris(an allow-list of valid callback URLs)allowed_scopes(the scopes this client is permitted to request)client_type(e.g., 'confidential' for apps with a backend, 'public' for SPAs/mobile)
B. The /authorize Endpoint
This endpoint orchestrates the user-facing part of the flow.
-
Request Parameters: It must handle GET requests with parameters like:
response_type=codeclient_idredirect_uriscopestate(an opaque value used to prevent CSRF)code_challenge&code_challenge_method(for PKCE)
-
Processing Logic:
- Validate Request: Check that the
client_idexists and theredirect_uriis in the client's pre-registered allow-list. - Authenticate User: This is a key integration point. The AS must authenticate the user. This is typically done by redirecting to a login page and managing a session.
- Obtain Consent: If the client is requesting scopes for the first time, display a consent screen to the user (e.g., "App XYZ wants to read your profile and contacts. Allow?").
- Generate Authorization Code: Create a short-lived, one-time-use authorization code.
- Design Trade-off: How should we implement this code?
- Option 1 (Stateful): Generate a random string and store it in a fast cache (like Redis) with associated metadata:
user_id,client_id,scopes,code_challenge, and an expiry time (e.g., 60 seconds). - Option 2 (Stateless): Create a JSON object with the metadata, encrypt it using a symmetric key known only to the server (e.g., AES-GCM), and then Base64 encode the result. This creates a self-contained, tamper-proof code that doesn't require a database lookup during validation.
- Option 1 (Stateful): Generate a random string and store it in a fast cache (like Redis) with associated metadata:
- Design Trade-off: How should we implement this code?
- Redirect: Send a
302 Foundresponse to the user's browser, redirecting them to the client'sredirect_uriwith thecodeandstatein the query string.
- Validate Request: Check that the
C. The /token Endpoint (Code Exchange)
This is the back-channel endpoint where the client's server exchanges the code for tokens.
-
Request: It must handle POST requests with a
Content-Typeofapplication/x-www-form-urlencoded. The body includes:grant_type=authorization_codecode(from the previous step)redirect_uriclient_idclient_secret(for confidential clients)code_verifier(the PKCE secret)
-
Processing Logic:
- Authenticate Client: If the client is confidential, verify its
client_idandclient_secretagainst the client registry. - Validate Code:
- If using the stateful approach, look up the code in the cache. If not found, it's invalid or expired.
- If using the stateless approach, decrypt and verify the code.
- Ensure the code has not been used before (requires a short-term cache of used code IDs to prevent replay).
- Validate PKCE: This is essential for security. Hash the incoming
code_verifierusing the method specified bycode_challenge_methodand verify that it matches thecode_challengeassociated with the authorization code. This proves the same client that started the flow is finishing it. - Issue Tokens: If all checks pass, generate an
access_tokenand, if requested (offline_accessscope), arefresh_token.
- Authenticate Client: If the client is confidential, verify its
To see this architectural logic translated into a concrete implementation, the following resource is invaluable.
ASP.NET Core Custom OAuth Server (.NET 7 Minimal Apis C#)
The video 'ASP.NET Core Custom OAuth Server' by Raw Coding is a masterclass in building an OAuth server from scratch. It demonstrates the precise logic needed for the /authorize and /token endpoints, including a clever stateless implementation for the authorization code.
Watch these three segments that cover the core implementation: /authorize Endpoint Implementation (03:25 - 10:39): See how incoming parameters are parsed and how an authorization code is generated as a protected payload, bundling all necessary validation context within it. /token Endpoint Implementation (Part 1) (14:10 - 18:58): Observe the construction of the token endpoint, how it parses the request, and how it prepares to generate a JWT access token. /token Endpoint Implementation (Part 2 - PKCE Validation) (18:58 - 27:14): This provides a step-by-step implementation of the critical PKCE validation logic, showing how the code_verifier is used to regenerate and match the code_challenge.
3. Grant 2: The Client Credentials Grant
This grant type is designed for machine-to-machine (M2M) communication. There is no user involved. A client (e.g., a backend microservice) needs to access an API on its own behalf.
The Flow
The flow is much simpler and uses only the back-channel.

Architectural Design
This flow reuses the /token endpoint with different logic.
-
Request: The client makes a POST request to
/tokenwith:grant_type=client_credentialsclient_idclient_secretscope(optional, to request specific permissions for itself)
-
Processing Logic:
- Authenticate Client: Verify the
client_idandclient_secretfrom the request against the client registry. This is the primary authentication step. - Validate Scopes: Ensure the requested scopes are within the client's
allowed_scopes. - Issue Token: Generate an access token. The claims in this token represent the client application itself. For example, the
sub(subject) claim would typically be theclient_id.
- Authenticate Client: Verify the
For a detailed explanation of this grant type and a practical example, the FusionAuth article 'OAuth 2.0 Simplified' provides a clear guide.
Read the section titled 'Client Credentials Grant'. It explains the M2M use case and shows code examples for both obtaining a token and verifying it, which is highly relevant to system design.
4. Shared Component: The Token Factory
Both grant flows culminate in the generation of an access token. This logic can be encapsulated in a shared "Token Factory" component. A key architectural decision here is the format of the access token.
- JWT (JSON Web Token): A self-contained, signed JSON object.
- Pros: Can be validated by Resource Servers statelessly by checking the signature against a public key, which is highly scalable.
- Cons: Cannot be easily revoked before expiry. The contents are visible (though not tamperable).
- Opaque Token: A random, high-entropy string.
- Pros: Can be revoked instantly. Reveals no internal information.
- Cons: Requires the Resource Server to make a network call back to the Authorization Server (to an
/introspectendpoint) for every validation, which is less scalable.
For modern distributed systems, JWTs are the common choice. When generating a JWT, your Token Factory must:
- Have access to a private signing key.
- Populate standard claims:
iss(issuer): The URL of your AS.sub(subject): The User ID (for Auth Code grant) or Client ID (for Client Credentials grant).aud(audience): The identifier of the Resource Server the token is for.exp(expiration time): A short lifetime (e.g., 15 minutes) is best practice.scope: The granted scopes.
- Sign the token using a strong algorithm (e.g., RS256).
Conclusion
In this lesson, we designed the core architecture of an OAuth 2.0 Authorization Server. We moved from conceptual flows to concrete components, focusing on the two most important grant types for modern applications.
Key Takeaways:
- An Authorization Server's primary components are the Client Registry, the interactive
/authorizeendpoint, and the machine-to-machine/tokenendpoint. - The Authorization Code grant uses a front-channel/back-channel split for security, preventing tokens from leaking into the browser. PKCE is a mandatory security layer for this flow.
- The Client Credentials grant is a simple back-channel flow for M2M authentication, where a client authenticates on its own behalf.
- Key design decisions include how to implement authorization codes (stateful cache vs. stateless encrypted blob) and access tokens (JWT vs. opaque), each with clear trade-offs.
Preview of the Next Lesson:
We've designed the server that creates tokens, but how are they structured, signed, and validated in a scalable and secure way? In our next lesson, we will zoom in on the "Token Factory" and the full lifecycle of a token by focusing on: "Design the token issuance and validation pipeline for an OAuth 2.0 server, including JWT structure, signing, and public key distribution." We'll cover topics like JWKS (JSON Web Key Set) endpoints, key rotation, and the responsibilities of the Resource Server in token validation.