Recommended resources
The freely available resources this lesson will direct you to.
Hello! Welcome to your next lesson.
In our last session, we designed the core architecture of an OAuth 2.0 Authorization Server. We focused on the authorize and token endpoints, laying out the logic for the Authorization Code and Client Credentials grant types. Both flows concluded with a crucial step: the issuance of an access token. We briefly touched on the idea of a "Token Factory" and the choice between opaque tokens and JSON Web Tokens (JWTs).
Today, we'll build out that "Token Factory" and design the entire lifecycle of the tokens it produces. We'll move beyond the high-level OAuth protocol and dive into the cryptographic heart of modern, stateless authorization.
The learning outcome for this lesson is to:
Design the token issuance and validation pipeline for an OAuth 2.0 server, including JWT structure, signing, and public key distribution.
By the end of this lesson, you will have a first-principles understanding of how JWTs are constructed, secured, and managed in a distributed system, enabling scalable and secure API access.
1. The Anatomy of a JSON Web Token (JWT)
For modern, distributed systems, JWTs are the standard format for access tokens. A JWT is a compact, self-contained JSON object that is cryptographically signed to ensure its authenticity and integrity. This "self-contained" nature is key: a service receiving a JWT can validate it without needing to call back to the server that issued it, which is a major scalability win.
Let's start with a video that introduces the fundamentals of JWTs.
JSON Web Tokens (JWTs) explained with examples | System Design
The video 'JSON Web Tokens (JWTs) explained with examples' provides a great introduction to what JWTs are, their structure, and why they are so useful compared to traditional session tokens.
Please watch the following segments: Introduction to JWTs (00:00 - 03:46): This covers the core concept of JWTs and their advantages in distributed systems. JWT Structure (04:37 - 07:29): This segment breaks down the three parts of a JWT: the header, payload, and signature.
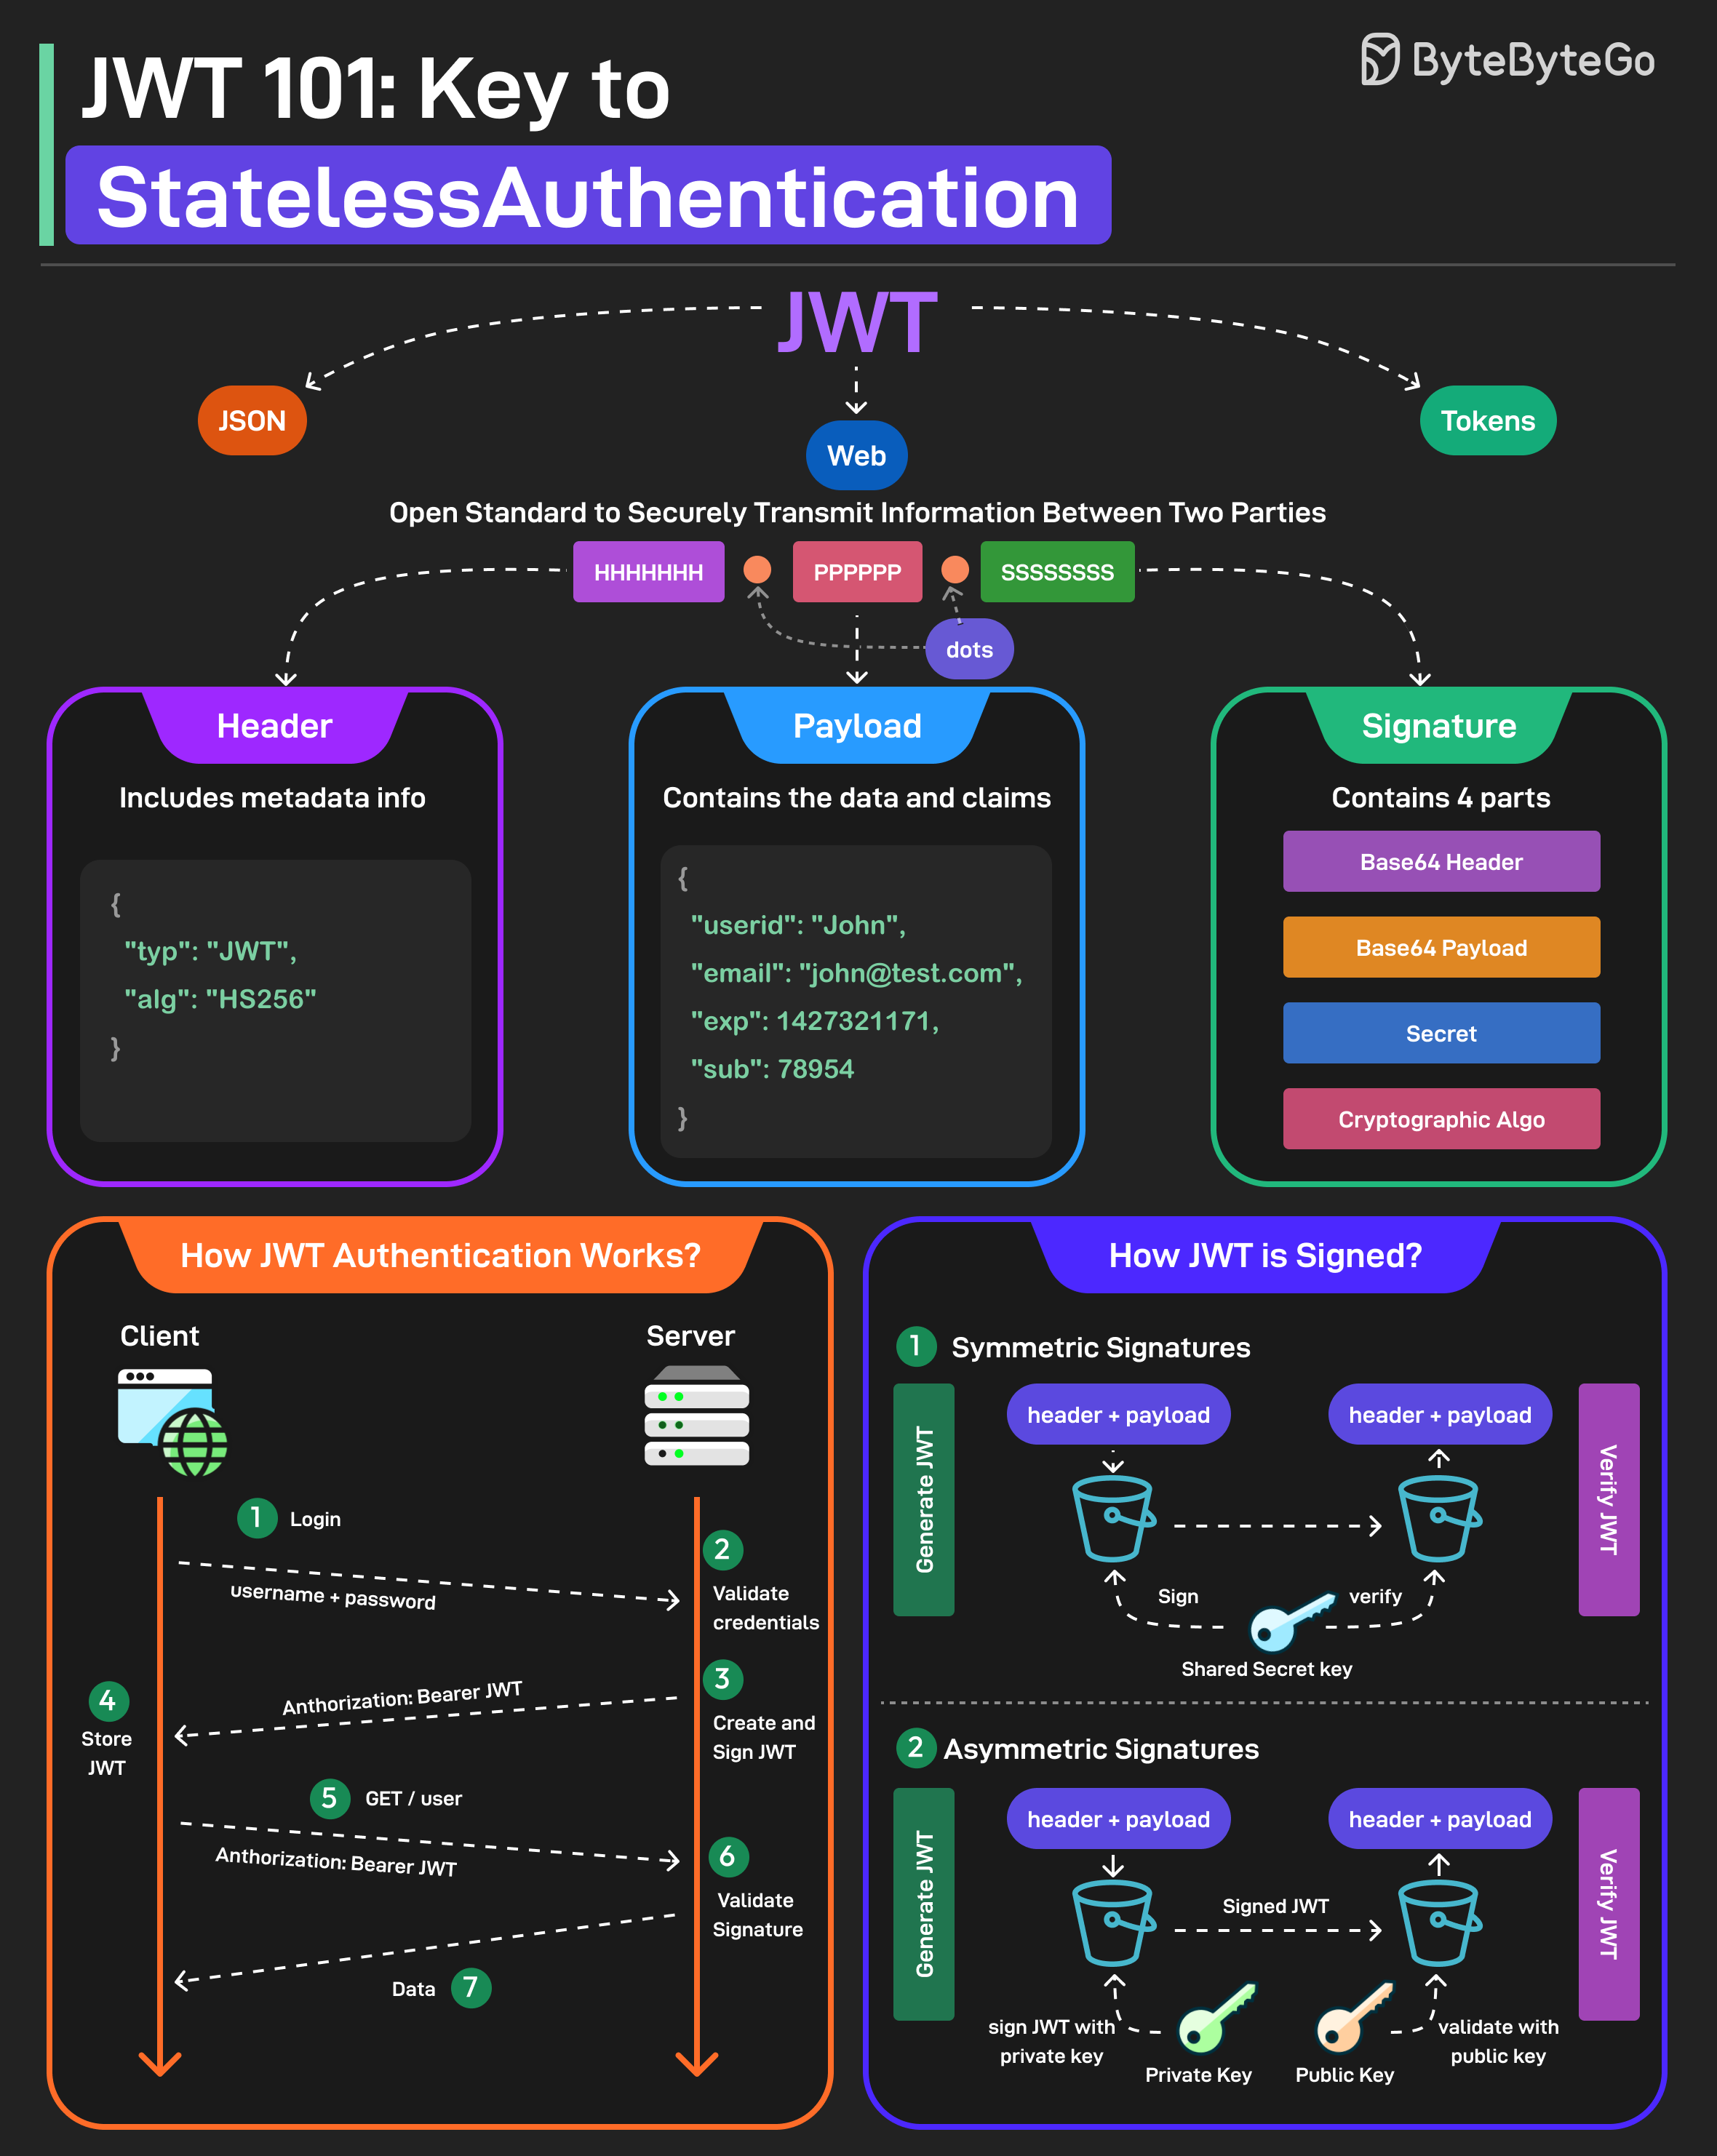
As the video explained, a JWT consists of three parts, separated by dots (.):
eyJhbGciOiJSUzI1NiIsInR5cCI6IkpXVCIsImtpZCI6ImtleS0yMDI0LTAxIn0.eyJzdWIiOiJ1c2VyLTEyMyIsImlzcyI6Imh0dHBzOi8vYXV0aC5teWFwcC5jb20iLCJhdWQiOiJteS1hcGkiLCJzY29wZSI6InJlYWQ6ZGF0YSIsImV4cCI6MTcxNTc4OTgwMCwiaWF0IjoxNzE1Nzg4OTAwfQ.signature-goes-here
Let's break down each part.
A. The Header
The header is a JSON object that provides metadata about the token itself, primarily the signing algorithm used.
{
  "alg": "RS256",
  "typ": "JWT",
  "kid": "key-2024-01"
}
alg(Algorithm): Specifies the cryptographic algorithm used to sign the token. Common values areHS256(HMAC with SHA-256) andRS256(RSA with SHA-256).typ(Type): AlwaysJWT.kid(Key ID): An optional but crucial field that identifies the specific key used to sign the token. We'll see its importance when we discuss key rotation.
Security Note: A critical vulnerability in early JWT libraries was the "alg: none" attack. An attacker could craft a token, set "alg": "none", and strip the signature. If the validation library blindly trusted the alg header, it would bypass signature verification. Modern systems must always use an allow-list of accepted algorithms and reject any token that doesn't match.
B. The Payload
The payload contains the claims, which are statements about the subject (e.g., the user) and other contextual information.
{
  "sub": "user-123",
  "iss": "https://auth.myapp.com",
  "aud": "my-api",
  "scope": "read:data",
  "exp": 1715789800,
  "iat": 1715788900
}
iss(Issuer): Who issued the token (your Authorization Server's URL).sub(Subject): The principal the token is about (e.g., the user's ID or the client's ID in a Client Credentials flow).aud(Audience): The intended recipient of the token (e.g., the API's unique identifier).exp(Expiration Time): A Unix timestamp (in seconds) after which the token MUST NOT be accepted.iat(Issued At): A Unix timestamp for when the token was issued.scope: A space-separated list of permissions granted by the token.
Crucially, the payload is only Base64URL encoded, not encrypted. Anyone who has the token can read its contents. Therefore, never store sensitive information in a JWT payload.
2. The Token Issuance Pipeline
Now, let's design the "Token Factory" inside our Authorization Server. This pipeline is responsible for creating and signing a JWT.
Step 1: Assemble the Payload
The first step is to gather all the necessary claims based on the context of the authentication/authorization event. This includes the standard claims (iss, sub, aud, exp, iat) and any custom claims like scope.
Step 2: Choose a Signing Algorithm
The choice of signing algorithm is a fundamental architectural decision with significant security implications.
Session Vs JWT: The Differences You May Not Know!
The video 'Session Vs JWT' offers a concise explanation of the difference between symmetric (HMAC) and asymmetric (RSA/ECDSA) signing algorithms and their respective trade-offs.
Please watch the segment from 02:40 to 03:52, which compares HMAC with RSA/ECDSA and discusses when to use each.
As the video explains, the two main approaches are:
-
Symmetric Signing (e.g.,
HS256):- Mechanism: The same secret key is used to both sign and verify the token.
- Use Case: Simple, monolithic applications where the token issuer and verifier are the same service, or a small, tightly-coupled set of services that can securely share the secret.
- Drawback: The secret must be shared with every service that needs to validate tokens. If any one of those services is compromised, the attacker can forge new tokens. This doesn't scale well in a microservices architecture.
-
Asymmetric Signing (e.g.,
RS256,ES256):- Mechanism: Uses a public/private key pair. The private key is used to sign the token, and the corresponding public key is used to verify it.
- Use Case: This is the standard for distributed systems. The Authorization Server holds the private key securely and is the only entity that can create tokens. Resource Servers (APIs) only need the public key to validate tokens.
- Advantage: The private key is never shared. A compromised Resource Server cannot forge new tokens.
Given your goal of understanding security product architecture, asymmetric signing is the more robust and scalable pattern you should focus on.
Step 3: Create the Signature
The final step is to cryptographically sign the token. The process is as follows:
- Base64URL encode the JSON header.
- Base64URL encode the JSON payload.
- Concatenate the two encoded strings with a period:
encodedHeader + "." + encodedPayload. - Sign this concatenated string using the chosen algorithm and the secret (for HMAC) or the private key (for RSA/ECDSA).
- Base64URL encode the resulting signature.
- Append the signature to the string with another period.
For a deeper dive into how this is implemented in code and the nuances of key management, the following article is an excellent resource.
The article 'How to Create and Sign JWTs' provides a comprehensive guide with practical code examples in multiple languages. It also covers the internal mechanics, which aligns with your goal of building a first-principles understanding.
Please read the following sections: Signing Algorithms: This section categorizes and explains the different symmetric and asymmetric algorithms. Creating JWTs in Node.js: Focus on the logic for both symmetric (HS256) and asymmetric (RS256) signing. You don't need to memorize the code, but understand the flow and the different inputs required. Manual JWT Creation (Understanding the Internals): This part is excellent for demystifying the process by showing how to build a JWT from scratch using basic crypto functions.
3. The Token Validation Pipeline
A Resource Server (your API) receiving a JWT must treat it as untrusted input until it has passed a rigorous validation pipeline. A common mistake is to only check the signature. Secure validation is a multi-step process.
Understanding JSON Web Tokens: Complete guide for developers
The article 'Understanding JSON Web Tokens' clearly outlines the critical steps involved in securely validating a JWT.
Please read the two sections 'What happens during JWT validation' and 'Signing keys and trust boundaries'. These explain the necessary checks beyond simple signature verification.
Based on this, let's design our validation pipeline:
-
Parse and Decode the Token:
- Split the token string into its three parts.
- Base64URL-decode the header and payload. Do not trust the content yet.
- From the header, extract the
algandkid.
-
Verify Algorithm:
- Check the
algfrom the header against a pre-configured allow-list (e.g.,['RS256']). If it's not in the list, reject the token immediately.
- Check the
-
Fetch the Verification Key:
- This is where the
kid(Key ID) from the header becomes vital. The Resource Server uses thekidto find the correct public key to verify the signature. But how does it get the public keys? This is the problem of public key distribution.
- This is where the
-
Verify the Signature:
- Using the public key obtained in the previous step, verify the token's signature against the
encodedHeader + "." + encodedPayloadpart of the token. If the signature is invalid, reject the token.
- Using the public key obtained in the previous step, verify the token's signature against the
-
Validate the Claims:
- If the signature is valid, you can now trust the payload's contents. Perform the following checks:
exp: Check that the expiration timestamp is in the future.nbf(Not Before): If present, check that the "not before" timestamp is in the past.iss: Check that the issuer claim matches the known, trusted URL of your Authorization Server.aud: Check that the audience claim matches the unique identifier of this API. This prevents a token intended for one API from being used at another.
- If the signature is valid, you can now trust the payload's contents. Perform the following checks:
Only if all of these steps pass is the token considered valid and the request can be processed.
4. Public Key Distribution: JSON Web Key Sets (JWKS)
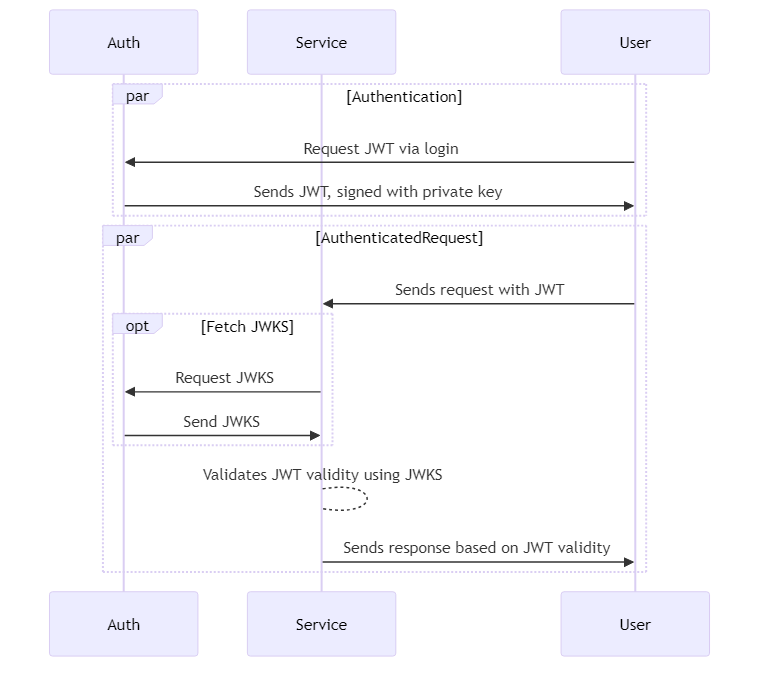
We left a question hanging: How does a Resource Server get the public key to validate a token? Hardcoding it is brittle and makes key rotation a nightmare. The standard solution is JSON Web Key Sets (JWKS).
A JWKS is a standardized JSON document containing a set of public keys. An Authorization Server exposes its JWKS at a well-known public endpoint, typically /.well-known/jwks.json.
This flow is illustrated perfectly in the following diagram:
A JWKS document looks like this:
{
  "keys": [
    {
      "kty": "RSA",
      "use": "sig",
      "kid": "key-2024-01",
      "n": "oahUI....wKJH",
      "e": "AQAB"
    },
    {
      "kty": "RSA",
      "use": "sig",
      "kid": "key-2023-12",
      "n": "x_FEzR....DFHJ3G",
      "e": "AQAB"
    }
  ]
}
keys: An array of public keys.kid: The unique ID for each key. This matches thekidin the JWT header.kty: The key type (e.g.,RSA).use: The intended use (e.g.,sigfor signature verification).n,e: The modulus and exponent of the RSA public key.
This architecture enables seamless key rotation:
- The Authorization Server generates a new private/public key pair with a new
kid(e.g.,"key-2024-02"). - It adds the new public key to its JWKS endpoint.
- It starts signing new tokens with the new private key and including the new
kidin the header. - When a Resource Server sees a token with the new
kid, it fetches the updated JWKS, finds the new public key, and successfully validates the token. It should cache the JWKS for performance but have a strategy to refresh it. - Tokens signed with the old key (e.g.,
"key-2024-01") remain valid until they expire, as the old public key is still in the JWKS.
Understanding JSON Web Tokens: Complete guide for developers
To see a detailed explanation of JWKS and its role in production systems, let's return to the Scalekit article.
Read the section titled 'JSON Web Key Sets (JWKS)'. It provides a clear definition, an example, and explains how JWKS facilitates key rotation.
Conclusion
In this lesson, we designed the complete issuance and validation pipeline for JWTs within an OAuth 2.0 ecosystem. We've moved from the abstract concept of a "token" to a concrete, cryptographically-secure artifact and the infrastructure needed to manage it.
Key Takeaways:
- JWT Structure: A JWT is composed of a Header, a Payload (with claims), and a Signature. The payload is readable by anyone, so it must not contain secrets.
- Asymmetric Signing is Superior for Distributed Systems: Using RSA/ECDSA (
RS256/ES256) with a private/public key pair allows token validation to scale without sharing secrets. The Authorization Server holds the private key; Resource Servers only need the public key. - Issuance Pipeline: Involves assembling claims (e.g.,
sub,iss,aud,exp) and signing the token with the private key. - Validation Pipeline: A rigorous, multi-step process. It requires verifying not only the signature but also the claims (
exp,iss,aud) to ensure the token is authentic, unexpired, and intended for the correct recipient. - JWKS for Key Distribution: The
/.well-known/jwks.jsonendpoint is the standard mechanism for publishing public keys, enabling scalable validation and seamless key rotation.
Preview of the Next Lesson:
OAuth 2.0 is an authorization framework. So far, we've designed a system that can tell an API what a user/client is allowed to do. But how do we handle authentication—proving who the user is? In the next lesson, we will build on OAuth 2.0 by designing the OpenID Connect (OIDC) layer. We will use our knowledge of JWTs to create a special type of token, the ID Token, and explore how it enables secure, federated login for applications.