Recommended resources
The freely available resources this lesson will direct you to.
Hello! Last time, you used a feature branch to make and review a focused Android-project change. You can use that same workflow for build configuration: it makes a dependency change easy to inspect before it reaches main.
This lesson is about Gradle version catalogs. You’ll learn how a catalog names libraries and plugins, then configure or update one in an Android project and verify that the build still works. Allow about 40 minutes, including the project changes.
Why put dependencies in a catalog?
An Android module declares the libraries it needs in a Gradle build file. Without a catalog, a declaration might contain the full coordinate directly:
dependencies {
    testImplementation("junit:junit:4.13.2")
}
That coordinate identifies a group, an artifact, and a requested version. A version catalog gives the dependency a project-wide alias, so a build file can instead say testImplementation(libs.junit4). The module still decides whether and how to use the library; the catalog holds its identity and version in one place.
Watch the beginning of Philipp Lackner’s Modern Dependency Management With Version Catalogs for the Android-project context. The video shows both projects with direct dependency strings and projects that already have a catalog.
Modern Dependency Management With Version Catalogs - Android Studio Tutorial 💻
Philipp Lackner’s Android Studio tutorial introduces the problem version catalogs solve and shows where the catalog file lives.
Watch the motivation for dependency coordinates and shared versions, then catalog setup for the file location and its main sections. The Android Studio versions shown in the video are historical; inspect your own project to see whether the file is already present.
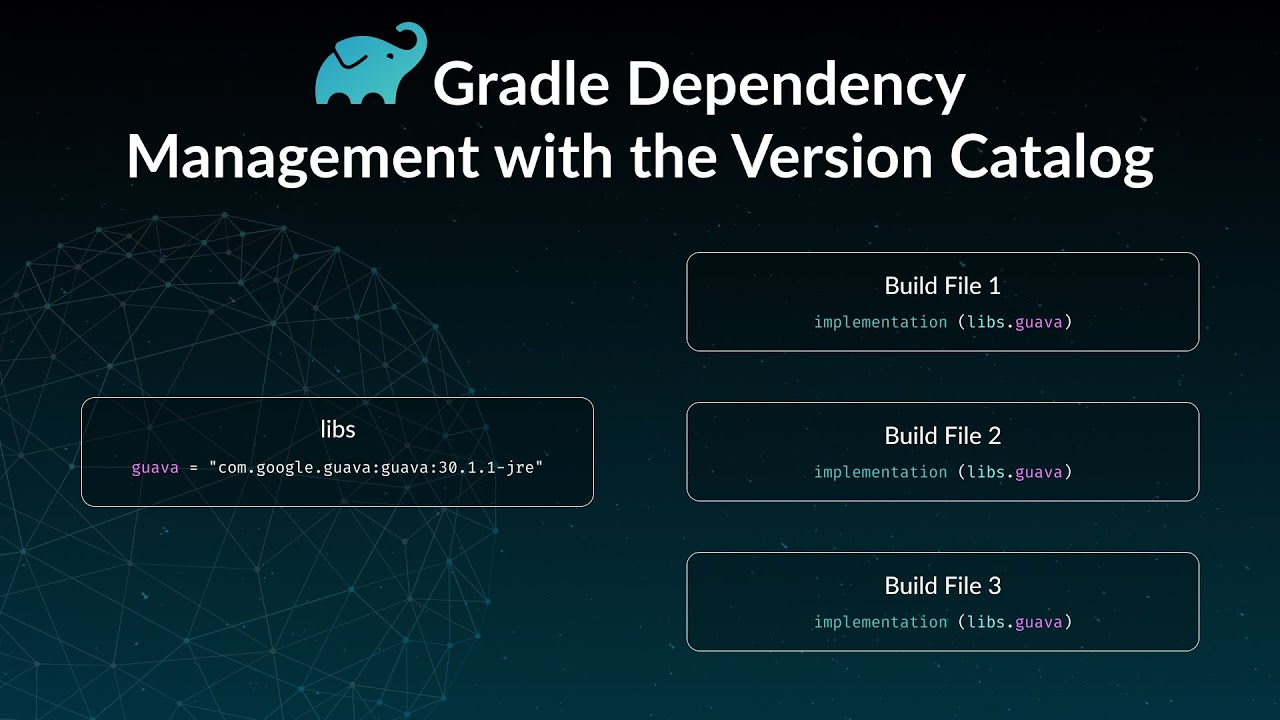
The image captures the main benefit: when several modules use the same alias, you edit its declaration in one place. A catalog is not a lockfile or a guarantee that Gradle will resolve exactly the version written there; other constraints in a dependency graph can affect the selected version.
Gradle’s Version Catalogs guide explains the underlying mechanism. Read its opening definition and the short subsection on generated accessors:
Gradle’s guide explains what a catalog supplies to build scripts and how its aliases become code-completable names.
At the start of “Version Catalogs,” before “Using a catalog,” read the catalog definition. Then find “Aliases and type-safe accessors” and read from alias mapping through the example table. Notice how an alias such as ktor-client-core becomes a dotted accessor. Also note the warning near the opening advantages list: catalog versions are requested versions, not enforced resolved versions.
Read the TOML file alongside the build script
In a standard Android project, Gradle automatically recognizes gradle/libs.versions.toml at the project root. A newly created Android Studio project may already contain it. If yours does, edit its existing sections rather than creating a second file or duplicating section headers.
Here is a small, complete illustration:
[versions]
junit4 = "4.13.2"

[libraries]
junit4 = { module = "junit:junit", version.ref = "junit4" }

[plugins]
The [versions] entry gives a number a name. The [libraries] entry connects an alias to a group and artifact; version.ref points to the named version. Gradle then makes libs.junit4 available in module build scripts:
dependencies {
    testImplementation(libs.junit4)
}
This example preserves the same JUnit declaration as the direct string above. It does not mean every Android project should add JUnit 4 or use that version. For your project, migrate a dependency you actually use and preserve its current version unless you intend to make a separate upgrade.
Aliases containing hyphens produce dotted accessors. For example, a library alias androidx-core-ktx is referenced as libs.androidx.core.ktx. The alias is your chosen catalog name; the module value must still contain the dependency’s real group and artifact. [plugins] serves a different purpose: it names Gradle plugins, which are applied in a plugins {} block rather than added with implementation(...).
The Android Developers’ Migrate your build to version catalogs guide gives a useful order for making these changes:
Migrate your build to version catalogs | Android Studio | Android Developers
Android Developers describes a gradual migration, including where to create the file and how to replace library and plugin declarations without moving everything at once.
In “Create a version catalog file,” read from the file location. Under “Migration steps” → “Migrate dependencies,” read from the migration order through the androidx-ktx example and the instruction to use the catalog name in a module build file. Finally, under “Migrate plugins,” read from the plugin steps through the android-application example and the explanation of alias. The guide’s version numbers are examples, not versions to copy over your project’s existing ones.
There is also an optional [bundles] section for grouping several library aliases. You do not need it to configure a useful catalog. Start with clear individual aliases; a bundle becomes helpful when multiple modules repeatedly need the same set.
Migrate one library without changing its behavior
Work on a focused branch, as in the previous lesson. At the project root, first inspect gradle/libs.versions.toml, the module build file (often app/build.gradle.kts), and the root build file. Locate one existing direct library declaration—or, if the project already uses catalog aliases, trace one alias from the module file back to its catalog entry.
For a direct declaration, make the migration in this order:
- In
gradle/libs.versions.toml, add a version key and a library alias within the appropriate existing sections. Copy the dependency’s current group, artifact, and version accurately. - Sync the project in Android Studio. This lets Gradle generate the accessor and exposes TOML or alias errors before you change the build script.
- Replace the direct string in the module’s
dependencies {}block with itslibsaccessor. Keep the configuration the same:testImplementationshould remaintestImplementation, for example. Sync again.
The video demonstrates these actions and shows why a sync may be needed before a new accessor resolves:
Modern Dependency Management With Version Catalogs - Android Studio Tutorial 💻
The tutorial demonstrates migrating a library declaration in Android Studio, then handling a Compose Bill of Materials (BOM) declaration separately.
Watch one migration, focusing on what changes in the TOML file and what changes in the module build file. Then watch the Compose BOM if your project uses Compose: notice that the BOM has a version, while libraries whose versions it supplies can omit individual versions. You may type the entries yourself even if Android Studio’s quick action differs from the one shown.
A Compose BOM illustrates why “put every version in [versions]” is not an absolute rule. A catalog can identify the BOM and versionless Compose libraries; the module must still import the BOM as a platform:
dependencies {
    implementation(platform(libs.androidx.compose.bom))
    implementation(libs.androidx.compose.ui)
}
Here the catalog aliases would identify the BOM and Compose UI artifacts, while the imported BOM supplies a compatible version for Compose UI. Do not remove platform(...) merely because the BOM now has an alias. Likewise, if Compose dependencies are used in an Android test configuration, that configuration needs its own applicable BOM declaration.
Catalog plugins, then verify the change
Libraries are only part of an Android build. The Android application plugin, for example, can also have a catalog alias. If your catalog already has plugin entries, trace one from [plugins] to a build file. If it does not, you can migrate an existing versioned plugin without changing its version.
For an application plugin, an entry inside [plugins] might be:
android-application = { id = "com.android.application", version.ref = "agp" }
This assumes [versions] contains an agp key set to the exact Android Gradle Plugin version your project currently uses. An app module can then apply it with:
plugins {
    alias(libs.plugins.android.application)
}
If the root build file declares the plugin for use by modules without applying it to the root project, its declaration commonly uses apply false:
plugins {
    alias(libs.plugins.android.application) apply false
}
Replace only the relevant entry in an existing plugins {} block; retain the project’s other plugins. A catalog plugin alias cannot be used in settings.gradle.kts, so do not move settings-file plugin declarations into this pattern without checking how that build is configured.
Modern Dependency Management With Version Catalogs - Android Studio Tutorial 💻
The final selected part of the tutorial shows the separate syntax for cataloged Gradle plugins.
Watch plugin migration. Focus on the distinction between a plugin ID stored under [plugins] and alias(libs.plugins...) in a build file. Keep your project’s existing plugin versions rather than copying the video’s versions.
Finish with a check that tests the build, not just the appearance of the TOML file. Sync in Android Studio, then run a build from the project root. For a module named app, use:
./gradlew :app:assembleDebug
On Windows, use .\gradlew.bat :app:assembleDebug; substitute your actual module name if it differs. If you migrated a test dependency, run the relevant test task as well. A successful sync confirms Gradle can interpret the catalog and generate its accessors; a successful build or test also checks that the dependencies work in the configurations where you use them.
If something fails, check the boundary you just crossed. An unresolved libs accessor often means an alias spelling differs from its generated dotted name, the TOML entry is in the wrong section, or Gradle has not synced. A dependency-resolution failure calls for checking the exact group, artifact, version, and configured repositories. Review your diff before committing: this change should principally replace declarations, not silently upgrade dependencies.
Takeaways
A version catalog centralizes what a library or plugin is called and which version it requests; each module build file still specifies where it is used. You can migrate incrementally, preserve existing configurations and BOM behavior, and verify each change with a sync and build. Your feature-branch workflow gives you a way to review that configuration change before merging it.
Next, you’ll define separate debug and release build configurations. The catalog will keep their shared dependency declarations easier to manage while those configurations give the builds different purposes.