Recommended resources
The freely available resources this lesson will direct you to.
Hello! This course begins with the habits that keep an Android project manageable as it grows. Before adding dependencies, screens, or network features, you need a reliable way to make a change without putting unfinished work on the project’s main line.
In this lesson, you’ll take one small change through a feature-branch workflow: create a branch, commit and push the change, propose it in a pull request, merge it, and update your local project. Allow about 40 minutes, including time to follow the workflow in an Android project.
Why work on a branch?
A Git branch lets you work on one change while main remains at its existing version. A commit records a version of your work in your local repository; pushing sends commits to a remote repository such as GitHub. Neither committing nor pushing a feature branch changes main. That happens only when the work is merged.
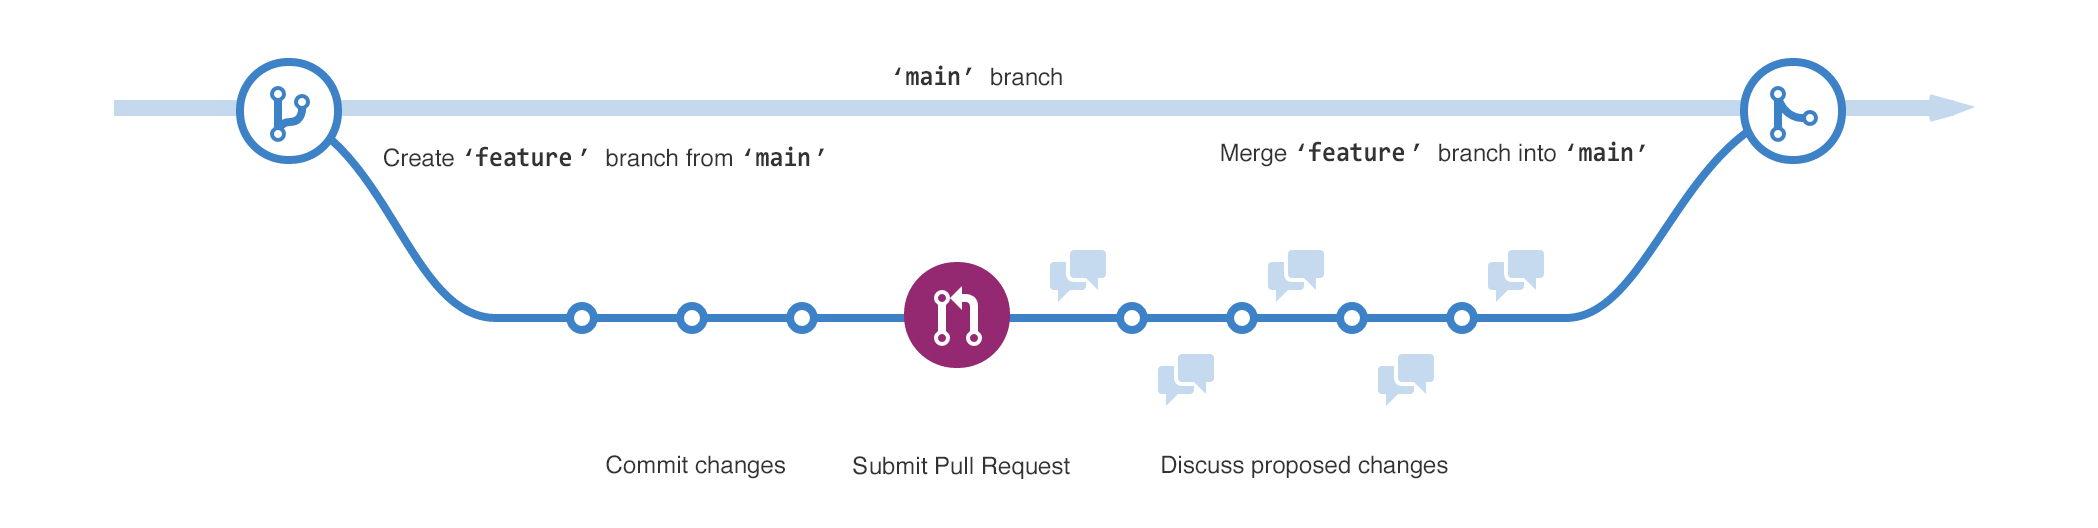
The important boundary in this picture is the merge. It gives you a place to inspect a change before it becomes part of the main project. For an Android app, that inspection might include reviewing the changed files, building the app, and checking that a new behavior works on a device or emulator.
Create a git branch in Android Studio Arctic Fox/GitHub, pull request, merge, pull
Watch “Create a git branch in Android Studio Arctic Fox/GitHub, pull request, merge, pull” by Brandan Jones for a complete Android-project example. The Android Studio interface shown is older, but the branch workflow still applies.
Watch why branches to see why unfinished work stays separate. In branch and push, notice the difference between creating a local branch and publishing it. Follow the pull request, paying particular attention to the fact that opening a PR does not merge it. Finally, watch the pull: after a merge on GitHub, the local main branch still needs updating. The video’s merge creates an extra merge commit; other merge methods can produce different commit histories.
The video uses master for its primary branch. The commands below use main; use your repository’s actual default-branch name if it differs.
Prepare a small, reviewable change
A feature branch should have a specific purpose. For this walkthrough, use docs/run-instructions to document how to open and run your Android app. Documentation is a useful first change: you can complete the Git workflow without having to learn the app’s Kotlin code at the same time. When you later change app behavior, the same workflow applies.
GitHub’s GitHub flow guide adds useful standards for branch names, commits, and review:
Read GitHub’s “GitHub flow” as the review-and-merge companion to the video. Focus on what makes a branch and pull request easy to understand, not on memorizing every interface option.
Under “Create a branch,” read branch guidance. Under “Make changes,” read commit guidance, especially why commits should describe isolated changes. Under “Create a pull request” and “Address review comments,” read PR guidance and the review cycle. Finish with merge conditions under “Merge your pull request” and branch cleanup under “Delete your branch.”
For the hands-on steps, you need an Android project that is already a Git repository with a remote named origin and a published main branch. Run the commands in a terminal at the project root, where the Gradle wrapper (gradlew or gradlew.bat) lives. Android Studio’s Terminal window is suitable. If you created a new project without Git, initialize and publish its initial version before beginning this branch workflow; use an empty remote repository to avoid starting with two unrelated initial histories.
Before any commit, check the files you are about to include. Android projects can contain machine-specific files, build output, or credentials. Keep those out of commits; do not assume a file is safe merely because Git allows you to add it.
Create, commit, and publish the branch
Start by checking where you are. git status reports uncommitted work, and git branch --show-current reports the checked-out branch.
git status
git branch --show-current
git remote -v
If you already have uncommitted changes, finish or safely set them aside before following the commands below. Avoid switching branches over work you might lose. Confirm that origin points to the intended remote repository, then start from an up-to-date main:
git switch main
git pull --ff-only origin main
git switch -c docs/run-instructions
git branch --show-current
--ff-only declines to make an unexpected merge commit while updating main. git switch -c creates and checks out the new branch. The final command should print docs/run-instructions; check this before editing.
Now create or update README.md with concise, accurate instructions for opening the project in Android Studio and running the app. If a README already exists, preserve its useful content. Look at your project rather than guessing its required SDK or setup steps.
After editing, inspect and record only the intended file:
git status
git diff -- README.md
git add README.md
git diff --cached
git commit -m "Document Android app launch steps"
git push -u origin docs/run-instructions
There are two deliberate checks here. git diff shows the edit before staging; git diff --cached shows exactly what the next commit will contain. The commit is local until the push. The -u option establishes a tracking relationship, so subsequent pushes on this branch can usually be made with git push.
If you make another related improvement after pushing, commit and push it on the same branch. If you discover an unrelated change you want to make, give it a separate branch rather than expanding this pull request.
Review, merge, and return to main
On GitHub, open the repository and create a pull request with base main and compare docs/run-instructions. The base is the branch you propose to change; compare is the branch containing your work. Give the PR a title and a short description of why the instructions are needed, what changed, and how you checked them. Review the displayed file diff yourself before requesting anyone else’s review.
For a Kotlin or resource change, you would also run the relevant app build and tests before merging. For this documentation change, checking the instructions against your actual project is essential; you can additionally build a standard app module with ./gradlew :app:assembleDebug (or .\gradlew.bat :app:assembleDebug on Windows). If your module is not named app, use its actual name.
A PR is a proposal, not a merge. Feedback or failed checks may call for another edit and push; the PR updates with the new commit. Merge only when the change is ready and any repository requirements are satisfied. If GitHub reports a conflict, do not force the PR through: bring the current main into your feature branch, resolve the conflicting files, check the result, and push again. That situation is less likely in this short walkthrough, but it is part of normal branch work.
Once the PR has been merged on GitHub, bring its result into Android Studio’s local repository:
git switch main
git pull --ff-only origin main
git status
You should now see the accepted README change on local main. Delete the merged branch on GitHub using the PR’s branch-deletion option, then remove its local copy:
git branch -d docs/run-instructions
If Git refuses the local deletion—possible with some PR merge methods—first verify on GitHub that the PR was merged and that the branch has no work you still need. Do not force-delete a branch just to silence the warning.
Takeaways
A feature branch isolates a focused change; commits record it locally; a push publishes it for a pull request. Review and checks happen before merging into main, and a merge on GitHub does not automatically update your local main. You now have a repeatable workflow for the Android changes ahead. Next, you’ll use it as you configure project dependencies with a Gradle version catalog.