Recommended resources
The freely available resources this lesson will direct you to.
Hello and welcome back!
In our previous lesson, you learned how to create a planner agent that can decompose a complex user request into a concrete, multi-step plan. This was a crucial first step in moving from simple, reactive agents to more sophisticated, proactive ones.
However, a plan is only as good as its execution. This brings us directly to our current learning outcome: Build an agent that executes a multi-step plan, handling tool call outputs and synthesizing a final answer.
Today, we will build the "executor" component of our agent. You will learn how to:
- Implement a multi-step workflow using LangGraph.
- Manage the agent's state to pass information between steps.
- Use tools to gather information at each step.
- Leverage structured output to reliably parse tool results.
- Synthesize the information gathered across all steps into a final, coherent response.
The Executor's Workflow: From Plan to Final Answer
Let's imagine our agent is tasked with a typical research query you might face as a software engineer: "What are the best alternatives to Firebase for my new project?"
A good plan for this might look like:
- Extract Candidates: Search the web for articles comparing Firebase alternatives and extract a list of promising tool names.
- Research Details: For each tool, find its official website, scrape the content, and analyze it to find key details like pricing, features, and whether it has an API.
- Synthesize & Recommend: Based on the detailed information gathered for all tools, formulate a final recommendation.
This sequence—extract, research, synthesize—is a classic execution flow. Our goal is to build an agent that can carry out this plan methodically.
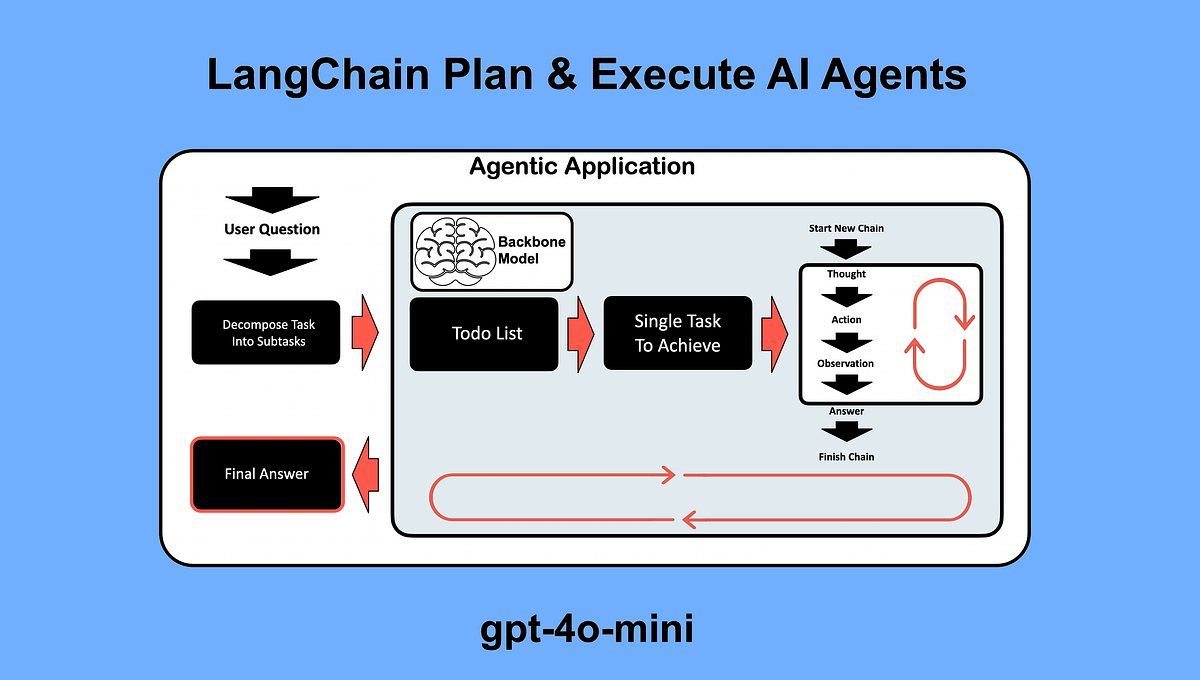
Implementing the Execution Flow with LangGraph
LangGraph is perfectly suited for this task. We will represent our execution flow as a StateGraph, where each step in our plan (Extract, Research, Synthesize) becomes a node. The flow of control and data between these steps is managed by edges and a central state object.
This article provides an excellent conceptual breakdown of the key LangGraph features we will be using.
LangGraph 101: Let's Build A Deep Research Agent
The article 'LangGraph 101: Let's Build A Deep Research Agent' explains the core concepts of building agents with LangGraph. It's a great primer for the practical implementation we're about to do.
Please read Section 2, 'The Agent’s Memory', and Section 3, 'Node Operations'. Focus on these key ideas: State Management: Understand the role of the central state object (OverallState) in sharing information between nodes. Structured Output: Note the use of llm.with_structured_output() to force an LLM's response into a predictable format (like a Pydantic model). This is crucial for reliable synthesis. Tool Calling: See how a node can execute external tools (like a web search) to gather information.
A Practical Walkthrough: Building a Research Agent
Now, let's dive into a complete, practical implementation of our research agent. The following video tutorial builds an agent that follows the exact Extract -> Research -> Synthesize plan we outlined. Given your background as a software engineer, you'll find the structure of defining services, models, and workflows very familiar.
Part 1: Setup and Defining the State
A robust agent needs a clear definition of its internal state and the structure of the data it aims to produce. This is where Pydantic models shine.
Python Advanced AI Agent Tutorial - LangGraph, LangChain, Firecrawl & More!
Before writing the workflow logic, it's essential to define our data structures. This segment covers setting up the project and creating the Pydantic models that will define our agent's state and the structured output we want from the LLM.
Watch from 23:41 to 29:31. Pay attention to the definitions of: ResearchState: This class will serve as our main state object in LangGraph, holding the query, extracted tools, and final analysis. CompanyAnalysis and CompanyInfo: These classes define the exact schema we want the LLM to populate with information scraped from company websites.
Part 2: Implementing the Execution Nodes
With our data models in place, we can implement each step of our plan as a separate function, or "node," in our graph.
Node 1: Extract Tools
This node's job is to perform the initial web search to identify candidate tools.
Python Advanced AI Agent Tutorial - LangGraph, LangChain, Firecrawl & More!
The first node in our graph implements the 'Extract Candidates' step. It will search the web for relevant articles, scrape their content, and use an LLM to pull out a list of tool names.
Now, watch from 37:08 to 49:56. This covers the extract_tools_step function. Notice the sequence of operations: A web search is performed to find articles. The content of the resulting URLs is scraped. The aggregated content is passed to an LLM to extract a simple list of tool names. This list is returned to update the extracted_tools field in the agent's state.
Node 2: Research Details
This is the heart of our executor. It takes the list of tools from the previous step and, for each one, performs a detailed investigation. This node demonstrates how to handle the output of one step as the input for the next and how to synthesize unstructured data into a structured format.
Python Advanced AI Agent Tutorial - LangGraph, LangChain, Firecrawl & More!
The 'Research Details' node takes the list of candidates and dives deep on each one. This is where we see the power of structured output for handling tool call results.
Watch from 49:56 to 01:03:27. This segment implements the research_step. Focus on the following: The node retrieves the extracted_tools list from the state object. It loops through each tool_name, searches for its official website, and scrapes the page content. Crucially, it uses self.llm.with_structured_output(CompanyAnalysis) to have the LLM parse the unstructured scraped text and populate the CompanyAnalysis Pydantic model. The resulting structured objects are collected and used to update the companies field in the state.
Node 3: Synthesize and Recommend
The final node takes all the structured data collected and generates the final answer for the user.
Python Advanced AI Agent Tutorial - LangGraph, LangChain, Firecrawl & More!
With all the detailed, structured data gathered, the 'Synthesize' node's job is straightforward: pass the data to an LLM and ask for a final recommendation.
Watch from 01:03:27 to 01:06:35. This short segment shows the analyze_step. Because the previous node did the heavy lifting of structuring the data, this final step is simple and reliable.
Part 3: Assembling the Workflow
We have our individual step functions (nodes). Now, we need to wire them together into a complete, executable graph.
Python Advanced AI Agent Tutorial - LangGraph, LangChain, Firecrawl & More!
The last piece of the puzzle is to assemble the nodes into a StateGraph and define the edges that dictate the sequential flow of execution.
Watch from 01:06:35 to 01:09:40, which covers the build_workflow function. Observe how it uses: graph.add_node() to register each step function. graph.set_entry_point() to kick off the process. graph.add_edge() to define the sequence: extract_tools -> research -> analyze -> END.
By following this video, you have built a complete agent that can execute a pre-defined, multi-step research plan from start to finish.
Conclusion
In this lesson, you moved from planning to execution. You learned how to build a robust agent that can carry out a multi-step plan, handle the outputs from various tool calls, and synthesize all the gathered information into a structured, final answer.
Key Takeaways:
- Graph-based Execution: Multi-step plans can be modeled as a
StateGraphin LangGraph, with each step represented by a node. - State as Memory: A central state object is used as the agent's short-term memory, allowing information to be passed from one step to the next.
- Handling Tool Outputs: The process of taking the output of one tool call (e.g., a URL from a search) and using it as the input for another (e.g., a scraper) is fundamental to execution.
- Structured Synthesis: Using an LLM with
.with_structured_output()and a Pydantic schema is a powerful technique for reliably converting unstructured data (like scraped web content) into a structured format for final synthesis. - Sequential Edges: Simple, linear plans are constructed by connecting nodes with
graph.add_edge().
The agent we built today has a powerful execution capability, but its memory is fleeting—it only exists for a single run. What if we wanted an agent that could remember information across multiple conversations?
Our next lesson, Add persistent memory to an agent using a vector store or key-value database, will address exactly that. We will explore how to give our agents long-term memory, enabling them to learn and build context over time.