Recommended resources
The freely available resources this lesson will direct you to.
- Cinematic Lighting 101: Three Point Lightingwww.youtube.com
- What Is Hard Light and Soft Light? | Cinematography Lighting Tutorialwww.youtube.com
- Three-Point Video Lighting: Key, Fill, & Backlight Setup Guidewww.studiobinder.com
- Film Lighting: A Cinematic Guide (w/ Free Lighting Plots)www.litepanels.com
Welcome to your seventh lesson in the Foundations of Visual Design. In our last session, we explored depth of field, learning how to manipulate focus to isolate subjects and create a cinematic look. We discussed how a camera's job is to capture light. Now, we shift our focus from capturing light to intentionally shaping it.
Lighting is the art of painting with light and shadow. It sculpts your subject, creates mood, adds dimension, and transforms a flat image into a three-dimensional world. For your goal of creating high-end advertising, mastering lighting is non-negotiable. It's the difference between a simple snapshot and a compelling, professional visual that tells a story and sells a product.
This lesson introduces the two most fundamental lighting concepts. By the end, you will be able to explain the industry-standard three-point lighting setup and distinguish between the distinct emotional qualities of hard and soft lighting.
1. The Anatomy of Professional Lighting: The Three-Point Setup
The three-point lighting setup is the cornerstone of lighting in photography, film, and advertising. It's a simple but incredibly versatile system that uses three distinct light sources to make a subject "pop" from the background and appear three-dimensional and well-defined.
The three lights are the Key Light, the Fill Light, and the Backlight. The diagram below illustrates their standard placement relative to the subject and camera.
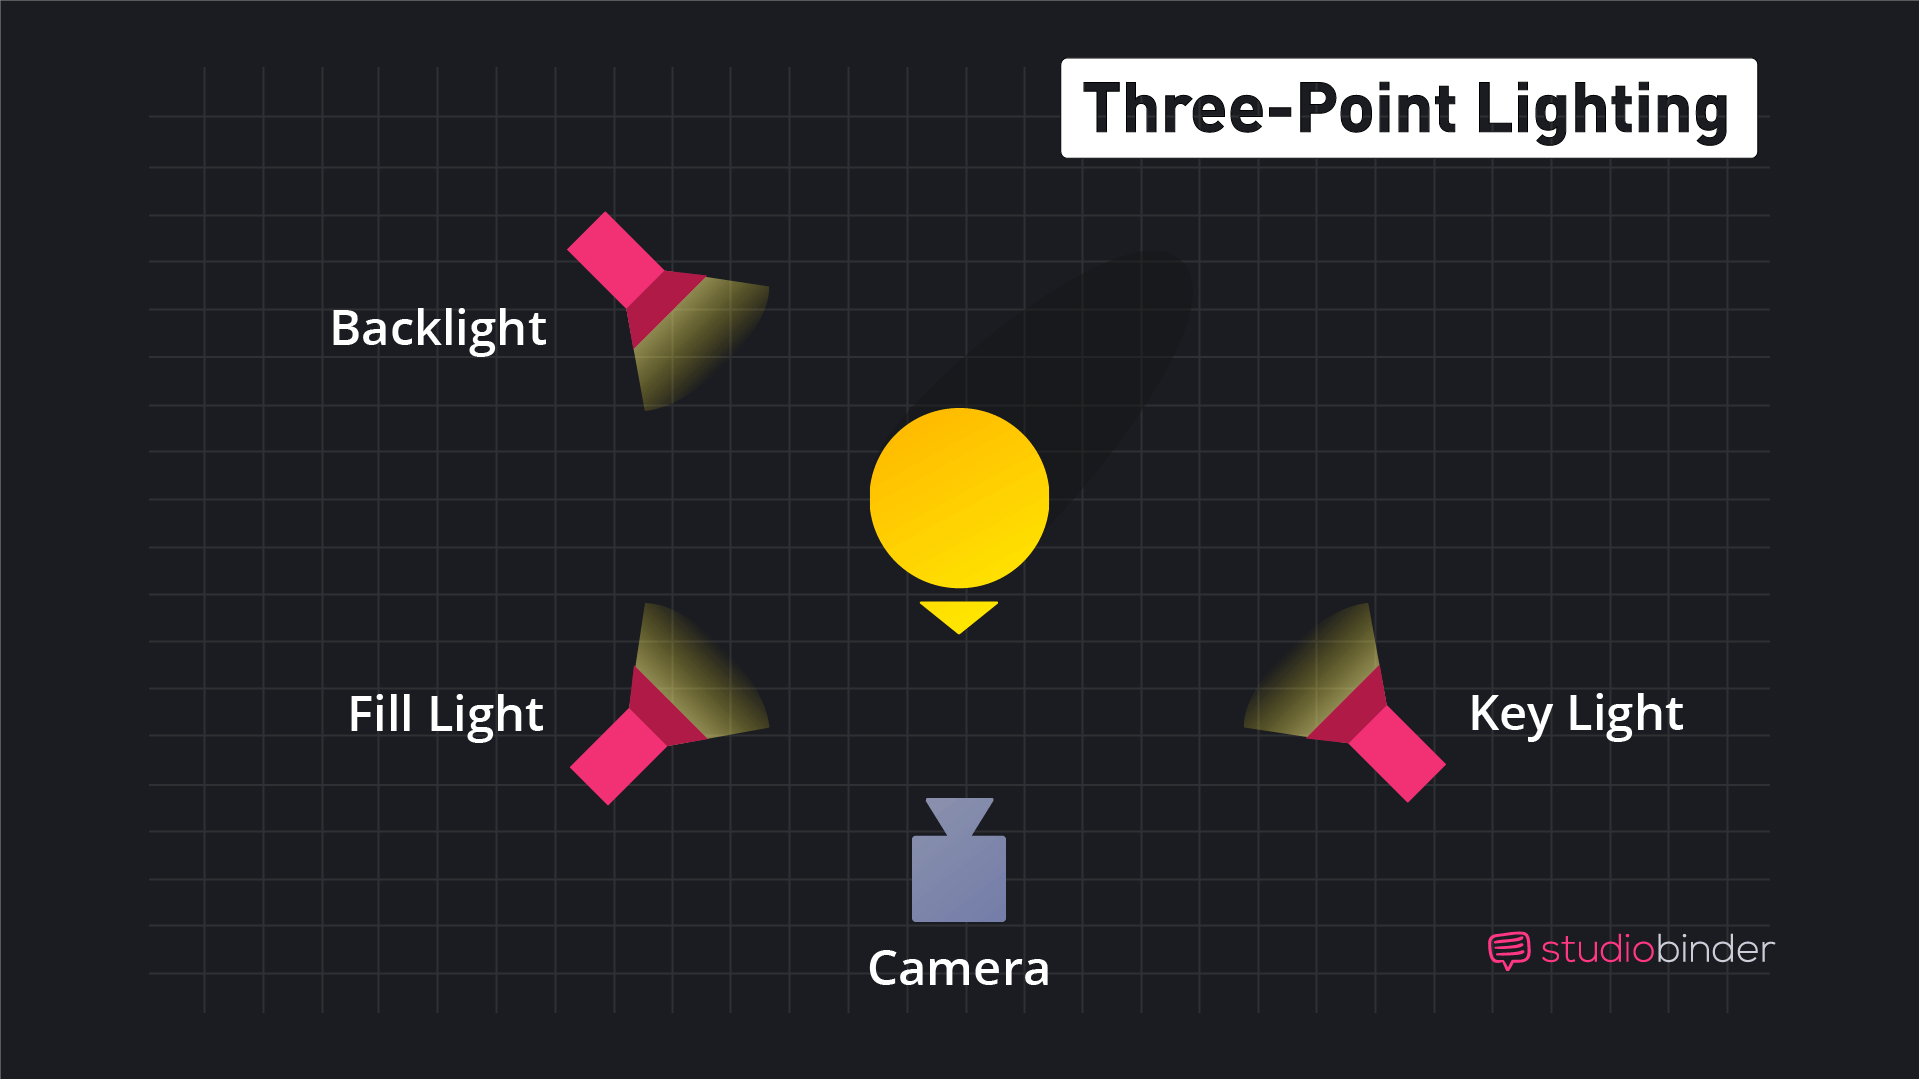
Each of these lights has a specific job. To understand their individual roles, let's turn to a detailed guide from StudioBinder.
Three-Point Video Lighting: Key, Fill, & Backlight Setup Guide
This article provides clear, concise definitions for each of the three lights in the setup. Focus on understanding the primary function and typical placement of each one.
Please read the following three sections: Under "Key Light Definition," read the description starting from the main definition and its placement. Under "FILL LIGHT DEFINITION," read the section explaining its purpose. Under "BACKLIGHT DEFINITION," read the description of how a backlight offsets the flattening effect of the front lights.
Now that you have the theoretical definitions, let's see this setup built in real-time. Watching a professional build the lighting from scratch is the best way to internalize how each light contributes to the final image. The following video from Damien Cooper provides an excellent step-by-step demonstration.
Cinematic Lighting 101: Three Point Lighting
This video demonstrates the practical application of three-point lighting in a cinematic interview context. Pay close attention to how the image changes as each light is added.
Watch these segments to see the process unfold: The Key Light : Observe how the main light is positioned to create shape and a pleasing look, and note the mention of "Rembrandt lighting," a classic and powerful style. The Back Light : See how the rim/hair light is added to separate the subject from the background. The discussion on "motivating" the light source with existing elements in the scene is a key professional technique. Fill and Negative Fill : This part explains how to either add light (fill) to soften shadows or subtract light (negative fill) to increase contrast and mood. Final Recap : A quick summary of how all the pieces work together.
As you can see, three-point lighting isn't a rigid rule, but a flexible framework. By adjusting the position and intensity of these three lights, you can create a huge range of looks, from bright and clean commercial aesthetics to dark and moody dramatic scenes.
2. The Quality of Light: Hard vs. Soft
Beyond the placement of lights, the quality of the light itself profoundly affects the mood and message of an image. The two primary qualities are hard and soft.
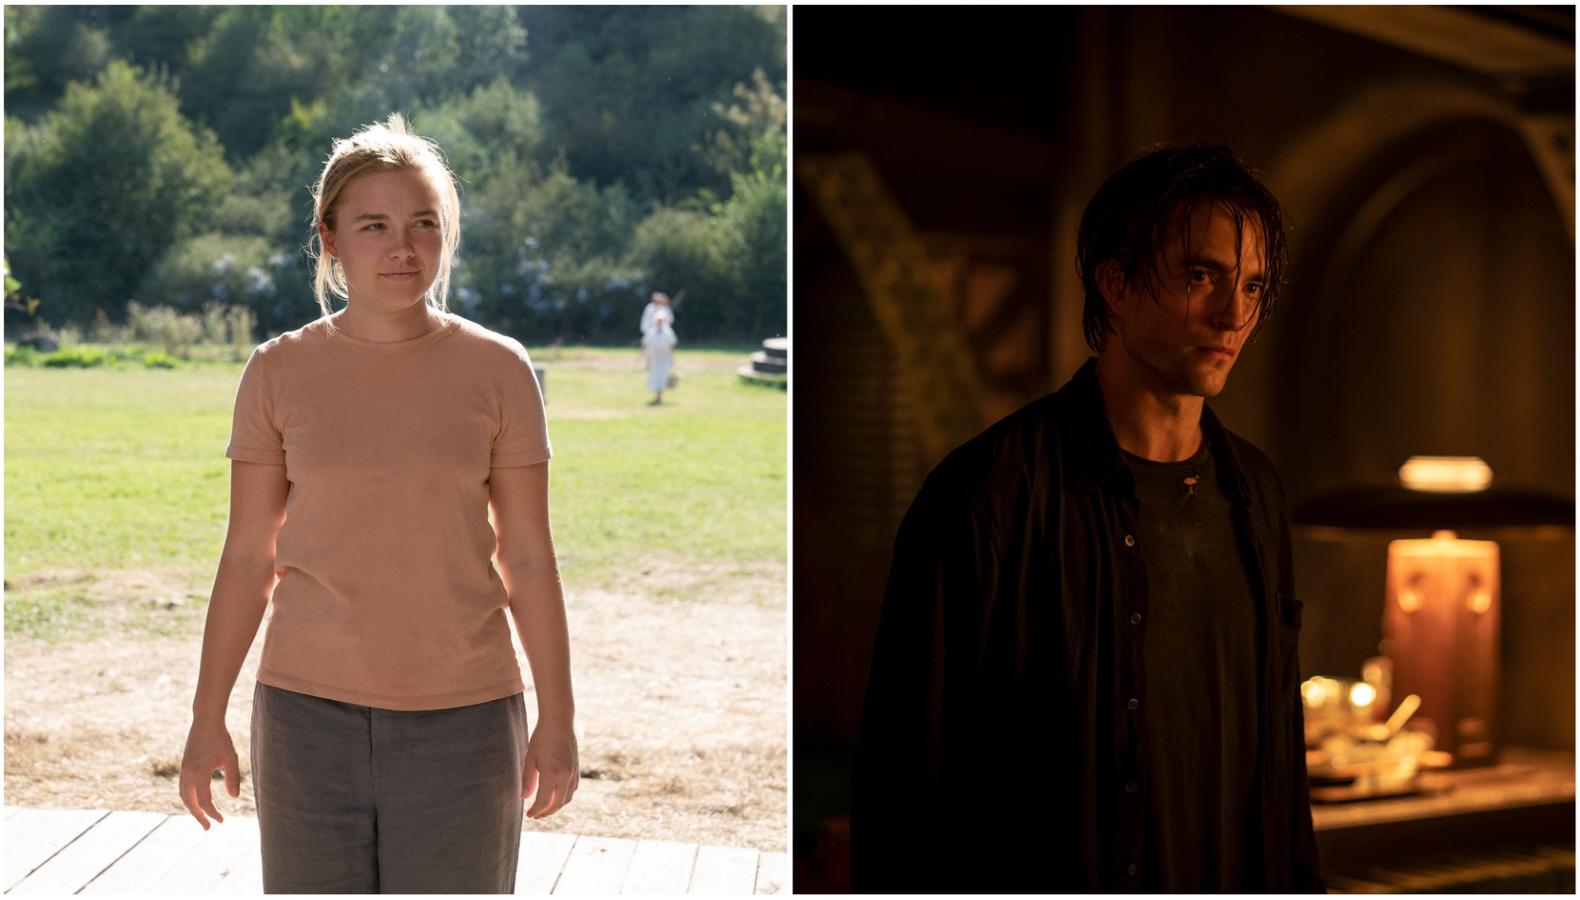
- Hard Light comes from a small, direct light source (like the sun on a clear day or a bare bulb). It creates sharp, clearly defined shadows and high contrast.
- Soft Light comes from a large, diffused light source (like an overcast sky or light shining through a sheer curtain). It wraps around the subject, creating soft, gentle shadows and lower contrast.
The image below shows a powerful comparison. On the left, the scene from Midsommar is lit with soft, natural light, creating an open and even look. On the right, the scene from The Batman uses hard light to create deep shadows and high contrast, resulting in a dramatic, tense, and gritty mood.
To dive deeper into how to create and use these lighting styles, watch this short, focused tutorial from FXhome.
What Is Hard Light and Soft Light? | Cinematography Lighting Tutorial
This video clearly defines hard and soft light and, most importantly, explains when to use each style to achieve a specific emotional effect.
Focus on these key segments: Hard Light : Understand its characteristics—crisp shadows and high contrast—and its use for creating a cinematic, intense look. Soft Light : Learn how it creates even, balanced illumination and how it can be achieved with diffusers or natural sources. When to Use Each : This is the most crucial part for your advertising work. It connects the lighting style to the desired audience perception: serious and dramatic versus warm and friendly.
To solidify your understanding, here are the text definitions from a cinematic lighting guide by Litepanels.
Film Lighting: A Cinematic Guide (w/ Free Lighting Plots)
These sections provide another perspective on the use of hard and soft light in professional filmmaking.
Read the two short sections under the "Types of Lighting" heading: First, read the description of hard light and its dramatic applications. Then, read the definition of soft light and its use for creating flattering and romantic moods.
In advertising, this choice is strategic. A skincare brand will almost always use soft, flattering light. A brand selling a rugged, durable tool might use hard light to emphasize texture and strength. Your choice of light quality directly supports the brand's message.
3. Practical Exercise: Sculpting Mood for an Ad
Now it's time to apply these principles. Your task is to generate two portraits for a fictional tech company's new laptop. The goal is to create two different moods for two different ad campaigns by only changing the lighting style. This will be an excellent portfolio piece demonstrating your control over atmosphere.
The Subject: A confident female software engineer in her late 20s, sitting in a minimalist, modern office.
-
The "Innovation & Collaboration" Ad (Soft Light - 20 minutes):
- Goal: Create an image for a campaign focused on teamwork, creativity, and user-friendliness. The mood should be approachable, bright, and optimistic.
- Prompt Strategy: Use keywords that specify a large, diffused light source.
- Example Prompt Keywords:
portrait of a confident female engineer, modern minimalist office, **soft flattering light**, **light from a large window**, bright and airy, no harsh shadows, welcoming expression, cinematic, commercial photography
-
The "Power & Performance" Ad (Hard Light - 20 minutes):
- Goal: Create an image for a campaign targeting power users, gamers, and developers. The mood should be intense, focused, and dramatic.
- Prompt Strategy: Use keywords that specify a smaller, more direct light source to create contrast and shadow.
- Example Prompt Keywords:
portrait of a focused female engineer, dark modern office, **dramatic hard lighting**, **high contrast**, **chiaroscuro**, strong shadows, **cinematic rim light** separating her from the dark background, intense expression, commercial photography
Generate both images. Compare them side-by-side. Notice how you, as the creative director, have crafted two entirely different brand messages simply by manipulating light.
Conclusion
In this lesson, you've unlocked the fundamentals of professional lighting. You now have a framework for adding dimension to your subjects and a palette for painting with mood and emotion.
Here are your key takeaways:
- The Three-Point Lighting setup uses a Key Light (main source), Fill Light (softens shadows), and Back Light (creates separation) to sculpt a subject.
- Hard Light creates sharp shadows and high contrast, evoking feelings of drama, intensity, and seriousness. It's ideal for edgy or powerful branding.
- Soft Light creates gentle shadows and low contrast, producing a flattering, natural, and friendly look. It's perfect for beauty, lifestyle, and corporate advertising.
- These terms are direct commands you will use in your prompts to control the look and feel of your AI-generated visuals.
We've learned how to place light and control its quality. In our final lesson for this foundational module, we will explore the last piece of the puzzle: color. You'll learn how to use color theory to evoke specific emotions and create visually harmonious palettes that align with a brand's identity.