Recommended resources
The freely available resources this lesson will direct you to.
Hello! In the previous lesson, you identified the cranium, jaw, centerline, and brow, nose-base, and chin landmarks on a reference. Now you’ll use those observations to build a front-facing head of your own. The aim is not a finished face: it is a proportionate, three-dimensional foundation that could later support a semi-realistic character portrait.
Allow about 40 minutes, with most of that time spent drawing in ibis Paint.
Build masses, not an outline
A head is easier to construct when you think of two connected masses: a rounded cranium and a facial-and-jaw form attached beneath its front. In a direct front view, much of their depth is hidden. You can still show that depth through the boundary between the front and side planes of the cranium, the way the face narrows toward the chin, and a small indication of the underside of the jaw.
Watch the first part of Easy Head Drawing Tutorial for Beginners (That Actually Makes Sense) by gwendolyn for this distinction between a cranial sphere and a facial form that wraps around it.
Easy Head Drawing Tutorial for Beginners (That Actually Makes Sense)
Watch gwendolyn explain why the first sphere represents the cranial mass rather than the entire head, and why the attached face must be imagined as a form with depth.
Watch the two masses. Focus on the warning against treating the face as lines merely hanging from the edge of a circle. You do not need the later feature-placement instructions for this lesson.
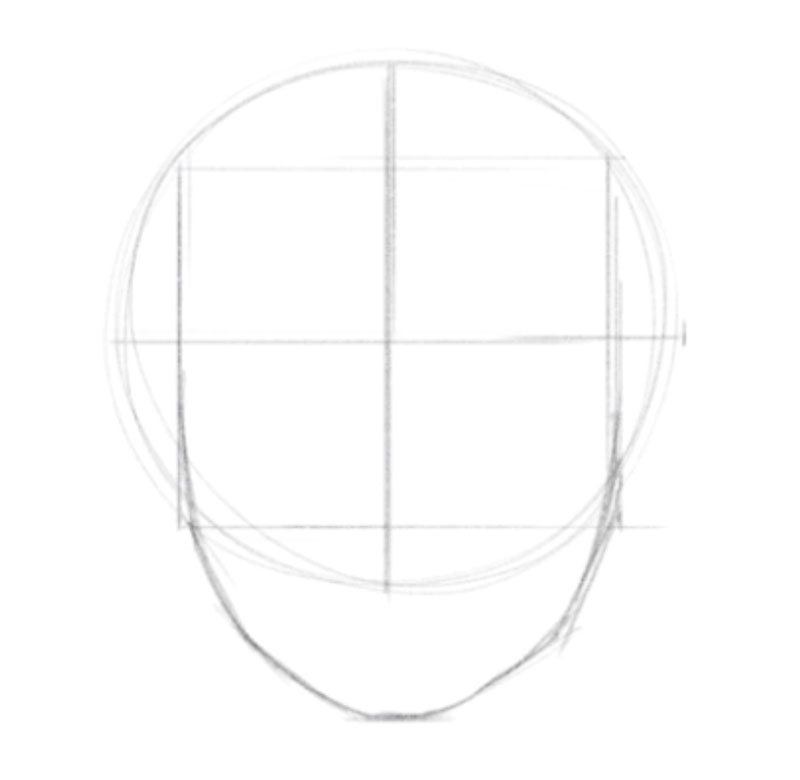
This sketch shows a useful early stage: a cranial circle, a central axis, horizontal guides, and a jaw narrowing toward the chin. Notice that the circle remains visible inside the developing head. It is scaffolding, not a contour to preserve everywhere.
Establish proportions before the jaw
For this study, construct a head facing directly forward, with no upward or downward tilt. Start with a light circle for the cranium. Imagine shaving a little off its left and right sides: the skull is rounded, but those flatter side planes prevent the face from looking like a ball with a pointed chin added to it. In a front view, keep the two side planes narrow and approximately balanced.
Draw a vertical centerline through the circle and extend it below. Place the brow line across roughly the circle’s center. This is a structural brow-ridge level, not a request to draw eyebrows. The centerline keeps both halves of your construction oriented together; the brow line establishes a level from which you can measure.
Watch how Proko develops these marks into a front-view head:
How to Draw the Head - Front View
In How to Draw the Head - Front View, Proko demonstrates the cranial ball, its flattened sides, and the measurements used to attach a jaw. Use the demonstration as a construction guide rather than a formula every face must obey.
Watch the cranium for the narrow side planes. Continue through the level brow; for today's straight-ahead head, notice where the brow crosses the circle. Finish with the proportions, paying particular attention to how the nose base and chin are measured before the jaw is finished.
Here is a practical way to repeat that measurement. If the circle’s height is , make the visible side-plane region about high, centered on the brow line. Half of that height gives you a convenient unit, . Mark the nose base about one unit below the brow and the chin another unit below the nose base. One unit above the brow gives an approximate hairline level—not the top of the skull or the top of a hairstyle.
The important comparison is that brow to nose base and nose base to chin are roughly similar distances in this starting construction. These are adjustable guides, not claims that all people have identical proportions.
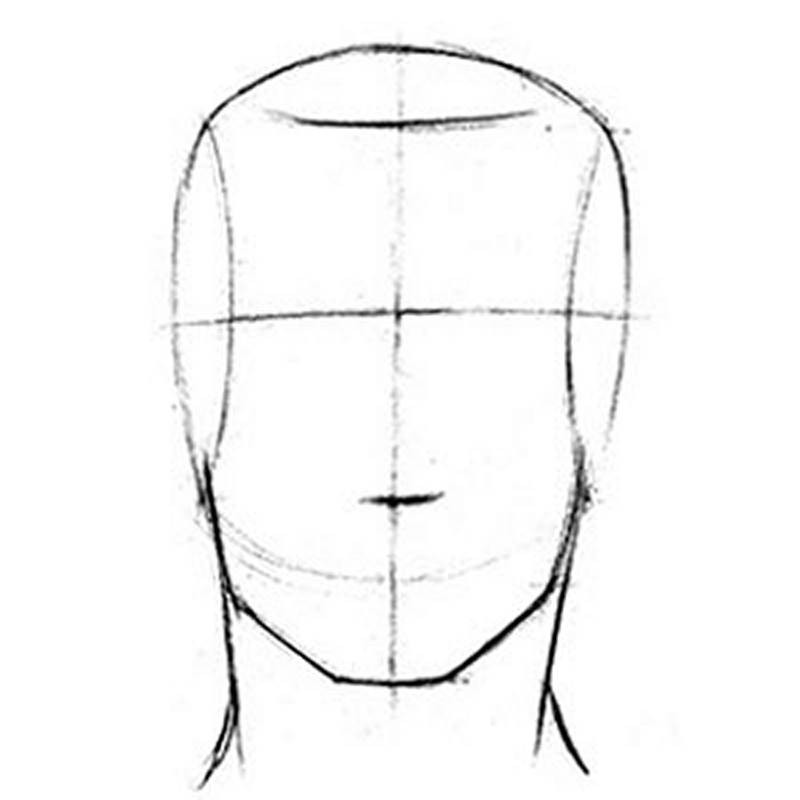
The sketch below shows how little detail is needed to make those decisions legible. Look at the inset boundaries of the side planes as well as the outer contour: they help separate the front of the head from its sides.
Attach a jaw that has volume
With the nose-base and chin levels marked, you can judge the lower face as a form rather than guess where a pointed outline should end. Lightly indicate the sides of the face beneath the cranium. Around the lower cheek and jaw region, change their direction inward toward a short chin width. The exact width and angle can vary, but avoid making both sides converge on a single sharp point unless that is a deliberate character-design choice.
Think of the front of the lower face as a shallow, tapering plane, with narrow planes turning away at its sides. A small, light line beneath the chin can suggest where its front turns underneath; it need not become a dark neck shadow. Keep the cranial circle and other guides faint enough that you can revise the attachment if the jaw looks pasted onto the ball.
At this stage, an identifiable nose, mouth, eyes, and ears would hide the problem you are trying to solve. The test is whether the blank construction already reads as a head with a believable upper mass, facial width, and chin position. Feature placement comes later.
Draw one front-view construction in ibis Paint
Use the canvas and brush setup from earlier lessons. Hide the previous reference-analysis marks if they compete with your new drawing, and make this construction on a separate sketch layer. Keep your earlier reference available for comparison, but begin with your own marks rather than tracing its contour.
Spend approximately 20–25 minutes on one head:
- Reserve space and draw the cranial ball. Make it large enough to adjust comfortably. Add the vertical centerline and a brow guide through approximately the circle’s midpoint. Keep both light.
- Suggest the side planes. Set an inset boundary on each side of the circle, spanning roughly the middle two-thirds of its height. Check that the front region has room to contain a face; do not let the side boundaries collapse into the centerline.
- Measure downward. Use the brow-to-nose-base distance as your unit, then repeat it from nose base to chin. Mark those levels across the front plane. Add the approximate hairline level above the brow if it helps you compare the thirds, remembering that the cranium continues above it.
- Attach the lower face. Indicate the cheek-to-jaw changes of direction and taper toward a chin with some width. Add only the lightest indication of the turn beneath the chin.
- Inspect the drawing without details. Temporarily hide your guides or lower their opacity. Does the skull seem large enough above the brow? Do the two sides belong to the same front-facing head? Is the chin centered beneath the facial centerline? Revise the large forms before restoring the guides.
If you finish early, make a small second construction with a slightly broader or narrower jaw, while leaving the cranial ball and landmark logic intact. This shows how a consistent structure can support different characters without relying on facial features.
For a final check, compare your drawing with the reference you analyzed last time. Look for differences in relationships—the relative size of cranium and jaw, the length of the lower face, and the width at the cheeks—rather than trying to copy its every edge. A sound construction can be adjusted to an individual head.
Takeaway
A front-view head starts with a rounded cranium whose sides turn away, a centered facial axis, measured brow–nose–chin levels, and a jaw attached as a tapering form, not merely a U-shaped line. Keep these decisions visible and revisable; they will do more for a believable semi-realistic portrait than early detail.
Next, you’ll turn the head to a three-quarter view, where these same forms and landmarks must remain coherent even though the two sides no longer look equal.