Recommended resources
The freely available resources this lesson will direct you to.
Hello! Last time, you built a front-facing head from a cranium, a facial centerline, measured landmarks, and an attached jaw. This lesson turns that construction to a three-quarter view. The challenge is not just making one side narrower: the brow, nose, and chin must still belong to the same head as its front plane turns away from you.
Allow about 40 minutes, with most of the time for a construction sketch in ibis Paint. Keep the facial features simple; their detailed forms come in the next module.
Turn the cranium, then find the face
Start with the same rounded cranium you used in the front view. In a three-quarter view, you can see more of one flattened side plane of the skull. The facial centerline no longer runs down the middle of the drawing: it curves across the visible front of the cranium, then continues down the face toward the chin.
Watch Quick Tips | 3/4 Head Proportions by Josh Papaleo for the construction in motion. Watch for how the side-plane oval, centerline, and brow guide work together rather than treating any one of them as an outline.
Quick Tips | 3/4 Head Proportions
Quick Tips | 3/4 Head Proportions by Josh Papaleo shows a head being built from a turned cranium through its major facial landmarks.
Watch the plane idea for the difference between the visible front and side of the head. In the construction, follow the side-plane oval, centerline, brow, nose, chin, and jaw; you can leave out the detailed eye and mouth marks for now. Finish with the overlap check, especially the reminder that a projecting nose may hide part of the far side of the face.
Imagine drawing a stripe down the front of a ball and rotating it. The stripe has not moved on the ball, but its position in your drawing changes. Similarly, a head turned toward the left side of your canvas has its facial centerline left of the cranium’s apparent middle. The visible side plane is on the right, toward the ear. If you draw a head facing right, reverse those positions.
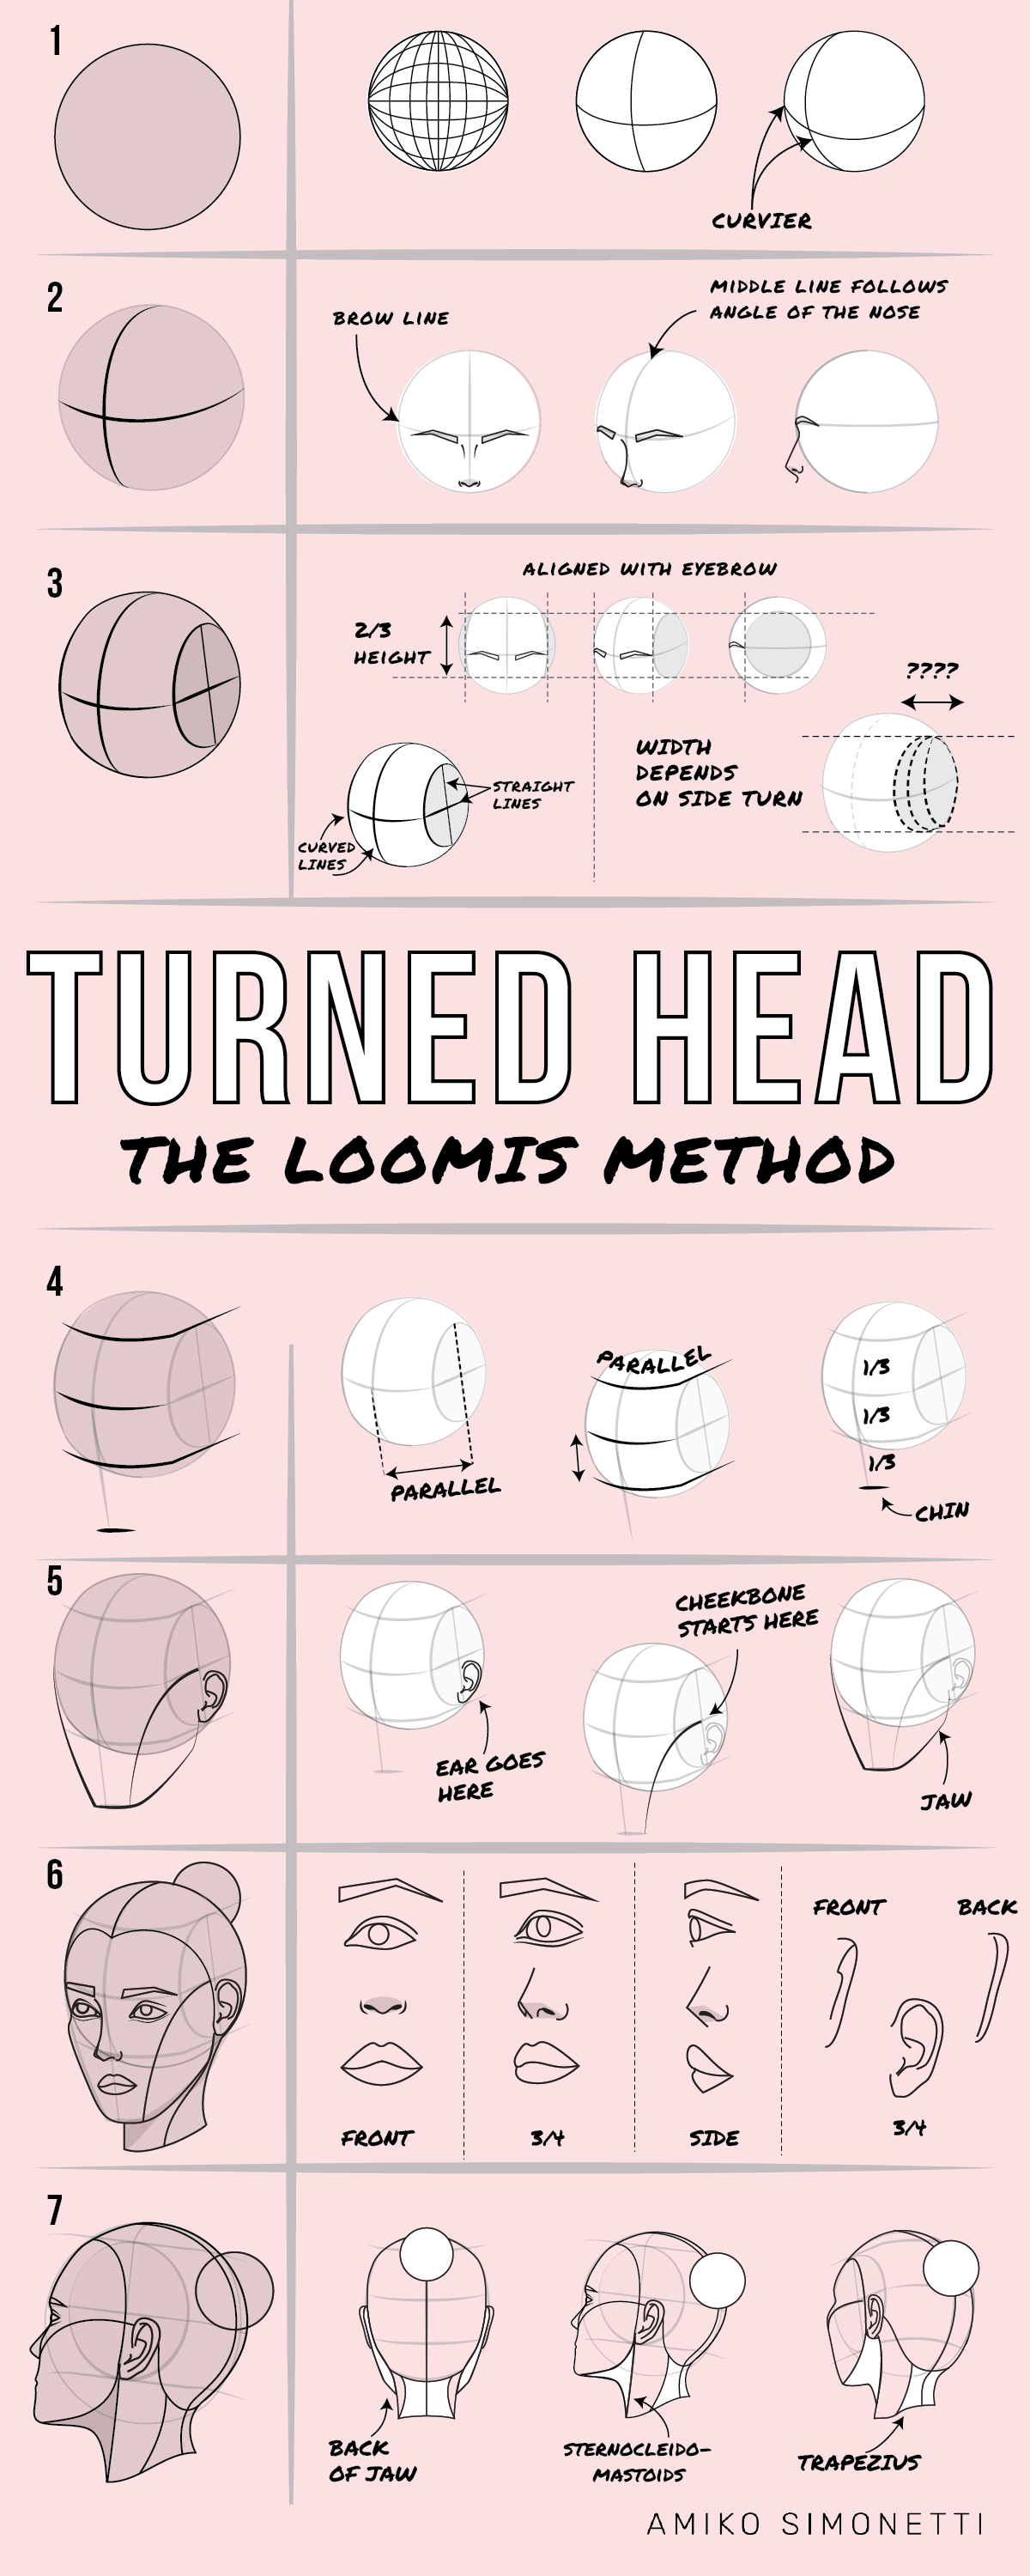
In the Turned Head infographic, look first at rows 1–3: the guide crossing the ball curves around it, while the oval identifies the flattened side plane. Rows 4–5 then show how those decisions give the lower face somewhere to attach. You do not need the finished features in rows 6–7 yet.
Keep the landmarks on one turned form
The hairline, brow, nose base, and chin remain useful landmarks from the front view. For a head that is turned but not looking markedly up or down, begin with roughly comparable hairline-to-brow, brow-to-nose-base, and nose-base-to-chin intervals. The hairline is a facial landmark, not the top of the cranium.
Read the short construction portion of How to Draw a Face from the 3/4 View (Loomis Method) by RapidFireArt. It connects these measured levels to the cheek, side plane, and jaw.
How to Draw a Face from the 3/4 VIEW (Loomis Method) | RapidFireArt
RapidFireArt’s construction guide shows where to carry the familiar front-view measurements on a turned head.
In “How to Draw a Face from the 3/4 View,” find the subsection “Locate The Facial Features.” Read the landmark construction, beginning where the author identifies the remaining hairline, nose, and chin levels and ending after the front and side of the lower face are distinguished. Focus on the repeated brow-to-nose and nose-to-chin measurement, then on the separate cheek and jaw edges.
Think of the brow and nose guides as lines crossing a surface, not rulers laid flat across the page. They meet the facial centerline at their respective levels and turn with the head toward the side plane. On this straightforward, untilted view, their overall directions should agree; one should not slope sharply against the others. The chin mark, meanwhile, belongs beneath the facial centerline—not beneath the center of the original circle.
The face also has unequal visible widths. A three-quarter turn exposes a broad near portion and compresses the far portion into a narrower strip; at some turns, the nose will overlap that far side. Do not “correct” the drawing back to two matching halves. Preserve the turn while keeping both halves attached to the same brow, nose, and chin levels.
The RapidFireArt construction image makes a useful second check. Its ear sits on the visible side plane, while the cheek and jaw bring that side of the cranium down toward the chin. The faint lines are scaffolding; the forehead-to-chin centerline and the jaw should agree about which way the head faces.

Construct one head in ibis Paint
Use your existing sketch brush and a separate sketch layer. Keep a three-quarter-view reference visible if you have one; if your earlier portrait reference faces forward, use the construction images above rather than trying to force that reference into a turn. Draw lightly enough to revise the large forms. Spend approximately 22–25 minutes on this sequence:
- Choose the turn and place the cranium. Draw a generous circle or ball. Decide clearly whether the face points left or right on your canvas. Add a lightly curved facial centerline over the front of the ball, offset toward that direction, and extend it below the ball.
- Expose the side plane. Add an oval on the opposite, visible side of the cranial ball. As a starting guide, make it about two-thirds of the ball’s height and center it around brow level. Its visible width depends on the degree of turn; avoid making it so wide that there is no room for the front of the face.
- Set connected levels. Carry the brow guide across the front of the ball toward the side-plane oval. Mark the hairline above it and the nose base below it, then repeat approximately the brow-to-nose-base distance to locate the chin. Let each guide respond to the turn rather than drawing unrelated horizontal strokes. Keep the head approximately level for this study; a strong upward or downward tilt would change the apparent spacing.
- Attach the lower face. Bring the facial centerline down to the chin. On the far side, indicate a short forehead-and-cheek edge. On the near side, let the cheek turn toward the jaw; take the jaw from beneath the side plane inward to a chin with some width. A small tick in the side plane between brow and nose levels can reserve space for the ear without drawing its details.
- Check the blank construction. Before adding anything else, briefly reduce the guides’ opacity. Does the cranium have room above the brow? Does the chin sit below the turned facial centerline? Do the cheek and jaw read as connected to the cranial ball rather than as a pointed shape pasted beneath it? Reinforce only the lines that answer those questions clearly.
If the blank head reads well, add small placement marks, not finished features: a nose-base mark where its guide meets the centerline and two simple eye-position marks along the brow region. Check that the far mark has less visible space and may be partly concealed by the future nose. Then stop. Rendering eyes, nose, and lips now would make structural problems harder to see.
Takeaway
A proportionate three-quarter head retains the front-view cranium and measured landmarks, but its centerline shifts and curves, one skull side plane becomes visible, and the far side of the face compresses. Keep the brow, nose base, and chin tied to that single turned form before adding features.
Next, you’ll check and correct proportion errors against a reference using canvas flip and ibis Paint’s selection and transform tools.