Recommended resources
The freely available resources this lesson will direct you to.
Hello! Last time, you prepared a portrait reference, canvas, and temporary layer in ibis Paint. Today you’ll use that setup to read the head beneath the visible features. Rather than drawing eyes or hair, you’ll mark the cranium, jaw, facial centerline, and three landmarks: the brow, base of the nose, and bottom of the chin.
These marks are a diagnostic map. They help you decide whether a head’s size, direction, and proportions make sense before you invest time in a semi-realistic character portrait. Allow about 40 minutes, including a short reference study.
Find the large head before the face
A portrait offers many tempting details, but the first distinction is between the cranium and the jaw. The cranium is the rounded mass above and behind the face. Hair can make its outline look larger, so estimate the skull beneath the hairstyle rather than treating every strand as part of the head’s structure. The jaw attaches beneath that mass, narrowing through the sides of the face toward the chin. Its contour may be softened by cheeks or lighting, but you can still look for where the face changes direction toward the chin.
In the image below, compare the photograph on the left with the structural drawing on the right. The drawing simplifies a particular head into a rounded upper mass and an attached lower form; it is an interpretation of structure, not a line-for-line tracing of every visible edge.
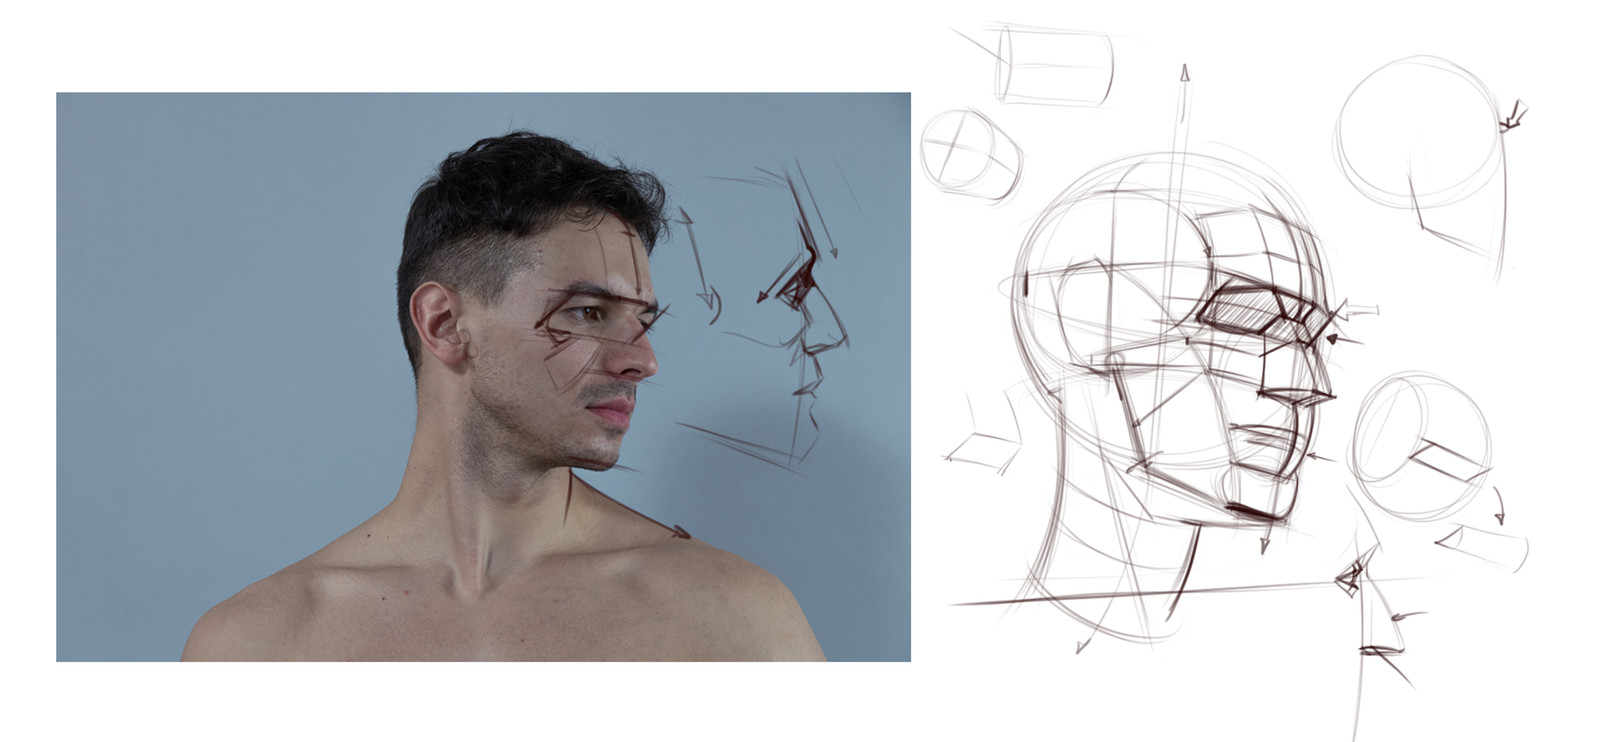
Watch how an artist makes those choices while looking at a reference. The useful question is not “Where would a perfect circle go?” but “What simple rounded mass best explains this head?”
How to Block-In the Head (HYBRID Method)
Watch “How to Block-In the Head (HYBRID Method)” by Proko to see large structural marks located and revised against a reference.
Watch the first block-in for the overall shape and brow, then the centerline for how the face’s direction is established. Continue with nose and chin to see those landmarks compared with the source. Finally, watch the revisions: pay attention to why changing the face width or chin early is more useful than defending the first sketch.
A light construction mark is a proposal, not a verdict. If the cranium seems too small once you locate the chin, enlarge it; if the jaw is too broad for the reference, narrow it. That willingness to revise is part of analyzing, not a sign that the analysis failed.
Place the centerline and three landmarks
The facial centerline tracks the middle of the front of the face. In a direct front view it runs roughly down the middle, between the brows and eyes, over the nose and mouth area, to the center of the chin. On a turned head, it shifts toward the side the face points to; it is not a line that divides the entire silhouette, hair included, into two equal halves. Treat it as a line laid over a rounded surface. It may change direction slightly as it passes from forehead to nose to chin.
Now locate three levels on that centerline:
- Brow: the brow-ridge region, around the level of the eyebrows—not the middle of the eyes.
- Nose: the base of the nose, around the nostrils—not the projecting tip or the bottom edge of a cast shadow.
- Chin: the lowest point of the chin itself—not where a neck shadow ends.
Mark each level first with a small tick where it meets the centerline. You can then extend a light guide across the face to check its direction. On a level, front-facing head the guides may look nearly horizontal. If the head is tilted or turned, let them follow what you observe instead of forcing them to be straight, parallel lines on the screen.
A construction method offers a useful starting check: the distance from brow to nose base is often roughly comparable to the distance from nose base to chin. The guide is not a measurement you must impose on every person. Individual proportions vary, and a tilted head or camera view changes apparent distances.
Proko - How to Draw the Head – Front View
Read Proko’s “How to Draw the Head – Front View” for a compact explanation of how cranium, jaw, centerline, brow, nose, and chin relate in a straightforward view.
In the subsection “Drawing the Head - Front View,” read from the front-view setup. Stop before the paragraph beginning “Before we add the thirds,” which turns to foreshortening. Focus on the order of the large shapes and on using the brow-to-nose and nose-to-chin distances as guides, then compare those guides with your actual reference.
Notice an important difference between finding a landmark and applying a proportion rule. You find the nose base by observing the reference. You use a proportion rule afterward to notice a surprising gap and look again. If the reference clearly has a longer lower face, keep that observation.
Mark your reference in ibis Paint
Use the clear front or mild three-quarter portrait you chose previously. For this study, a visible crown, both sides of the face where possible, and an unobscured chin matter more than dramatic lighting. You are making an analysis overlay, not starting a finished portrait.
If the image is in the Reference Window, you can make the marks on your Temporary marks layer beside it, comparing frequently. If you want to mark directly over the image, import a copy of the photo onto a layer below Temporary marks, leave your original photo unchanged, and draw only on Temporary marks. Hide Head study if its existing marks distract you. Lower the photo layer’s opacity only if your guide marks are difficult to see.
Spend roughly 12–15 minutes making one spare set of marks:
- Bracket the whole head. Identify its highest cranial point, widest upper mass, and lowest chin point. Look past the hair where you must estimate the skull.
- Outline the two large parts. Lightly wrap a rounded shape around the cranium. Indicate where the jaw leaves that upper mass, changes angle, and arrives at the chin. Do not chase every cheek contour.
- Draw the facial centerline. Follow the direction of the forehead, nose, and chin. Check it against the reference’s facial features, not against the center of the photo crop.
- Add three labeled ticks. Mark brow, nose base, and chin on the centerline. Extend short, light guides from them only as far as needed to compare their levels with the visible face.
- Compare and revise. Look at the photo again: Does your upper mass include the back of the skull? Does the jaw taper at the same rate? Are you marking the nose base rather than its tip? Change any mark that the reference contradicts.
If a landmark is obscured, use a lighter or broken line to show that you inferred it. That keeps observation separate from guesswork. You do not need to add eyes, lips, ears, or shading; they can serve as visual evidence without becoming part of this overlay.
Finally, hide the photo layer—or glance away from the Reference Window—and look at your marks alone. They should communicate a rounded cranium, an attached jaw, and the direction and main levels of the face. Restore the reference to make one last correction if needed. Save the study with your guide layer separate.
Takeaway
A useful head analysis is a small set of observable, revisable structural claims: where the cranial mass sits, how the jaw connects to it, which way the facial centerline turns, and where the brow, nose base, and chin fall. Proportion guides help you check those claims, but the reference has the final say.
Next, you’ll use these same parts to construct a front-view head from simple three-dimensional forms—moving from reading a reference to building a head of your own.