Recommended resources
The freely available resources this lesson will direct you to.
Hello! Last lesson gave you a small brush set and a way to make its strokes predictable. Now you’ll set up the space those brushes will work in: a portrait-sized canvas, an image you can consult without covering your drawing, and a few layers that let you experiment safely. Allow about 40 minutes, including time to build and test the setup.
The aim is not to produce a finished portrait today. It is to make the next head study easy to begin and easy to correct.
Choose a reference and create the canvas
Choose one clear portrait image for this study, ideally one you have permission to use. Look for a visible top of the head, chin, and sides of the face, with enough resolution to inspect their shapes. A straightforward front or three-quarter view is more useful for the coming construction lessons than a heavily filtered image or one with much of the face hidden. You can choose a more dramatic lighting reference later, when lighting becomes the focus.
In ibis Paint, create a new canvas from the gallery. A portrait ratio such as 1600 × 2000 pixels gives you room for the whole head and some surrounding space. If your device struggles with that size, 1000 × 1250 pixels preserves the same shape at a lighter workload. These are practical starting points, not required settings.
My TOP 10 ibisPaint X Tips in 2025!
Watch “My TOP 10 ibisPaint X Tips in 2025!” by Hanacue for a quick view of canvas creation and the drawing workspace.
Watch canvas setup. Notice the plus button for a new canvas and the position of the layer panel. The artist’s dimensions illustrate a choice of canvas shape; use dimensions appropriate to your device and this head study.
Leave enough blank space around where you expect to draw the head. Working right against the canvas edge can make it harder to judge the cranium and jaw together. You do not need to place any facial features yet.
Keep the reference visible without putting it in the artwork
For an observational study, the simplest arrangement is ibis Paint’s Reference Window. It floats over the workspace and can show your source image while your drawing remains on the canvas. This is different from importing the image as a painted layer: the window is for looking and comparing, not part of the artwork itself.
37. Display images to use as reference - How to use ibisPaint
Read the official ibisPaint guide to the Reference Window so you can set it up and recover it if it gets in your way.
In “37. Display images to use as reference,” begin with the opening explanation and the two modes. Continue through the instructions for enabling the window from the View menu, moving and resizing it, then read the import steps up to selecting an image from your Photo Library. In the following part of the same tutorial, read from the paragraph about the imported image through the notes on adding or removing references. Finish with the visibility controls, which explain how to close or temporarily hide the window.
Turn on Reference Window in the View menu, switch it to Reference Mode, and import your chosen portrait. Move the window by its move bar and resize it from a corner. Place it where it hides as little of your drawing area as possible; you can move it again whenever you need a closer comparison.
Check the mode if the window seems to show the wrong thing. Reference Mode displays the imported image; Canvas Mode displays a small view of your own artwork. Both are useful, but they answer different questions. The reference image in this window also does not become a layer in your canvas or travel with a shared artwork file, so keep access to the original image.
Build a small, temporary layer stack
A layer is a transparent surface you can draw on without changing marks on other layers. For this study, you need separation for two reasons: your head sketch should not alter a photo guide if you use one, and a temporary experiment should not force you to erase good marks underneath it.
05. About Layers - How to use ibisPaint
Read the official ibisPaint introduction to layers for the ideas of transparency, layer order, opacity, and the currently selected layer.
In “05. About Layers,” read the opening explanation from “Layers are an important aspect of digital art” through the separate sheets example. Continue from the paragraph beginning “The order of the layers is fixed” through the photo placement instructions. Below the layer illustration, read the opacity steps and their final warning about switching back to the drawing layer.
Start with this stack, listed top to bottom in the layer panel:
| Layer | Purpose |
|---|---|
| Temporary marks | An empty layer for trying a change without disturbing the study; hide it when you do not need it. |
| Head study | Your main drawing layer. Select this before you sketch. |
| Background | The white background already provided by the canvas. |
Add two transparent drawing layers above the background. If your version of ibis Paint allows you to rename them, use names such as those in the table; otherwise, remember their order. Make Head study the current layer. The empty temporary layer above it will not obscure anything, but selecting the wrong layer can still put your marks somewhere unexpected.
There is one useful alternative to the floating window: import a photo directly onto the canvas when you specifically want a faint guide beneath your drawing. In that case, place the photo layer below Head study and above Background. Lower the photo layer’s opacity until your own marks are easy to distinguish, then reselect Head study before drawing. A photo at full opacity can conceal layers below it. Use this underlay deliberately; for learning to judge proportions from observation, keeping the image beside the drawing is usually the better starting arrangement.
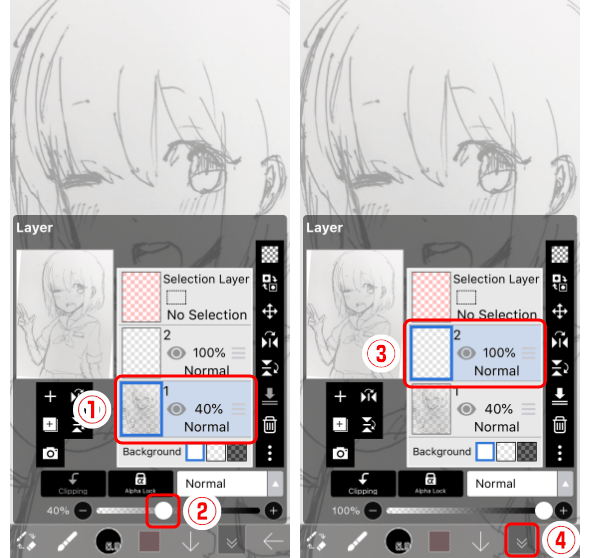
The pictured 40% is an example, not a universal setting. Lower a guide’s opacity only as far as needed to keep your new lines readable. Notice also that layer opacity changes the visibility of everything on that layer; it is not the same as the brush opacity control you used last lesson.
Test the arrangement before starting a head
Spend a few minutes checking the setup while mistakes are still cheap. With Head study selected, make a small oval and a centerline using your sketch brush. Confirm that the marks appear on that layer and that you can still see the reference. On Temporary marks, add a different small mark, then hide that layer. The first marks should remain while the temporary mark disappears.
If you chose the photo-underlay method, also toggle the photo layer’s visibility. Your drawing should remain on its own layer when the photo vanishes. If it vanishes too, undo if necessary and check which layer was selected when you drew.
Finally, leave Head study selected, clear your test marks if you want a fresh canvas, and make sure you can find the portrait image again. Save the working artwork and reopen it once to verify your canvas and layers are there. The Reference Window image may need to be available separately from the artwork.
Takeaway
You now have a canvas suited to a head study, a reference you can compare against your drawing, and a minimal layer stack with room for temporary changes. The most important distinction is reference beside the canvas versus photo guide inside the canvas. In either arrangement, check the current layer before drawing.
Next, you’ll use this setup to identify the cranium, jaw, centerline, and major facial landmarks in a head reference—without getting sidetracked by workspace controls.