Recommended resources
The freely available resources this lesson will direct you to.
Hi! In the previous lesson, you merged two branches on your own computer. Now you’ll put that Git history on GitHub, make a second local copy, and bring a GitHub change back down. This is the workflow you’ll use when sharing a GIS project or working across computers. Allow about 45–55 minutes.
One project, more than one copy
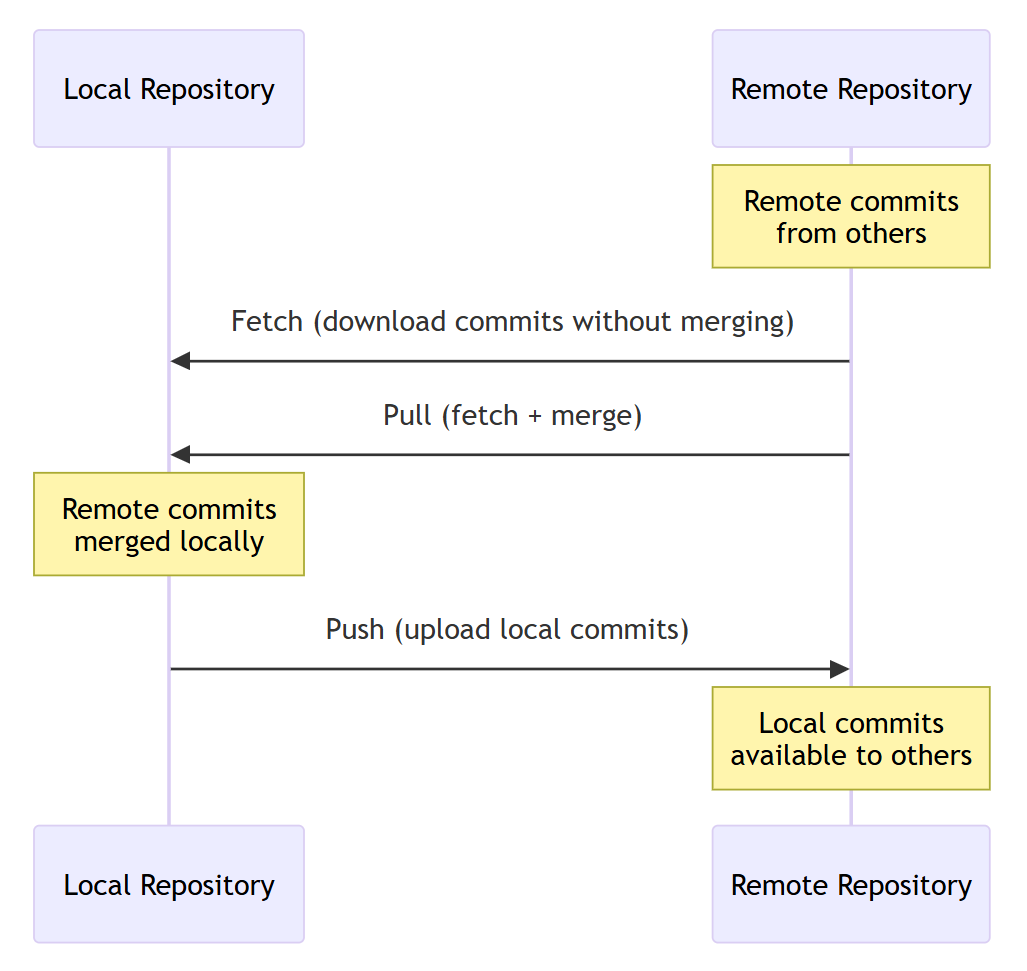
Git manages commits and branches. GitHub hosts a repository that other computers can access. A repository on GitHub is called a remote; origin is the conventional short name for its URL.
The three commands have different jobs:
git clonemakes a new local repository from a remote one.git pushsends local commits to the remote.git pullgets remote commits and integrates them into your current local branch.
A commit is still local until you push it. Conversely, a change committed on GitHub will not appear in a local working folder until you pull it.
Watch
How to Clone, Push and Pull with Git for Beginners | VS Code
Watch CBT Nuggets’ clone, push, and pull demonstration to see what changes on each side of the connection.
Watch the clone to see a new folder appear, the push to see a local commit appear on GitHub, and the pull to see a GitHub commit arrive locally. Use the PowerShell commands below rather than copying the presenter’s interface clicks.
GitHub’s Getting changes from a remote repository provides the command-line explanation. In “Cloning a repository,” read from “To grab a complete copy…” through the explanation of the local remote-tracking branch. Then read the complete “Pulling changes from a remote repository” subsection; focus on why committing local work before a pull is sensible.
Getting changes from a remote repository - Using Git
Read GitHub Docs’ explanation of cloning and pulling alongside the hands-on workflow.
In “Cloning a repository,” start at the clone explanation; it continues past the example command and GitHub’s Code menu to describe the local copy. In “Pulling changes from a remote repository,” read the pull guidance, including its warning about uncommitted work.
Publish the repository you already have
Open the repository from the previous lesson—gis-shell-lab or gis-shell-lab-2—in VS Code. Use its PowerShell terminal at the repository root:
Get-Location
git status
git branch --show-current
git remote -v
Check the folder and branch carefully. Finish any uncommitted changes to tracked files before continuing. Untracked files you deliberately left alone will not be included in the push; do not use git add . just to make the status output look empty.
If git remote -v already lists origin, stop before adding another remote. Check where it points; the setup below assumes this local repository has no remote yet.
Save the path and branch name for later in this same terminal session:
$source = (Get-Location).Path
$branch = git branch --show-current
$source
$branch
Sign in to GitHub in your browser and create a new repository. A name such as gis-shell-lab-remote is fine; choose another if it is unavailable. Choose Private for this practice repository unless you are ready for anyone to see its contents. Do not initialize it with a README, .gitignore, or license: your local repository already has commits, and an empty GitHub repository is simpler to connect. Before publishing any repository, check that its committed files contain no passwords, tokens, private location data, or other information you should not upload.
On the new repository’s page, copy its HTTPS URL from “Quick setup.” Once the repository has files, you can also find that URL under Code → Local → HTTPS:
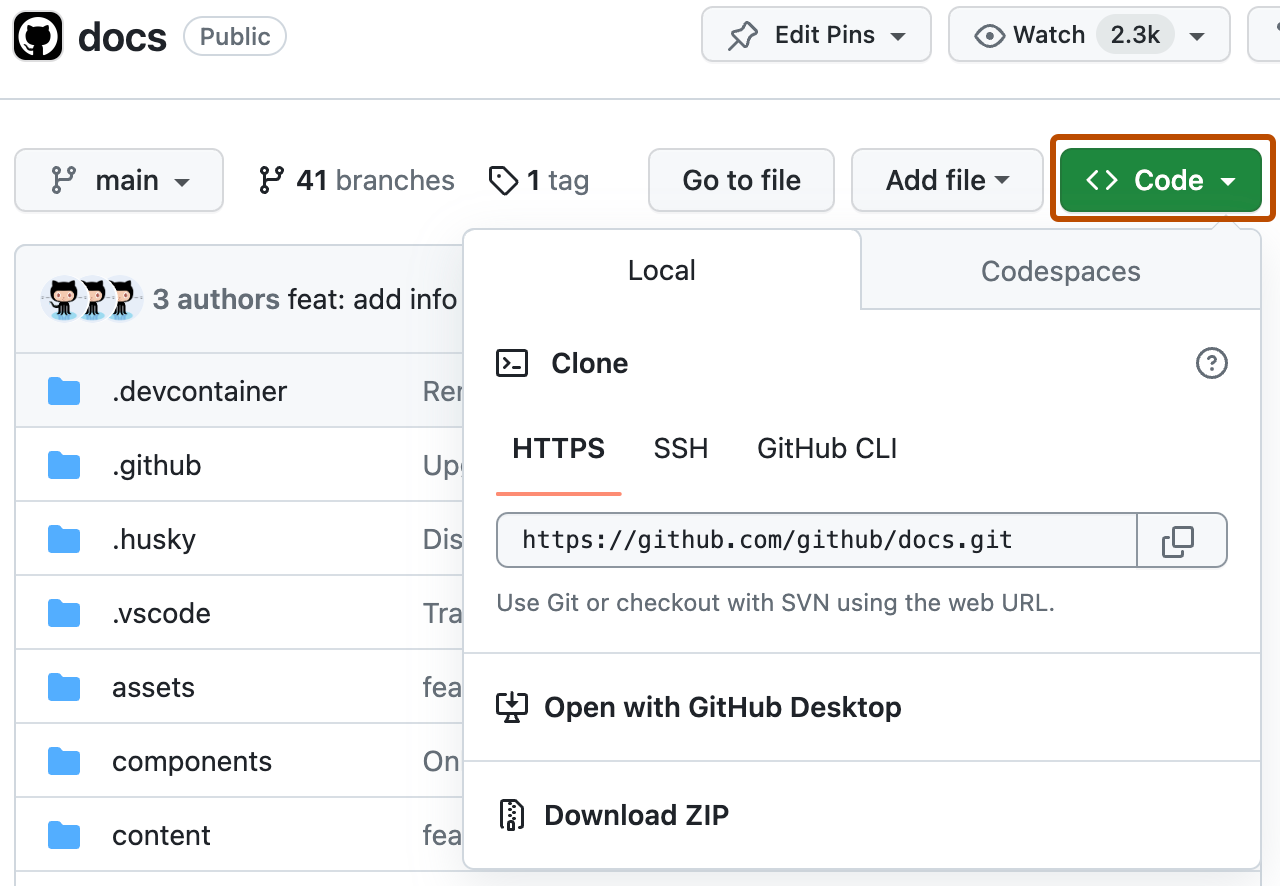
In the following command, replace the example URL with the HTTPS URL you copied. Do not put your password or a token in the URL.
$remoteUrl = "https://github.com/YOUR-USERNAME/YOUR-REPOSITORY.git"
git remote add origin $remoteUrl
git remote -v
The displayed fetch and push URLs should identify your new repository. Now publish the branch you were working on:
git push -u origin $branch
git status
The -u establishes an upstream: it associates your local branch with its GitHub counterpart, allowing a later plain git push or git pull to know which branch you mean. If Git opens a browser sign-in window, complete the GitHub authentication there. Your GitHub account password is not something to type into a Git password prompt; if authentication fails, read the error and check that you are signed into an account with access to this repository.
Refresh the repository page on GitHub. You should see your committed project files and commit history, including the merge from last lesson. If a file was merely untracked or modified but never committed, it will not appear: push sends commits, not every file in the folder.
Clone it into a second folder
A clone is a new repository folder, not a way to refresh an existing one. Keep your original folder; do not delete it as the video demonstrator deletes theirs.
From the same PowerShell session, move to the original folder’s parent directory and clone into a distinctly named sibling folder:
Set-Location (Split-Path -Parent $source)
git clone $remoteUrl gis-github-clone
Set-Location .\gis-github-clone
git status
git branch --show-current
git remote -v
git log --oneline -3
The clone should be on the branch you pushed, and git remote -v should show origin without your having to add it: cloning configures that connection. If git branch --show-current shows an unexpected branch, pause rather than making changes on the wrong one. Open gis-github-clone as a separate VS Code folder if you want to inspect its files visually.
You now have two local folders containing the project. Changes made in one do not magically appear in the other. GitHub is how you will transfer the next changes between them.
Pull a change made on GitHub
In your browser, return to the GitHub repository. Confirm its branch selector shows the branch you pushed. Use Add file → Create new file to add remote-map-note.txt with this single line:
Map QA: check clinic markers at multiple zoom levels.
Choose Commit changes and commit directly to that same branch, rather than proposing a pull request. GitHub’s button wording may vary slightly. This browser action creates a commit on GitHub; it does not create a file in either local folder yet.
Back in the PowerShell terminal, confirm you are in gis-github-clone and that you have no uncommitted tracked changes. Then pull:
Get-Location
git status
git pull origin $branch
Get-Content .\remote-map-note.txt
You should now see the note in the clone. In this controlled example, the clone had no competing local commits, so the update should integrate without a conflict. In general, a pull may require you to resolve a conflict, just as your local merge did last lesson. If Git reports one, inspect git status and resolve it rather than repeatedly running pull.
Push from the clone, then update the original
Make one small checkpoint in the clone. Create a new file, inspect it, and commit only that file:
Set-Content .\field-checklist.txt "Confirm clinic marker visibility before publishing a map."
git status
git diff --no-index -- /dev/null .\field-checklist.txt
The last command is optional inspection and may behave differently on Windows; if it reports a path error, simply inspect the file with Get-Content .\field-checklist.txt. Then commit and push:
git add .\field-checklist.txt
git diff --staged
git commit -m "Add clinic map field checklist"
git push
The plain git push works because the clone has an upstream branch configured. Refresh GitHub: both remote-map-note.txt and field-checklist.txt should now be present.
Finally, return to your original repository. It has neither of those new commits yet:
Set-Location $source
git status
git pull origin $branch
Get-Content .\remote-map-note.txt
Get-Content .\field-checklist.txt
git status
If you restarted PowerShell and lost $source or $branch, reopen the original repository folder in VS Code and set $branch = git branch --show-current there before pulling. Do not run git clone inside the original repository to update it; pull updates an existing local copy.
What to carry forward
You connected an existing local repository to GitHub with git remote add origin, published commits with git push -u origin, created a second local copy with git clone, and brought GitHub commits into local folders with git pull. Before any push, check what you committed; before any pull, check your current folder, branch, and uncommitted work.
Next lesson, you’ll make the project easier for another developer to understand and use by organizing its folders and adding a practical .gitignore and README.