Recommended resources
The freely available resources this lesson will direct you to.
Hi! Your repository is now on GitHub, and you’ve practised moving commits between two local copies. The next step is to make the repository understandable to someone opening it for the first time. In about 45–50 minutes, you’ll organize a small GIS practice project, tell Git which local files to ignore, and write a README that accurately describes what exists today.
Give each file a clear home
A useful folder structure answers a practical question: Where should I look for the data, documentation, and application code? There is no need to create every folder your future full-stack application might use. Start with what this project has now, then add a frontend folder when you begin building web pages in the next module.
Watch Tech With Tim’s How To Structure A Programming Project… for a demonstration of separating project concerns without filling the repository root with files.
How To Structure A Programming Project…
Tech With Tim’s How To Structure A Programming Project… shows how a project can stay navigable as it grows, then discusses what its documentation should tell a newcomer.
Watch folder structure for the distinction between a project root and folders for particular kinds of work. Then watch documentation for the purpose of a README. You do not need to copy the presenter’s exact folders.
For your current practice repository, this is enough:
repository root/
├── README.md
├── .gitignore
├── docs/
│   ├── map-plan.md
│   ├── remote-map-note.txt
│   └── field-checklist.txt
└── data/
    └── sample/
        └── clinics.csv
The two .txt files are the notes you created in the previous lesson. Your repository may contain other earlier practice files; keep them. The layout above shows what you will organize or add today, not an instruction to delete everything else. data/sample is for small, shareable examples—not private records or large datasets.
Organize the files you already have
Work in the original repository folder you used at the end of the previous lesson. Open it in VS Code and check its PowerShell terminal:
Get-Location
git status
git branch --show-current
git ls-files -- remote-map-note.txt field-checklist.txt
Confirm that this is the intended repository and branch. If git status shows unfinished edits, deal with those before reorganizing. The last command should list the two notes if they were committed in the previous lesson.
Create folders for documentation and sample data:
New-Item -ItemType Directory -Path .\docs, .\data\sample -Force
Move the tracked notes into docs:
git mv -- remote-map-note.txt docs/remote-map-note.txt
git mv -- field-checklist.txt docs/field-checklist.txt
git status
If one of those notes does not exist or is not tracked, skip its move; do not invent a replacement merely to match the diagram. Later, omit that note from your README as well. git mv records the old path’s removal and the new path’s addition for the next commit. Git may display this as a rename.
Now create docs/map-plan.md in VS Code with a modest plan, such as:
# Clinic map plan

Purpose: practise building a web map using fictional clinic examples.

Current data: data/sample/clinics.csv contains names and cities only.
It does not contain map coordinates or real clinic records.

Future work: add a web page and, later, spatial data and an API.
Create data/sample/clinics.csv with this content:
id,name,city
1,Sample Clinic A,Pune
2,Sample Clinic B,Jaipur
3,Sample Clinic C,Kochi
These are fictional examples, not verified clinic locations. The CSV gives you a small file to document and keep under version control; it is not yet a mappable spatial dataset. You’ll study spatial data formats later.
Git tracks files rather than empty folders. Creating data/sample alone would not make it appear in a commit; adding clinics.csv gives the folder a place in the repository.
Decide what not to commit
Development also produces files that should stay on your computer: logs, installed dependencies, Python virtual environments, and local configuration containing credentials. A root-level .gitignore contains patterns telling Git not to offer untracked matching files for a normal commit.
Watch DevOps Journey’s Learning Git - How to use the gitignore file for the basic pattern syntax and the important exception for files Git already tracks.
Learning Git - How to use the gitignore file
DevOps Journey’s Learning Git - How to use the gitignore file demonstrates file patterns, directory patterns, and what happens when a file was committed before an ignore rule was added.
Watch ignore patterns, focusing on the log and virtual-environment examples. The presenter uses git add . while demonstrating; for this project, you will stage named files instead. Then watch tracked files to see why adding an ignore rule alone does not stop tracking an existing commit.
GitHub’s documentation confirms where to put the file and explains the already-tracked case. Its example uses touch, which you do not need to run in PowerShell; create the file using VS Code instead.
Read GitHub Docs’ “Ignoring files” to connect the demonstration to Git’s behaviour in a shared repository.
Under “Configuring ignored files for a single repository,” read the opening paragraphs beginning “You can create a” and ending with the recommendation for common configurations; focus on placing and committing the root-level ignore file. Then read the tracked-file warning immediately below the creation steps. The document’s touch instruction is for a different shell.
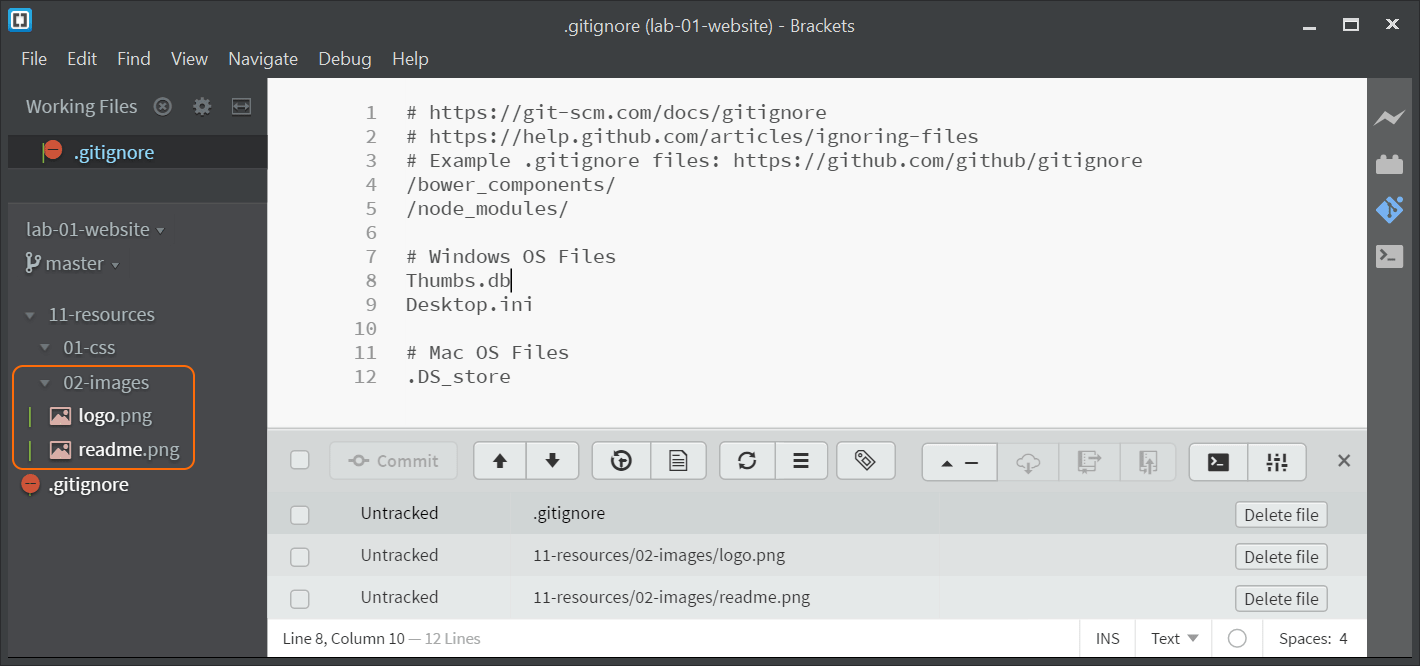
Here is an example of an ignore file open in an editor. Notice that having a .gitignore does not mean all untracked files are ignored: the image files shown remain untracked because the displayed rules do not exclude them.
In VS Code, create a file named .gitignore at the repository root—not inside docs or data—and enter:
# Local configuration; never store real credentials here
.env
.env.*

# Generated development files
*.log
.venv/
node_modules/
__pycache__/
*.pyc

# Data that must stay local
/data/private/

# Windows-generated file
Thumbs.db
The patterns have different scopes. *.log matches filenames ending in .log. A trailing / denotes a directory; .venv/ and node_modules/ exclude such directories wherever they appear below this ignore file. The leading / in /data/private/ anchors that rule to the repository root. The .env rules cover a local configuration file and names such as .env.local.
Do not ignore all CSV or GeoJSON files: a small, permitted sample dataset can be part of a reproducible GIS project. Conversely, never assume .gitignore makes private data safe. Review files before committing, and do not put real secrets into the repository.
You can test the rules with harmless temporary files. First make sure files with these names do not already exist, then run:
Set-Content .\.env.lesson-test "DEMO_ONLY=true"
Set-Content .\lesson-local.log "Temporary test"
git check-ignore -v -- .env.lesson-test lesson-local.log
git status --short --untracked-files=all
git check-ignore -v should show which rule matched each temporary file. Neither test file should appear as an untracked candidate in git status, while data/sample/clinics.csv should. Remove the test files afterward:
Remove-Item .\.env.lesson-test, .\lesson-local.log
An ignore rule does not untrack a file already committed. If you discover an already-tracked file that should become local-only, GitHub Docs shows git rm --cached FILENAME for stopping future tracking while leaving your working copy in place. Do not run it on the sample CSV or today’s notes. More importantly, if a real password or token was ever committed or pushed, removing the file from the latest commit does not erase it from earlier history; treat that credential as exposed and replace it.
Write the project’s front door
GitHub displays a root-level README.md prominently. A useful README says what the project currently does, what is in its folders, and how someone can inspect it. Avoid installation instructions for an API or web app you have not built.
Create README.md at the root in VS Code. If one already exists, edit and preserve it instead of overwriting it. Adapt this example to the files that actually exist in your repository:
# GIS Shell Lab

A practice repository for learning Git and preparing a small web GIS project.
There is no runnable map or API yet.

## Repository contents

- `docs/map-plan.md`: purpose and planned next steps.
- `docs/remote-map-note.txt` and `docs/field-checklist.txt`: map review notes.
- `data/sample/clinics.csv`: fictional clinic names and cities for practice.
- `.gitignore`: rules for excluding local and generated files.

## Explore the sample on Windows

Clone the repository from its GitHub page, open the folder in VS Code,
and run this in its PowerShell terminal:

    Get-Content .\data\sample\clinics.csv

The sample has no coordinates and does not represent verified clinic locations.

## Next step

Build a simple web page for the project, then add spatial data as the
course progresses.
Omit the two note entries if you did not have those files to move. A README is a description, not a wish list presented as completed work. That distinction will matter when this repository becomes a portfolio project.
Check the checkpoint before publishing
Inspect what Git sees:
git status --short --untracked-files=all
git diff --staged --stat
The moves made with git mv may already be staged. Stage the four files you created by naming them explicitly:
git add -- README.md .gitignore docs/map-plan.md data/sample/clinics.csv
git status
git diff --staged --stat
git diff --staged -- .gitignore README.md docs/map-plan.md data/sample/clinics.csv
Check that the staged list contains only files you intend to share. In particular, the temporary .env.lesson-test and log file should be gone, and no private dataset should be staged. If the staged changes are correct:
git commit -m "Organize GIS practice repository and document sample"
git status
git push
Refresh the repository on GitHub. Check that the README is visible, docs and data/sample contain the expected files, and .gitignore is committed. Your other local clone will not gain this commit automatically; it will need a pull when you next use it.
What to carry forward
You’ve given documentation and shareable sample data clear locations, used .gitignore to keep common local files out of new commits, and written a README that tells the truth about the project’s present state. The final git status and staged diff were as important as the folder names: they let you verify what you were about to publish.
This finishes the developer-setup module. Next, you’ll begin HTML and CSS and give the project its first web page; that is when a folder for frontend code will become useful.