Recommended resources
The freely available resources this lesson will direct you to.
Hello! In our last lesson, we constructed a wide and harmonically rich supersaw base by layering oscillators and manipulating unison settings. While the sound is big, it's also a raw, untamed wall of frequencies. Today, we'll take the crucial next step in sculpting that raw material into a distinctive lead sound.
This lesson focuses on the filter, arguably the single most important tool for defining a synthesizer's character. Our goal is to move beyond simply using a low-pass filter and instead learn how to select a specific filter type—be it a low-pass, high-pass, or something more exotic like a formant filter—to achieve a desired sonic outcome, and be able to justify that choice. This is the core of intentional sound design.
The Filter's Role: From Subtractive to Creative Shaping
At its heart, filtering is a subtractive process. You start with a harmonically rich source (like our supersaw) and carve away frequencies to shape its tone. Think of it as sculpting: our supersaw is a block of marble, and the filter is our chisel.
Before we dive into different filter types, let's establish a common language for the main controls you'll find on most of them:
- Cutoff: The frequency at which the filter begins to act. This is the primary control for shaping the sound's brightness.
- Resonance (Res): A narrow boost in volume right at the cutoff frequency. Low resonance provides gentle shaping, while high resonance creates a whistling, "squelchy" sound that can emphasize the filter's movement. Be mindful that high resonance can also reduce low-frequency content.
- Drive: This control increases the input gain of the signal going into the filter, often causing saturation or distortion. It's a great way to add warmth, aggression, and harmonic complexity directly at the filter stage.
The following video provides an excellent overview of the fundamental purpose of filters and a tour of these core controls.
Complete Guide To Master Serum 2— EP4: Filters for Pro Level Sound Design
The video "Complete Guide To Master Serum 2— EP4: Filters for Pro Level Sound Design" by Zen World starts with a great explanation of why we use filters and then details the most common types.
First, watch the brief introduction explaining the purpose of filters. Then, watch the detailed breakdown of the low-pass filter and its main controls—Cutoff, Resonance, and Drive. Pay close attention to the visualizer to see how each knob affects the frequency spectrum.
The "Workhorse" Filters: LP, HP, and BP
These three filter types form the foundation of subtractive synthesis. You'll use them constantly for fundamental tonal shaping. Let's load up the supersaw patch you designed in the last lesson and apply these filters to understand their purpose.
1. Low-Pass (LP) Filters: Taming and Warming
A low-pass filter allows low frequencies to pass through while cutting off high frequencies.
- Sonic Goal: To control brightness, add warmth, or make a sound feel less aggressive and more "rounded." In a dense DnB mix, a low-pass filter is essential for preventing a lead from sounding overly harsh or clashing with the cymbals.
- Justification: Choose a low-pass filter when your raw sound has too much high-frequency energy ("fizz") and you need to make it sit more comfortably in the mix.
However, not all low-pass filters are created equal. Serum offers several "flavors," each with a unique character. This is a crucial detail for intentional sound design.
This section from the article "25 Essential Serum Sound Design Tips" by CFA-Sound explains the subtle but important differences between Serum's various low-pass filter models.
Read tip #10, "GET THE RIGHT LOWPASS FILTER." As you read, consider the descriptive words used for each filter type: "analog-ish," "distinctive," "shimmer." This will help you build a mental model for when to choose one over the other. For instance, the "French LP" might be a great choice for a liquid DnB lead where you want a bit of shine, while the "German LP" could be better for a grittier dancefloor lead.
2. High-Pass (HP) Filters: Creating Space
A high-pass filter does the opposite of a low-pass: it lets high frequencies through and cuts the lows.
- Sonic Goal: To remove low-end "mud" and prevent a lead from clashing with the kick drum and sub-bass.
- Justification: In DnB, the low-frequency spectrum is sacred ground for the kick and bass. Choose a high-pass filter for your lead to ensure it occupies the mid and high frequencies, maintaining mix clarity and punch. A common technique is to apply a gentle high-pass filter to most melodic elements.
3. Band-Pass (BP) Filters: Focus and Movement
A band-pass filter is effectively a low-pass and high-pass filter working together, allowing only a specific "band" of frequencies to pass through.
- Sonic Goal: To create a focused, "mid-rangey" or telephone-like sound, or to generate sweeping textural effects when the cutoff is modulated.
- Justification: Choose a band-pass filter when you want your lead to have a very specific, narrow frequency character, or when the primary goal is to create a sweeping "wah-wah" effect with modulation.
To see these workhorse filters in action, let's return to the Zen World video.
Complete Guide To Master Serum 2— EP4: Filters for Pro Level Sound Design
This segment provides clear demonstrations of the High-Pass and Band-Pass filters.
Watch the section covering the High-Pass and Band-Pass filters. Notice how the high-pass thins the sound out, and the band-pass creates a more focused tone.
Character Filters: Injecting Personality
Now we move into filters whose primary purpose is less about simple tonal balance and more about imparting a unique, complex character to the sound.
Formant Filters: The Human Touch
Formant filters are designed to simulate the resonant peaks of the human vocal tract, creating vowel-like sounds.
- Sonic Goal: To give your lead a vocal, "talking," or "growling" quality. This is a hallmark of many expressive lead styles, including those from artists like Fox Stevenson.
- Justification: Choose a formant filter when you want your lead to sound less like a traditional synthesizer and more like an organic, expressive voice. Modulating the
Cutoffknob will shift between vowel sounds (e.g., 'a-e-i-o-u'), creating dynamic, speech-like patterns.
The resources below offer a comprehensive look at how formant filters work and how to use them effectively in Serum.
Using Formant Filters for Seriously Precise Vocals
This article from Unison.audio provides a clear explanation of what formant filters are and how to apply them in synthesis.
Read the sections "What Exactly Are Formant Filters?" and "Synthesizer Sound Design." This will give you the theoretical foundation and a practical application specifically for synthesizers like Serum.
Now, let's see and hear this in Serum.
Complete Guide To Master Serum 2— EP4: Filters for Pro Level Sound Design
Zen World's video demonstrates Serum's Formant filter.
Watch the segment on Formant filters. Listen for the distinct "hey-yo" vowel sounds as the cutoff is swept. This is the core character you're aiming for when you select this filter type.
Comb, Flanger, and Phaser Filters: Metallic Textures & Sci-Fi Sounds
These filters create their character by introducing a series of sharp peaks and notches into the frequency spectrum. They are less about natural-sounding results and more about creating complex, often metallic or "phasey" textures.
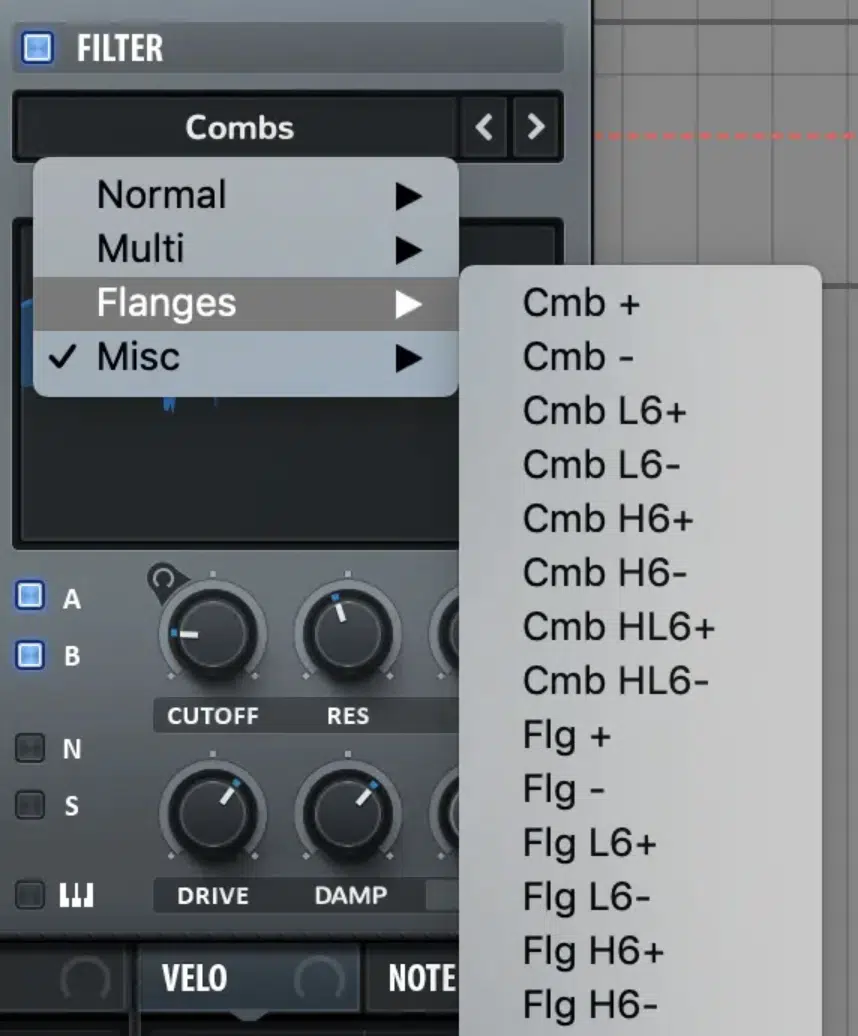
- Sonic Goal: To create metallic, robotic, resonant, or sci-fi textures.
- Justification: In genres like Neurofunk and dancefloor DnB, these filters are key for designing aggressive, futuristic sounds. Choose a comb or flange filter when you want to transform your source sound into something entirely new and complex, rather than just shaping its existing tone. Be aware of the trade-off: as the video below mentions, these filters can sometimes reduce the perceived "power" or fundamental weight of a sound in exchange for adding interesting character.
Complete Guide To Master Serum 2— EP4: Filters for Pro Level Sound Design
This section of the Zen World video dives into the more experimental filter types.
Watch the overview of the Flange, Comb, and Phaser filters. The key insight here is that these are tools for adding "interesting tones" and are particularly well-suited for genres like Drum & Bass.
Advanced Workflow: Dual Filters and the FX Rack
As an experienced Serum user, you can leverage more advanced routing to achieve highly complex and controlled results.
1. Dual Filter Routing (Serial vs. Parallel)
Serum's two filter slots can be run in series (one after the other) or in parallel (side-by-side).
- Serial (
Filter 1 -> Filter 2): This is for multi-stage processing. A classic use case is to use Filter 1 as a High-Pass to clean up the low end, and then send that signal into Filter 2 as a Low-Pass for melodic shaping. - Parallel: This allows you to blend two different filter characteristics. For example, you could send your supersaw through a standard Low-Pass in Filter 1 and a Formant filter in Filter 2, then use the filter mix control to blend the two characters.
The following video demonstrates a powerful, practical example of serial routing.
Complete Guide To Master Serum 2— EP4: Filters for Pro Level Sound Design
This part of the video showcases a professional sound design workflow using dual filters.
Watch the segment from "a good like practical example". The producer creates a unique bass by sending a textural oscillator through a High-Pass filter (Filter 1) and then into a Low-Pass filter (Filter 2), while routing a separate sub oscillator only to Filter 2. This is a perfect demonstration of intentional design: using one filter for cleanup and texture, and another for body and warmth.
2. Using the Filter in the FX Rack
Sometimes, you might want to use the main filter for a purely timbral effect (e.g., setting a Comb filter to a static position for a metallic tone) but still need a traditional filter for dynamic shaping (like a low-pass sweep).
In this case, you can use the Filter effect in the FX Rack. This acts as a post-processing filter, leaving your main filter free for creative sound design. This decouples the core timbre from its articulation, a very powerful workflow concept.
Conclusion
We have transformed our understanding of the filter from a simple "brightness" knob into a powerful sound design module for defining character. By making a conscious choice of filter type, you dictate the fundamental nature of your lead sound before any modulation or effects are even applied.
Key Takeaways:
- Justify your choice: Select a filter based on a specific sonic goal. Use a Low-Pass for warmth, a High-Pass for clarity, a Formant filter for vocal character, and Comb/Flange filters for complex textures.
- Flavors matter: Not all filters of the same type sound the same. Experiment with Serum's different LP models (
German,French, etc.) to find the character that fits your track. - Advanced Routing: Use Serum's dual filter architecture and the FX filter to create complex, layered, and highly controlled sounds.
In our next lesson, we'll address the next dimension of our sound: time. We have a harmonically rich, filtered, but static patch. We will learn how to design an amplitude envelope (ADSR) to give our lead a dynamic shape, turning it into a punchy pluck, a sustained note, or a percussive stab.