Hello! Welcome back.
In our last lesson, you began the crucial process of risk assessment by applying Failure Mode and Effects Analysis (FMEA) to your linear motion system. You identified potential failure modes for key components and calculated a Risk Priority Number (RPN) for one of them, turning a general sense of risk into a prioritized list.
Today, we move to the most important part of the FMEA process: taking action. Merely identifying risks is not enough; a professional engineer must propose and document solutions to mitigate them. This lesson directly addresses the learning outcome: Propose and document mitigation strategies for the highest-risk failure modes. Completing this step demonstrates a proactive approach to design robustness, a skill highly valued in industry and a great addition to your portfolio.
1. The Goal of Mitigation: Reducing the RPN
After calculating the RPN for various failure modes, your FMEA table will highlight the highest-risk items. The primary goal of mitigation is to take action to lower these high RPNs to an acceptable level. Since RPN is a product of Severity, Occurrence, and Detection (), you have three levers you can pull:
- Reduce Severity (S): This is the most desirable but often the most difficult action. It involves a fundamental design change that reduces the impact of the failure. For example, adding a mechanical stop to prevent a catastrophic collision.
- Reduce Occurrence (O): This is the most common and practical approach. It involves design changes that make the root cause of the failure less likely to happen. Examples include using a stronger material, adding a fillet to reduce a stress concentration, or increasing a factor of safety.
- Improve Detection (D): This involves implementing better inspections or tests to catch the failure before the product is finalized. Examples include adding an FEA simulation to your workflow, performing a physical load test, or specifying a more precise measurement technique during assembly.
There is a clear hierarchy of preference: Design the risk out (reduce S or O) before you resort to just testing for it (improve D).
The following video provides a simple, real-world example of this thought process.
Mastering FMEA | Failure Modes and Effects Analysis Explained | Lean Six Sigma| Anexas | FMEA Guide
This video from Anexas explains how to formulate recommendations based on high RPNs. It clearly states the goal of reducing risk and then applies it to a relatable example.
First, watch from 07:12 to 08:20 to understand the primary goals of your recommended actions (reducing S, O, or D). Then, watch the practical example from 08:20 to 13:36. Notice how the 'Recommended Actions' for the highest RPNs aim to reduce the occurrence of the cause or improve its detection.
2. Documenting Actions and Measuring Success
A key part of the FMEA process is documenting your proposed actions and tracking their effectiveness. In a standard FMEA template, you add columns for:
- Recommended Action(s): A specific, actionable task (e.g., "Add 3mm fillet to inner corner of motor bracket").
- Responsibility & Target Date: Who is responsible for the action (in this case, you as the Design Engineer) and the deadline.
- Actions Taken: A summary of what was actually done.
- New S, O, D, and RPN: After the action is implemented, you re-evaluate the risk ratings.
The goal is to show a tangible reduction in the RPN, demonstrating that your mitigation strategy was successful.
The video below quickly shows what this "after" state looks like on the FMEA document.
FMEA, the 10 Step Process to do an FMEA (PFMEA or DFMEA)
Let's revisit the CQE Academy video. This segment focuses on the final step: taking corrective action and documenting the results.
Watch from 18:28 to 20:34. Focus on how the FMEA template includes columns for recommended actions and the 're-ranked' RPN. This shows the 'before and after' of your risk mitigation efforts.
Here is an image of a completed DFMEA for a ballpoint pen. Notice how it captures the full loop from initial risk to final, reduced risk.
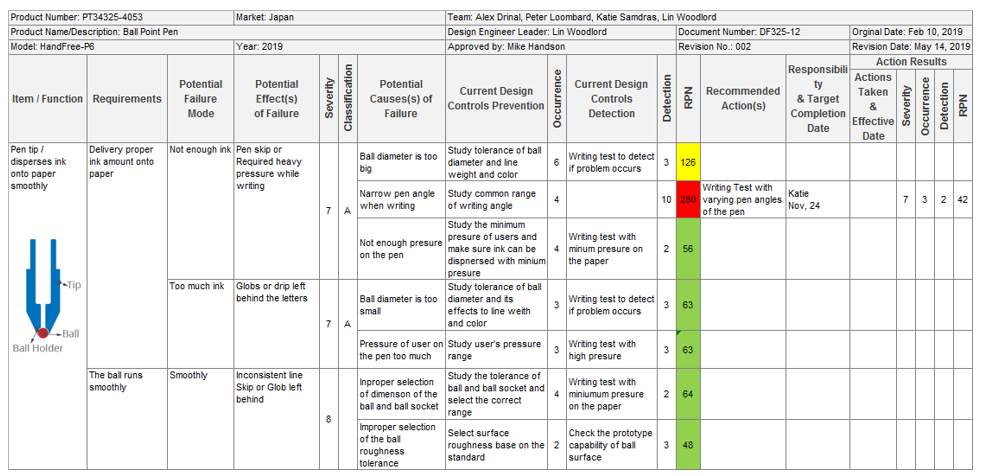
3. Brainstorming Strategies for Your Linear Motion System
Now, let's make this concrete for your project. To brainstorm effective mitigation strategies, it helps to consult industry knowledge about common failures. The following article details common problems and fixes for linear guides—a perfect resource for our FMEA.
Top 10 Linear Guide Problems and Fixes
This article from IMTEK is a practical guide to troubleshooting linear guides. We can use it as a source of inspiration for both identifying failure modes and, more importantly, finding effective mitigation strategies.
Scan through this article, paying special attention to the tables: 'Common Failure Symptoms Table': Use this to confirm or inspire failure modes. 'Quick Fix and Maintenance Actions': The 'Preventive Action' column is a direct source of mitigation strategies. 'Factors That Shorten Linear Guides Life': The 'Prevention' column here also lists powerful actions to reduce the occurrence of failures.
Let's walk through an example using this resource. Suppose in your FMEA you identified a risk related to contamination.
- Component: Guide Rail & Bearing Block
- Potential Failure Mode: Grinding feel during motion, premature wear.
- Potential Effect(s) of Failure: Loss of positioning accuracy, eventual seizure of the axis.
- S: 7 (significant loss of primary function)
- Potential Cause(s) of Failure: Dust/chips from the environment enter the bearing block.
- O: 6 (assuming a typical home workshop without special dust control)
- Current Controls: Standard seals on the bearing block.
- D: 4 (standard seals are good, but may not be perfect against fine dust over time)
- Initial RPN: (This is a notable risk.)
Now, we add Recommended Actions based on the IMTEK article and our own engineering judgment:
- Action to reduce Occurrence: "Design and add protective bellows or a simple sheet metal cover over the guide rail to prevent contaminants from reaching it." (Inspired by 'Add covers or wipers' from the resource).
- Action to improve Detection: "In the user manual, specify a weekly maintenance schedule to wipe down and inspect the rails for signs of contamination."
Now, we re-rank the RPN for each proposed action:
- After Action 1 (Bellows): The Severity (7) and Detection (4) remain the same, but the bellows make contamination far less likely. We can confidently lower the Occurrence to 2.
- New RPN: . A significant reduction!
- After Action 2 (Inspection): The Severity (7) and Occurrence (6) remain, but the weekly check makes it very likely we'll spot contamination early. We can lower the Detection to 2.
- New RPN: . Also a good reduction.
This analysis shows that designing a physical barrier (Action 1) is more effective at reducing the overall risk than simply adding an inspection task (Action 2), reinforcing our S-O-D hierarchy.
Test your understanding!
A high RPN is caused by a Severity of 9, an Occurrence of 5, and a Detection of 4 (RPN = 180). Your team proposes a design change that will reduce the Occurrence to 2 but requires a complex new manufacturing step. Another proposal is to implement a new, highly accurate automated inspection system that will reduce the Detection to 1. Which action is generally preferred from a design philosophy standpoint, and why?
Show answer
The action to reduce the Occurrence is generally preferred. Even though the new RPNs are close (S=9, O=2, D=4 -> RPN=72 vs. S=9, O=5, D=1 -> RPN=45), the philosophy of FMEA prioritizes prevention over detection. Reducing the likelihood that the failure cause occurs in the first place creates a more robust and inherently reliable design. Relying on inspection means the problem is still occurring; you're just getting better at catching it, which is less ideal.
4. Your Task: Finalize the Risk Analysis for One Failure Mode
It's time to close the loop on your FMEA.
- Return to the DFMEA table you started in the previous lesson. Identify the failure mode that you analyzed and gave the highest RPN.
- Add the following columns to your table:
Recommended Action(s),Responsibility,Target Date,Action(s) Taken,New S,New O,New D,New RPN. - For your highest-risk failure mode, brainstorm and document at least two potential mitigation strategies in the
Recommended Action(s)column.- One action should aim to reduce Occurrence (O).
- Another action should aim to improve Detection (D).
- For each action, fill out the rest of the row:
- Assign 'Design Engineer' as the Responsibility.
- Set a realistic Target Date.
- Estimate the New O or New D that would result from the action. (Severity usually stays the same unless the action specifically targets the failure effect).
- Calculate the New RPN.
- Briefly state which of your proposed actions you believe is the more effective solution and why.
This completed analysis for a single, critical failure mode is an excellent piece of documentation for your project portfolio. It shows the full cycle of identifying, analyzing, prioritizing, and solving a potential design problem.
Conclusion
In this lesson, you've moved from risk analysis to risk mitigation—the most critical output of the FMEA process. You now have a framework for not just finding potential problems but for systematically developing and documenting solutions to make your design more robust.
Key Takeaways:
- The goal of FMEA is to drive action to reduce risk.
- Mitigation strategies should be prioritized to reduce Severity, then Occurrence, then improve Detection (S > O > D).
- Documenting recommended actions and re-calculating the RPN is essential to demonstrate the effectiveness of your design improvements.
- Industry resources and practical experience are invaluable for brainstorming effective, real-world mitigation strategies.
Preview of the Next Lesson:
Your FMEA, including the mitigation strategies you just developed, is a key design decision document. In the next lesson, we will focus on how to summarize key design decisions, analysis results, and solutions for the project. This will prepare you to structure a professional design review and communicate the value of your engineering work effectively.