Hello! Welcome back to our module on Design for Manufacturing and Assembly.
In our last lesson, you learned how to apply Design for Manufacturability (DFM) principles to individual parts made from sheet metal and casting. We focused on part-level details like bend radii, draft angles, and uniform wall thickness. Today, we're going to zoom out from the single part to the entire assembly.
Our learning outcome for this session is to apply techniques for part count reduction and component standardization in an assembly. These two principles are cornerstones of Design for Assembly (DFA), a methodology that aims to simplify product structure to reduce cost, assembly time, and potential errors. For a design engineer building a portfolio, demonstrating an ability to design efficiently at the assembly level is just as important as designing a high-quality individual part.
1. From DFM to DFA: A Shift in Perspective
While DFM focuses on making one part easy to manufacture, DFA focuses on making the entire product easy to assemble. Often, the most effective way to simplify assembly is to reduce the number of parts that need to be assembled in the first place.
Let's begin by watching a short video that introduces the concept of Design for Manufacturing and Assembly (DFMA) and highlights the central role of part count reduction.
DFM Lecture 3: DFMA Principles
The video 'DFM Lecture 3: DFMA Principles' provides a great introduction to the overarching theme of DFMA and shows why Design for Assembly (DFA) is a critical first step.
Please watch the following two segments: 01:25 - 02:08: This section introduces DFMA and immediately shows a graphical example of dramatic part count reduction. 11:21 - 13:38: This segment explains why DFA is considered a prerequisite to DFM and lists its core principles, including reducing part count and standardizing parts.
As the video explains, DFA comes before DFM in the ideal workflow because the assembly structure determines which parts exist. There's no point in optimizing the manufacturing of a part that you are about to design out of existence. This leads to a powerful mantra in the field: "The cheapest component is one that does not exist."
2. The Golden Rule: Minimum Part Criteria
"Reduce part count" is easy to say, but how do you do it systematically? The core of the DFA methodology is a simple, repeatable test called the Minimum Part Criteria. For each part in an assembly, you ask three questions:
- During the product's operation, does this part move relative to all other parts already assembled?
- Must the part be made of a different material or be isolated from all other parts (for reasons like electrical insulation or heat resistance)?
- Must the part be separate to allow for assembly or disassembly of other parts, or to allow for service and maintenance?
If the answer to all three questions is "no," then the part is a prime candidate for elimination or consolidation with another part.
To see this logic in action, let's watch a video that applies these three questions to a simple, everyday product.
WHAT IS DFMA/DFA (DESIGN FOR ASSEMBLY)
The video 'WHAT IS DFMA/DFA (DESIGN FOR ASSEMBLY)' by ENGINEERING SPIRIT does an excellent job of walking through the three elimination questions using a tea set as an example.
Watch from 01:47 to 06:37. Pay close attention to how the ear of the teacup is analyzed against the three questions, identified as a 'suspect component,' and then redesigned to be integrated into the cup itself.
This systematic process transforms part-count reduction from a vague goal into a structured engineering task. For a more formal definition and some great real-world examples, the following reading is an excellent resource from DFMA.com, the company founded by the pioneers of this methodology.
Design for Assembly (DFA): Simplify Product Structure to Cut Total Cost
This article, 'Design for Assembly (DFA)', provides a concise, professional summary of the core principles and the minimum part criteria.
Please read the first half of the article, down to the end of the 'Minimum part criteria' section. This will solidify your understanding of the three questions and their importance.
3. The Impact of Part Count Reduction: A Case Study
Applying these principles can have a dramatic impact on cost, quality, and assembly time. Let's look at a real-world case study from IDEXX Laboratories, a manufacturer of veterinary devices. They applied DFA to redesign a subassembly, with remarkable results.
The IDEXX team redesigned a Maintenance Access Door subassembly, which originally consisted of many sheet metal parts and fasteners—a perfect candidate for DFA.
This case study details the redesign of the IDEXX 'Catalyst Dx' subassembly. It's a fantastic example of how a design engineer used DFA to drive significant product improvements.
Please read through the case study. Pay attention to: The initial state of the design (183 parts, 63 fasteners). How the engineer used the DFA questions to identify consolidation opportunities (switching from sheet metal to injection-molded plastic). The final, staggering results in part reduction, assembly time, and cost.
The results speak for themselves: 183 parts reduced to 31. This wasn't just an academic exercise; it led to a 75% reduction in assembly time and completely eliminated a source of potential field failures (loose fasteners). This is exactly the kind of impactful, data-driven engineering that looks great in a portfolio.
4. Component Standardization
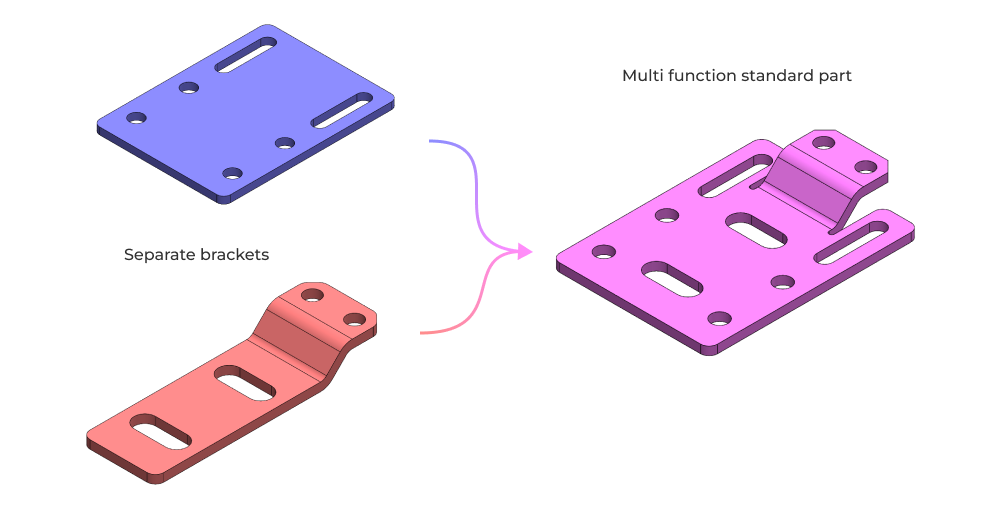
A related technique for simplifying assemblies and reducing costs is component standardization. This involves reusing the same components or designs across an assembly or even an entire product line.
Standardization can be applied to:
- Off-the-shelf components: Using the same size and type of screw, bearing, or o-ring in as many places as possible. This simplifies purchasing, inventory, and assembly tooling.
- Custom components: Intentionally designing a custom part, like a bracket or housing, to be used in multiple places. For example, designing a single mounting bracket that can be used on both the left and right sides of a machine.
Let's look at a final clip that illustrates this principle.
DFM Lecture 3: DFMA Principles
The 'DFM Lecture 3' video also has a clear example of standardizing custom components within a product family.
Watch from 20:56 to 24:02. The example of the three different gear reducer models that share the same internal gears and bearings is a perfect illustration of standardization.
Standardization in Onshape
Modern CAD tools like Onshape have powerful features to facilitate standardization. The Configurations feature allows you to create a family of parts from a single Part Studio. For example, you can design one flange and then use a configuration table to automatically generate versions with different diameters or bolt patterns. This avoids having dozens of separate, disconnected files and makes managing a standardized part library much easier.

Test your understanding!
Imagine you are designing a small, enclosed electronics box. The initial design consists of:
- A flat base plate.
- Four separate vertical side walls (front, back, left, right), made of sheet metal.
- A separate top cover.
- Eight small L-brackets to connect the walls to the base plate.
- Sixteen M3 screws to attach the brackets (8 to the base, 8 to the walls).
Using the principles of part count reduction and standardization, what are two significant changes you could propose to simplify this design?
Show answer
Here are two high-impact changes based on DFA principles:
-
Part Count Reduction: The four separate side walls and eight L-brackets are prime candidates for consolidation.
- Applying Minimum Part Criteria: Do the walls need to move relative to each other? No. Do they need to be different materials? No. Do they need to be separate for assembly? No.
- Redesign: You could redesign the four walls and the base plate as a single, more complex sheet metal part, often called a "clamshell" or "U-bend" design. You would start with a flat sheet and bend the four walls up from the base. This single action eliminates 4 walls, 8 brackets, and 16 screws, dramatically simplifying the assembly. Alternatively, you could design it as an injection-molded plastic "tub."
-
Part Count Reduction / Feature Integration: The L-brackets and screws are classic examples of parts that can often be designed out.
- Redesign: Instead of brackets, you could design the walls with flanges that have holes for screws. Even better, you could incorporate features like snap-fits if the material were plastic, eliminating fasteners entirely (as seen in the IDEXX case study).
Conclusion
Today, you've learned to look beyond the individual part and think about the efficiency of the entire assembly. By systematically challenging the existence of every part and seeking opportunities for standardization, you can create designs that are not only functional but also significantly cheaper, faster to assemble, and more reliable.
Key Takeaways:
- Design for Assembly (DFA) prioritizes simplifying product structure, with part count reduction as its most powerful tool.
- The Minimum Part Criteria (relative motion, different material, assembly/service) provides a systematic method to identify non-essential parts.
- Component Standardization (using common parts and designs) simplifies logistics and leverages economies of scale.
- Integrating features (like snap-fits or molded-in bosses) and choosing the right manufacturing process (like injection molding over sheet metal fabrication) are key enablers of part consolidation.
Preview of the Next Lesson:
We've successfully reduced the number of parts in our theoretical assembly. Now, how do we make sure the remaining parts are easy to put together? In our next lesson, you will learn how to incorporate geometric features for error-proofing (poka-yoke) and to guide assembly orientation. We'll explore how simple design features can make it physically impossible to assemble a product incorrectly.