Welcome to your third lesson. In our previous sessions, we explored React's foundational theories: the declarative, component-based architecture for describing UIs, and the Virtual DOM for rendering them with high efficiency. With that conceptual groundwork in place, it's time to transition from theory to practice.
Today, you will set up your first local React development environment. This is a critical, hands-on step that will serve as the foundation for all the code you'll write in this course. Our goal is to set up a new React project using Vite, a modern and incredibly fast build tool. By the end of this lesson, you will not only know the commands to get started but also understand why these tools are essential in the React ecosystem, a key insight for when you teach this yourself.
Why Do We Need a Build Tool?
You already know that React components are often written using JSX, a syntax extension for JavaScript. However, web browsers do not understand JSX natively. This is the first problem we need to solve. Furthermore, modern web applications consist of many modules and dependencies that need to be managed and optimized for production.
React itself is a UI library, not a complete framework. It provides the functions to build and manage user interfaces, but it doesn't include the "batteries" for a complete development workflow. This is where build tools come in. A build tool automates several crucial tasks:
- Transpiling: It converts JSX and modern JavaScript syntax into standard JavaScript that all browsers can execute.
- Bundling: It gathers all your JavaScript modules and third-party libraries into a few optimized files for the browser to download.
- Development Server: It runs a local web server to host your app during development, often with powerful features that boost productivity.
For a deeper explanation of this necessity, the following article provides excellent context on React's nature as a library and the role of build tools.
Modern React Setup with Vite: Step-by-Step Guide for ...
This article from Medium, "Modern React Setup with Vite," starts by explaining why a build environment is essential for React development.
Read the first two sections, "Why Environment Setup Matters in React" and "What Is Vite, Conceptually?". Pay close attention to the distinction between a library and a framework, and the three key features of Vite that the author highlights.
Introducing Vite: The Modern Standard
As the article mentions, the modern standard for building React applications is Vite (pronounced "veet", French for "fast"). Vite provides a significantly faster and leaner development experience compared to older tools like Create React App.
Its key advantage is the use of native ES modules in the browser during development. This means it doesn't need to bundle your entire application before starting the server. It serves files on demand, leading to:
- Instant Server Start: The development server is ready almost immediately.
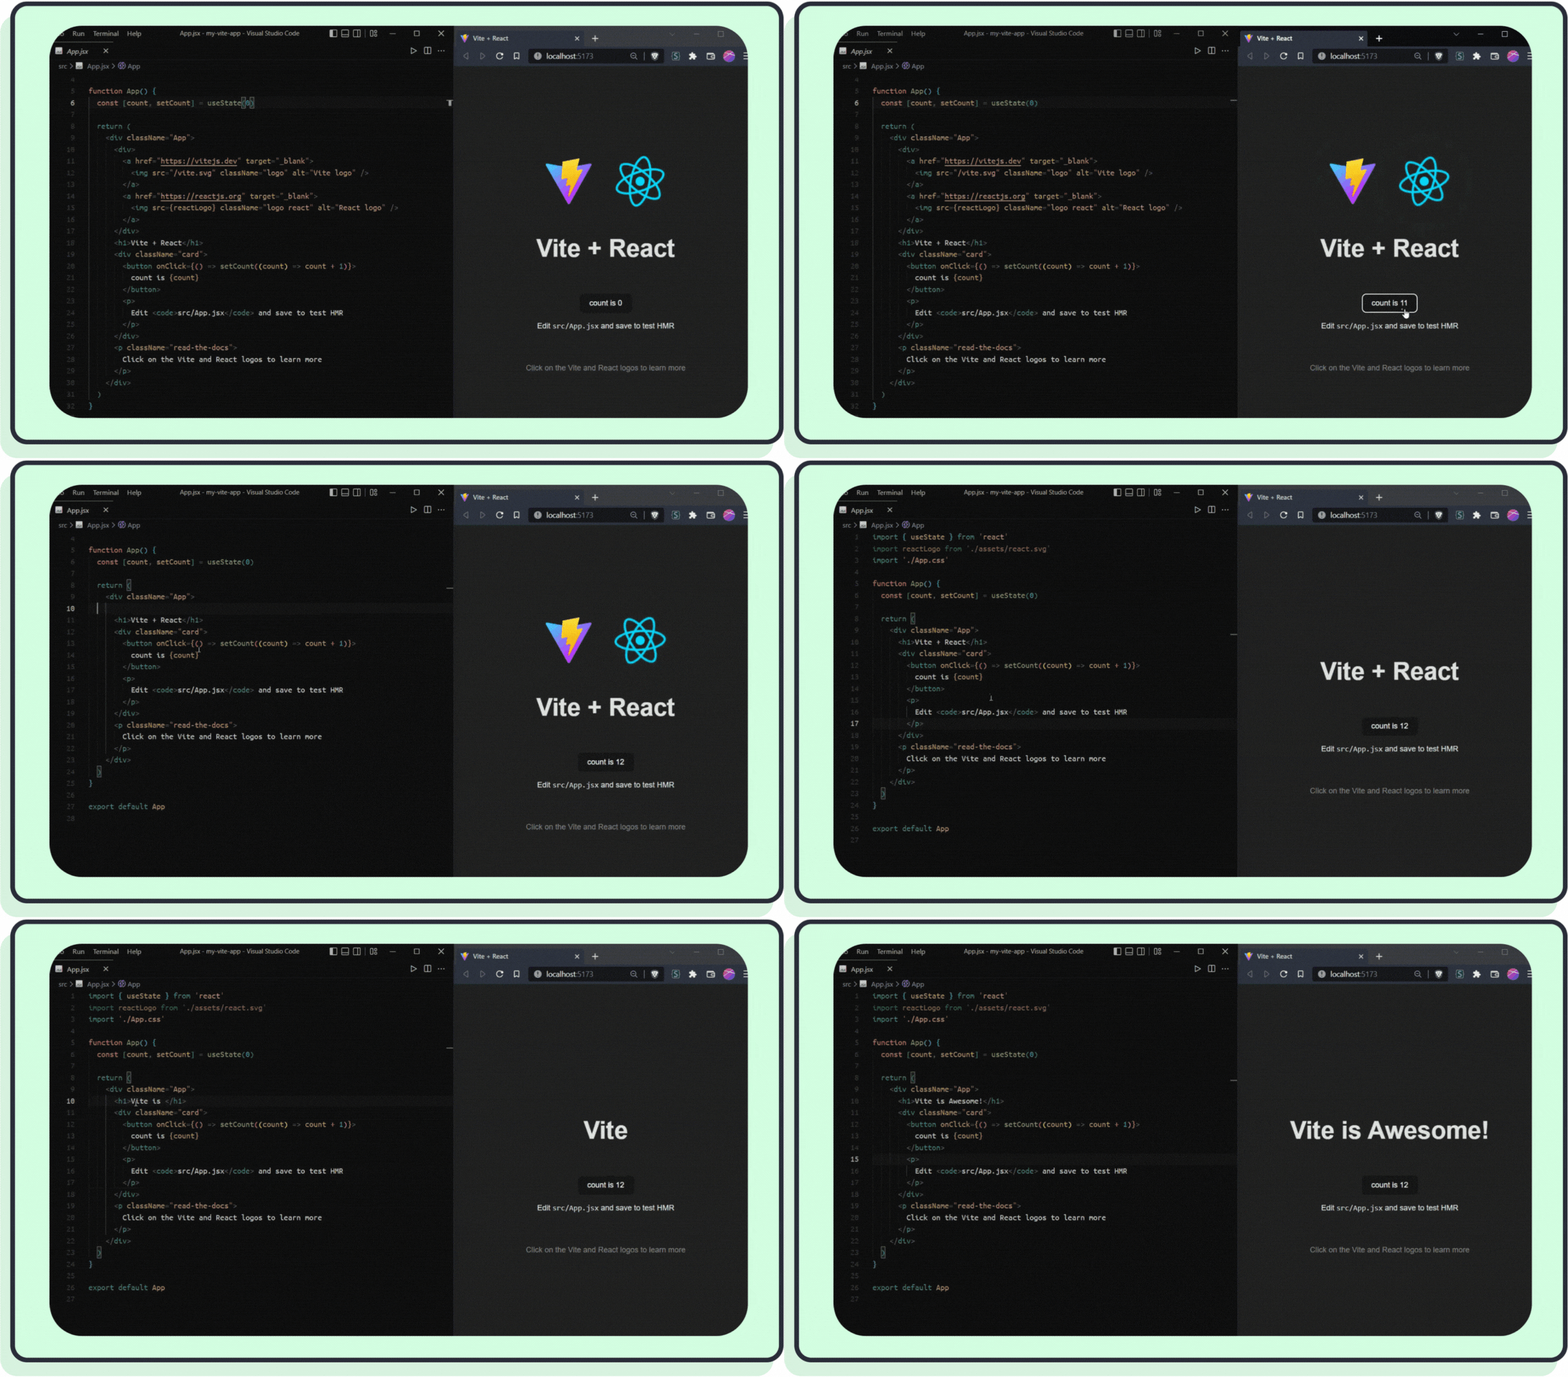
- Lightning-Fast HMR (Hot Module Replacement): When you edit a file, the changes are reflected in the browser almost instantly, without losing the component's state. This creates a tight and highly productive feedback loop.
This HMR feature is a game-changer for development speed. The following animation demonstrates it perfectly: a code change on the left results in an immediate update in the browser on the right, without the page reloading or the counter state being reset.
Setting Up Your First React Project
Now, let's get our hands dirty and create a project. We will use npm, the Node Package Manager, which comes bundled with Node.js. Please ensure you have a recent version of Node.js installed on your system.
The process involves three simple commands in your terminal. The following video gives a clear, visual walkthrough of these steps.
How to Set Up a React App with Vite | Fast React Project Setup
The video "How to Set Up a React App with Vite" from the ProgrammingKnowledge channel demonstrates the exact commands we'll be using.
Watch the segment from this timestamp, where the presenter runs the commands to create the app, install dependencies, and start the development server. You can follow along in your own terminal.
Here are the steps in detail:
1. Create the Application
Open your terminal in the directory where you want to create your project and run the following command:
npm create vite@latest
This command initiates an interactive setup process. It will ask you for a few things:
- Project name: Enter a name for your project folder (e.g.,
my-react-app). - Select a framework: Use the arrow keys to choose
React. - Select a variant: Choose
JavaScript.
2. Install Dependencies
Once the project folder is created, navigate into it and install the necessary packages.
cd my-react-app
npm install
This command reads the package.json file in your new project and downloads the required libraries (react, react-dom) and development tools (vite).
3. Start the Development Server
Finally, start the Vite development server:
npm run dev
Your terminal will display a local URL (usually http://localhost:5173). Open this URL in your web browser, and you should see the default Vite + React starter page. Congratulations, you're running a React application!
Understanding the Project Structure
Now that the project is running, let's examine the files Vite has created for us. A clear understanding of this structure is fundamental.

Let's focus on the most important files. The article we looked at earlier provides an excellent breakdown of the core files that make the application work.
Modern React Setup with Vite: Step-by-Step Guide for ...
We'll return to the Medium article to understand what these generated files do.
Read the section "Step 4: Understanding the File Structure". This will walk you through the purpose of three critical files: index.html, src/main.jsx, and src/App.jsx. Understanding how they connect is key to grasping how React boots up.
To summarize the flow:
- The browser loads
index.html, which is the main HTML page. - Inside
index.html, a<script>tag points tosrc/main.jsx. This is the JavaScript entry point of your app. src/main.jsxfinds the<div id="root">inindex.htmland instructs React to render your main application component,<App />, inside it.src/App.jsxcontains the JSX that defines the initial UI you see on the screen. This is where you will begin building your own components.
Development vs. Production
One last concept to complete your mental model of a build tool is the distinction between development and production modes.
npm run devstarts the development server. It's optimized for speed and developer experience, with features like HMR and detailed error messages.- When you are ready to deploy your application to a live web server, you will run
npm run build. This command creates a production build. Vite will heavily optimize your code, bundle it into small and efficient files, and place them in adist(distribution) folder. These are the files you would upload to a web host.
We will focus on the dev command throughout this course, but it's important to know that the build tool also prepares your app for the real world.
Conclusion
In this lesson, you made the crucial leap from theory to practice by setting up a professional React development environment.
Key Takeaways:
- React development relies on build tools to transpile JSX, bundle modules, and provide a productive development experience.
- Vite is the modern, industry-standard build tool known for its incredible speed and Hot Module Replacement (HMR).
- Creating a new React project is a simple three-step process:
npm create vite@latest,cd, andnpm install, followed bynpm run devto start the server. - The application flow starts from
index.html, which loadssrc/main.jsx, which in turn renders the<App />component into the DOM.
You now have a running React application on your local machine. In our next lesson, we will finally start writing our own React code by diving into the heart of JSX, learning how to write basic UI and embed JavaScript expressions directly into your markup.