Welcome to your fourth lesson on React. In our last session, you successfully set up a local development environment using Vite, giving you a live, running React application. We established that tools like Vite are essential because they transpile modern code, like JSX, into standard JavaScript that browsers can understand.
Today, we will dive into the heart of what you'll be writing in those .jsx files. This lesson focuses on JSX, the syntax extension that allows you to describe your user interfaces in a way that is both powerful and familiar. We'll explore not just how to write JSX, but why it's designed the way it is. We will then learn how to embed JavaScript expressions directly within your markup to create dynamic and responsive UIs. Mastering this is fundamental, as it's the language you'll use to tell React what to render on the screen.
What is JSX?
At first glance, JSX looks just like HTML. However, it is a syntax extension for JavaScript. It was created to provide a more ergonomic and readable way to describe UI structures within your JavaScript code.
For decades, the standard practice was to keep HTML, CSS, and JavaScript in separate files, promoting a "separation of concerns." React takes a different philosophical approach. It recognizes that the logic for rendering a piece of UI is intrinsically tied to the markup of that UI. For example, the logic that determines whether a button is disabled is closely related to the button element itself. By keeping them together in a single unit—a component—the code becomes more self-contained, predictable, and easier to maintain.
The most critical concept to grasp is that JSX is syntactic sugar. Browsers do not understand JSX. During the build process (which Vite handles for you), JSX is transpiled into regular JavaScript function calls. Specifically, it becomes calls to React.createElement().
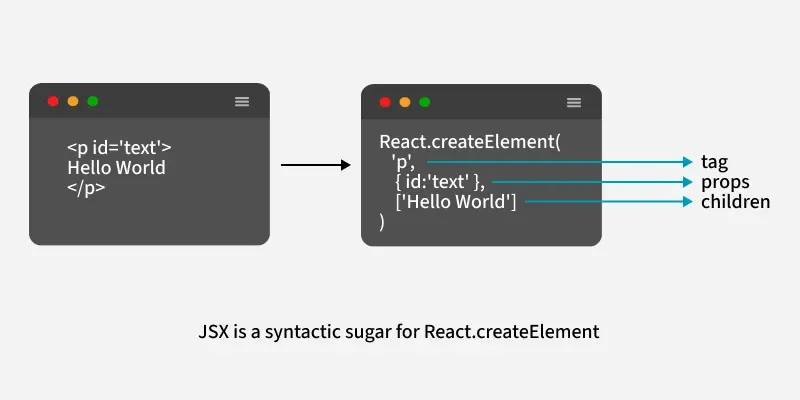
This diagram illustrates the transformation from a JSX paragraph element into a React.createElement function call. The function takes the tag, its properties (props), and its children as arguments.
Understanding this transformation is key to demystifying React. The following video provides an excellent walkthrough, comparing a component written with JSX to the same component written without it, using React.createElement directly. As you watch, pay close attention to how much more verbose and complex the non-JSX version becomes.
Watch the video "ReactJS Tutorial - 8 - JSX" from the Codevolution channel. Focus on these two sections.
First, watch the demonstration of a simple component written using JSX. Then, pay close attention to the following segment where the same component is rebuilt without JSX, highlighting how React.createElement is used to construct the UI tree step-by-step.
As you can see, while you could write an entire React application with React.createElement, JSX provides a far more declarative and intuitive syntax. This is why you must import React in your files, even if you don't explicitly use the word "React"—your JSX is compiled into code that does.
The Rules of JSX
Because JSX is stricter than HTML, there are a few rules you must follow to write valid markup. The official React documentation provides a clear and comprehensive guide.
This article from the official React documentation explains the core principles and rules of JSX. It's the definitive source for understanding this syntax.
First, read the section JSX: Putting markup into JavaScript to solidify your understanding of why React co-locates markup and logic. Next, focus on the main section, The Rules of JSX. This covers the three fundamental rules you need to know: Return a single root element: Understand why your component's return value must be wrapped in a single parent, and learn about Fragments (<>...</>). Close all the tags: Note the requirement for explicit closing tags, including for self-closing elements like <img />. camelCase all most of the things!: Pay special attention to why HTML attributes like class and stroke-width become className and strokeWidth in JSX. This is a direct consequence of JSX being JavaScript.
Let's briefly summarize those three crucial rules:
- Single Root Element: A component must return a single JSX element. If you have multiple elements, you must wrap them in a parent
<div>or, if you don't want to add an extra node to the DOM, a Fragment (<>...</>). - Tags Must Be Closed: Every tag must be closed. For tags that don't have children, like
<img>or<input>, you must use a self-closing slash:<img />,<input />. - Attribute Naming (camelCase): Since JSX attributes are converted into keys of a JavaScript object, they must follow JavaScript's naming conventions. This means attributes with hyphens become camelCased (e.g.,
font-sizebecomesfontSizein style objects), and reserved words likeclassbecomeclassName.
Embedding JavaScript in JSX
The true power of JSX comes from its ability to seamlessly embed JavaScript expressions. This allows you to make your UI dynamic, responding to data and logic. You can "escape" from JSX back into JavaScript by using curly braces {}.
The following article from the React documentation is an excellent guide to this feature.
JavaScript in JSX with Curly Braces
This article explains how to use curly braces to embed variables, function calls, and even objects directly into your JSX markup.
Read through the following sections: Start with Using curly braces to see how to switch from static strings to dynamic JavaScript variables for attributes. The section on using curly braces demonstrates embedding variables and function calls directly as content. Pay attention to Where to use curly braces, as it clarifies the two valid contexts for them. The section on "double curlies" is very important. It demystifies the style={{...}} syntax, explaining it as a JavaScript object inside JSX expression braces. Finally, review the Recap to consolidate your knowledge.
Let's put this into practice. Open the App.jsx file in the project you created in the last lesson. It probably looks something like this:
import './App.css'

function App() {
  return (
    <>
      <h1>Vite + React</h1>
    </>
  )
}

export default App
Now, try applying what you've learned.
-
Use a variable: Create a JavaScript variable and display its value.
function App() { const appName = "My First React App"; return ( <> <h1>{appName}</h1> </> ) } -
Use a function call: You can call functions directly inside the braces.
function App() { const appName = "My First React App"; return ( <> <h1>{appName.toUpperCase()}</h1> <p>Today's date is {new Date().toLocaleDateString()}</p> </> ) } -
Use an object for styling: Apply an inline style using the "double curly" syntax.
function App() {
  const appName = "My First React App";
  const headerStyle = {
    color: 'cornflowerblue',
    textAlign: 'center'
  };

  return (
    <>
      <h1 style={headerStyle}>{appName.toUpperCase()}</h1>
      <p>Today's date is {new Date().toLocaleDateString()}</p>
    </>
  )
}
You can even use standard JavaScript control flow, like an if statement, to decide which JSX to render.
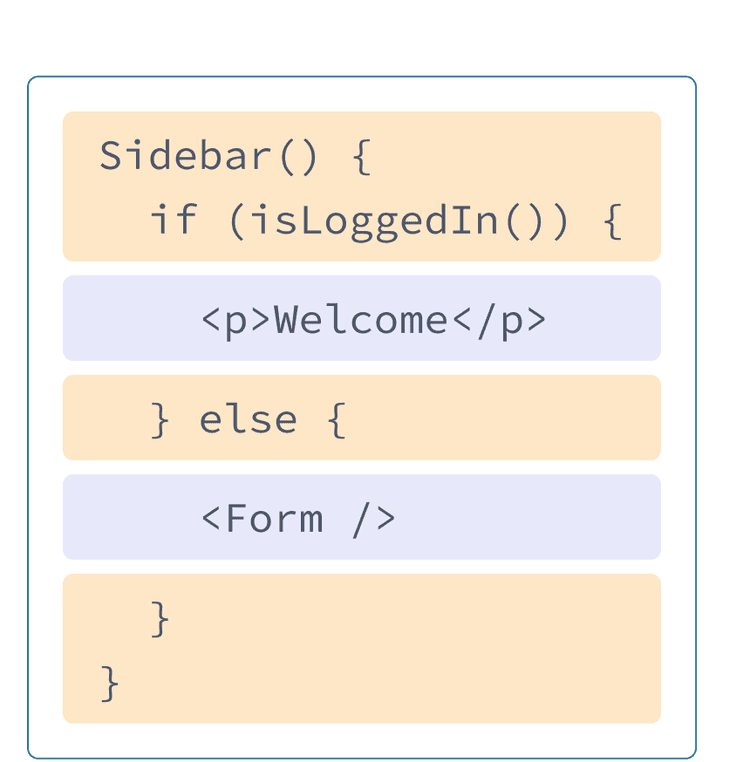
This example shows a React component using an if-else statement to conditionally return different JSX, displaying a welcome message or a form based on the user's login status.
Conclusion
In this lesson, you've explored the foundational syntax of React. You now understand not only how to write JSX but also the core concepts that make it work. This deep understanding is vital for teaching others effectively.
Key Takeaways:
- JSX is a JavaScript syntax extension that lets you write HTML-like markup inside your JavaScript files.
- It promotes co-locating rendering logic and markup within components.
- JSX is syntactic sugar for
React.createElement()calls, which is what the browser ultimately executes after transpilation. - There are three main rules for JSX: you must return a single root element, close all tags, and use camelCase for attributes like
className. - You can embed any JavaScript expression in JSX by wrapping it in curly braces
{}, enabling dynamic UIs. - The
style={{...}}syntax is just a JavaScript object literal passed inside the JSX curly braces.
You've now covered the essential building blocks: setting up a project and describing a UI with JSX. In our next lesson, we will build upon this by learning how to create your own reusable components, a cornerstone of React's modular architecture.