Hello! Welcome to our next lesson.
In our last session, we successfully created our first interactive ImGui window. However, you probably noticed that all our UI logic, state variables, and rendering code are currently mixed together inside the main function. While this is fine for a simple "hello world" app, it's not a scalable or maintainable way to build the sophisticated telemetry engine we're aiming for.
Today, we will address this by learning how to organize our ImGui code into reusable, modular components using functions and classes. This is a critical software engineering practice that will allow us to build complex UIs with multiple windows without our codebase turning into an unmanageable mess. We'll also explore how to create these powerful abstractions with zero performance overhead, a key concern for any high-performance system.
Why Organization Matters
Before we dive into the code, take a look at what a complex, real-world application built with ImGui looks like.
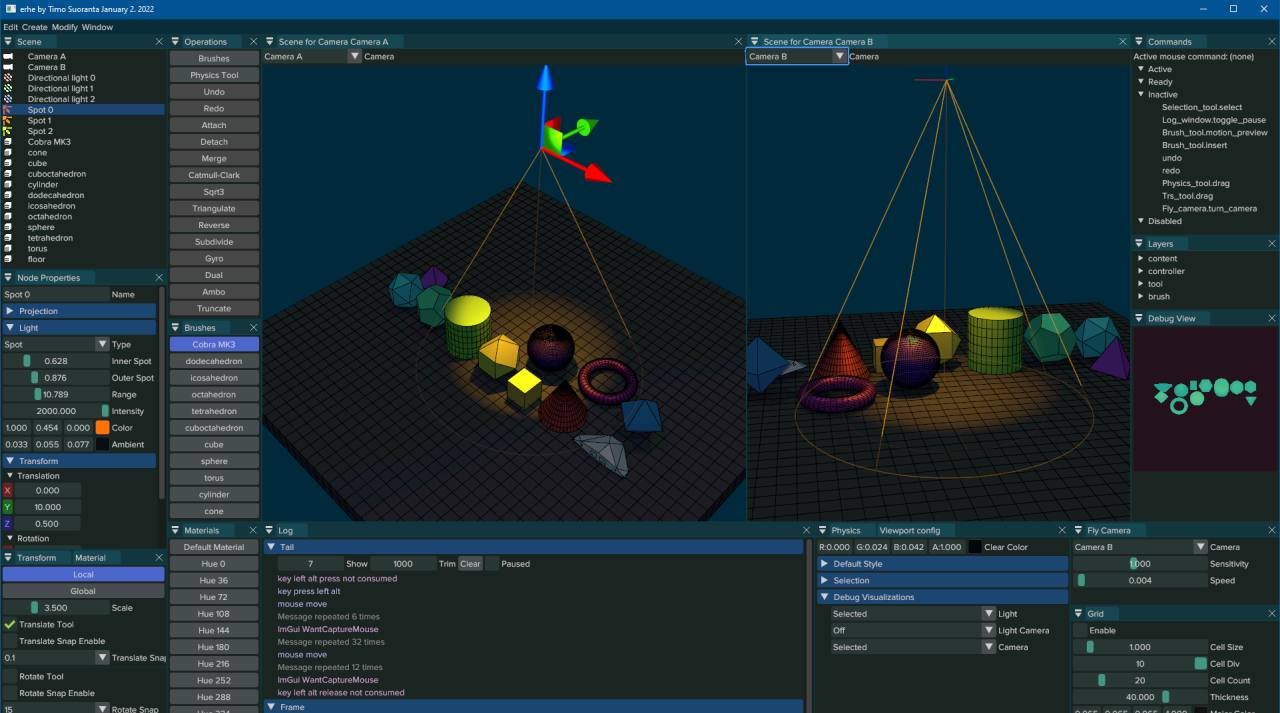
To build an application like our telemetry engine, which will have separate windows for plots, logs, and profiler controls, we need to think beyond a single main loop. Each piece of the UI should be its own self-contained, reusable component.
The Simplest Approach: Encapsulating UI in Functions
The most straightforward way to clean up our main loop is to move the code for each window into its own function. This is an excellent pattern for simple, mostly stateless windows.
For example, the "Controls" window we built last time could be refactored like this:
// In a new file, e.g., "UI.h" / "UI.cpp"
namespace UI
{
    void RenderControlsWindow(ImVec4& clear_color)
    {
        ImGui::Begin("Controls");

        ImGui::Text("Change the background color.");
        ImGui::ColorEdit3("Background Color", (float*)&clear_color);

        // ... other widgets ...
        if (ImGui::Button("Reset Color"))
        {
            clear_color = ImVec4(0.45f, 0.55f, 0.60f, 1.00f);
        }

        ImGui::End();
    }
}

// In main.cpp
int main()
{
    // ... setup ...
    static ImVec4 clear_color = ImVec4(0.45f, 0.55f, 0.60f, 1.00f);

    while (!glfwWindowShouldClose(window))
    {
        // ... new frame setup ...

        UI::RenderControlsWindow(clear_color); // Just one function call!
        // You could call other functions for other windows here.

        // ... rendering ...
    }
    // ... cleanup ...
}
This simple change already makes our main loop much cleaner and separates the UI logic from the application's core loop.
BEST WAY to make Desktop Applications in C++
The Cherno demonstrates this exact approach. Watch this short clip to see how he separates his application's UI code into a dedicated namespace and function, then calls it from the main loop.
Watch from 15:03 to 17:08. Pay attention to how he creates a new application.h and application.cpp to house a renderUI function, cleaning up the main file.
A More Robust Structure: Classes for Stateful Windows
Functions are great, but what happens when a window becomes more complex? Our LOD Plotter, for instance, will need to manage its own data, zoom level, pan offset, and other state. Passing all of this state back and forth through function parameters would become clumsy.
A much better solution is to use a class to represent a window. Each window class can encapsulate its own state (member variables) and behavior (member functions). A common and effective pattern is to create a base Window class and have all your specific UI windows inherit from it.
C++ desktop application with Dear Imgui
This developer blog post provides a clear, practical example of this object-oriented approach. It outlines a base Window class and a WindowManager to manage all the UI elements.
Read the sections 'Making a base window class', the code for the example 'StartupWindow', and the 'Window management' section. Focus on the concept of a base class with a virtual update function and a manager class that holds and updates a list of windows.
Let's distill the core idea from the article:
-
Base Window Interface: Define an abstract base class that represents any window in our application. It has one job: to be drawn.
class IWindow { public: virtual ~IWindow() = default; virtual void Draw() = 0; // Pure virtual function }; -
Concrete Window Implementation: Create specific window classes that inherit from the base class and implement the
Drawmethod. They also hold their own state.class LogWindow : public IWindow { public: void Draw() override { ImGui::Begin("Log"); // ... draw log entries from log_messages ... ImGui::End(); } private: // State specific to the log window std::vector<std::string> log_messages; }; -
Window Manager: In your main application logic, you can now manage a collection of these windows polymorphically.
// In your main application class or loop
std::vector<std::unique_ptr<IWindow>> windows;
windows.push_back(std::make_unique<LogWindow>());
windows.push_back(std::make_unique<PlotterWindow>());

// In the render loop
for (const auto& window : windows)
{
    window->Draw();
}
This structure is clean, object-oriented, and highly scalable.
Encapsulating the Entire Application
We can take this one step further. Not only can we encapsulate our UI windows, but we can also hide all the boilerplate for setting up GLFW, OpenGL, and ImGui itself inside a main Application class. This follows the RAII (Resource Acquisition Is Initialization) principle you've seen before: the constructor sets everything up, and the destructor cleans everything up.
The goal is to make our main.cpp beautifully simple:
int main()
{
    MyApp app;
    app.run();
    return 0;
}
How to use Dear ImGui to build a simple Gui-App Framework in C++
This excellent video walks through the entire process of creating an App framework class. It starts by identifying the messy boilerplate and refactoring it into a clean, reusable class structure.
Watch from 10:02 to 18:48. This is the core of the lesson. Follow along as the presenter: Identifies the boilerplate in a standard ImGui example. Designs a base App class to handle setup, cleanup, and the main loop. Moves the initialization and cleanup code into the constructor and destructor. Implements a run() method containing the main loop, which calls a user-defined update() function. Shows how a user of the framework (that's us!) can simply inherit from App and implement update() to draw their UI.
After this refactoring, we have a base App class with a virtual void update() method. Our MyApp inherits from App and overrides update() to draw its specific UI. This is a solid, flexible design. But for a high-performance application, we can do even better.
Zero-Cost Abstraction with CRTP
The use of a virtual function introduces a small runtime overhead: a vtable lookup. Every time app->update() is called, the program has to look up the correct function pointer in a virtual table. For our profiler, where we want to eliminate every nanosecond of unnecessary overhead, we can remove this cost using a powerful C++ pattern: the Curiously Recurring Template Pattern (CRTP).
CRTP allows us to achieve compile-time polymorphism. Instead of a vtable lookup at runtime, the compiler knows exactly which function to call and can even inline it, reducing the abstraction's cost to zero.
How to use Dear ImGui to build a simple Gui-App Framework in C++
The same video provides a fantastic explanation of why virtual has a cost and how to use CRTP to eliminate it. This is directly relevant to your interest in high-performance systems programming.
Watch from 21:32 to 25:04. This is a crucial segment. Focus on: The performance penalty of virtual functions in a tight loop. How the base App class is turned into a template: template <typename Derived>. How the run method uses static_cast<Derived*>(this)->update() to call the derived class's method directly, with no virtual dispatch.
Here is what the CRTP pattern looks like in code:
Base Class (The Framework):
template <typename Derived>
class Application
{
public:
    void run()
    {
        // ... init ...
        while (/*... not closing ...*/)
        {
            // ... new frame ...

            // No vtable lookup! The compiler knows 'Derived' is 'MyApp'
            // and can inline this call. This is zero-cost abstraction.
            static_cast<Derived*>(this)->update();

            // ... render ...
        }
        // ... cleanup ...
    }
};
Derived Class (Our Application):
#include "Application.h"

class MyApp : public Application<MyApp> // <-- The "curiously recurring" part
{
public:
    void update()
    {
        // Our ImGui code goes here
        ImGui::ShowDemoWindow();
    }
};
By using CRTP, we get the best of both worlds: the clean, high-level organization of an application framework and the bare-metal performance of calling a function directly.
Test your understanding!
You are building the telemetry tool. You need a main "Profiler" window and a secondary "Log" window. Using the class-based patterns we've discussed, how would you architect this?
Describe the classes you would create. Which ones would hold state? Where would the ImGui drawing calls for each window reside?
Show answer
A good approach would be:
IWindowBase Class: An abstract interface with a pure virtualvoid Draw() = 0;.ProfilerWindowClass: Inherits fromIWindow. It would implement theDraw()method to create the main profiler view. This class would hold significant state: the data for the plots, zoom/pan levels, etc.LogWindowClass: Inherits fromIWindow. It would implementDraw()to display log messages. Its state would be a container (likestd::vector) of log strings.MyAppClass (using CRTP): Inherits fromApplication<MyApp>. Itsupdate()method would be responsible for overall layout (like creating a dockspace) and then calling theDraw()method on instances ofProfilerWindowandLogWindow. It would own these window objects, likely as member variables (e.g.,std::unique_ptr<ProfilerWindow> profiler_window;).
Conclusion
Today we've transformed our single-file application into a professional, scalable C++ project structure. This is a massive step forward and sets a solid foundation for the complex features we will build.
Key Takeaways:
- Placing all UI code in
mainis not scalable. - Functions are a simple first step to organize stateless UI elements.
- Classes are a superior way to encapsulate stateful UI windows, like our future plotter. Using a base class with a virtual
Draw()method is a common and effective OOP pattern. - The entire application boilerplate (window creation, main loop) can be encapsulated in a reusable
Applicationclass using RAII. - For maximum performance, we can replace runtime polymorphism (
virtualfunctions) with compile-time polymorphism using the Curiously Recurring Template Pattern (CRTP), achieving zero-cost abstraction.
What's Next?
With our application now cleanly structured, we are ready to start building the visualization tools themselves. In the next lesson, we will dive into the ImGui Draw List API. You'll learn how to break free from standard widgets and render custom primitives like lines and rectangles. This is the first step toward building our custom LOD Plotter, as we'll need to draw the plot axes, lines, and bars ourselves.