Hello! Welcome back to the course.
In our last session, we demystified the render loop, establishing the core structure that makes our ImGui application tick. You now understand the sequence of polling events, preparing a new frame, rendering, and swapping buffers. Our application currently displays a simple text widget, but our ambition is much larger.
This lesson is where we start building the interactive user interface for our telemetry engine. We will move beyond simple text and learn how to create a dedicated ImGui window populated with the most common interactive widgets: buttons, checkboxes, and sliders. By the end of this lesson, you will be able to construct a simple control panel and link its widgets to your C++ code to modify the application's behavior in real-time.
The Immediate Mode Philosophy
Before we write any code, let's briefly reinforce a core concept of ImGui you were introduced to previously: the Immediate Mode GUI paradigm.
Unlike traditional UI frameworks where you create button objects, add them to a hierarchy, and then attach event handlers, ImGui is much more direct. Inside the render loop, you simply call functions for the widgets you want to see on screen for that specific frame. The UI code "lives" right next to the data it manipulates.
An introduction to the Dear ImGui library
To solidify this concept, please read the short introductory paragraphs of this article from the Conan blog. It gives a concise and clear explanation of what an Immediate Mode GUI is and why it's beneficial.
Read the sections titled 'Dear ImGui?' and the paragraph explaining Immediate Mode GUIs. You can stop when you reach the 'Integrating Dear ImGui' section.
This approach is what makes ImGui so fast for prototyping and perfect for developer tools like the one we're building.
Creating a Window
All ImGui widgets must be placed inside a window. A window is created using a matching pair of function calls: ImGui::Begin() and ImGui::End(). Anything you put between these two calls will be drawn inside that window.
The ImGui::Begin() function takes a name for the window as its primary argument. This name is also used as a unique identifier.
// Inside your main while loop, after ImGui::NewFrame()
ImGui::Begin("My First Window");
// ... widgets go here ...
ImGui::End();
Let's watch a detailed breakdown of how to create and customize a window.
ImGui C++ Course 2025 – Complete Beginner to Advanced Guide (C++ UI Design Tutorial)
This video provides an excellent, beginner-friendly walkthrough of the ImGui::Begin and ImGui::End functions. It also covers how to use window flags to customize behavior, like disabling resizing or moving.
Watch from 12:28 to 21:42. Focus on how ImGui::Begin and ImGui::End are used to define a window, how to use a boolean variable to control its visibility, and how ImGuiWindowFlags can alter its properties.
As you saw, ImGui::Begin() can also take a pointer to a boolean variable. If you provide one, ImGui will draw a small 'x' button on the window. When the user clicks it, ImGui sets your boolean to false. You can then use this boolean to stop rendering the window.
static bool show_my_window = true;
if (show_my_window)
{
    // The &show_my_window argument gives us a close button
    ImGui::Begin("My Controllable Window", &show_my_window);
    ImGui::Text("You can close me!");
    ImGui::End();
}
Populating Your Window with Widgets
Now for the exciting part: adding interactive elements. We'll cover the most fundamental widgets you'll use constantly.

The following video segment is a comprehensive guide to implementing these essential widgets. We'll use it as our primary reference.
ImGui C++ Course 2025 – Complete Beginner to Advanced Guide (C++ UI Design Tutorial)
Watch this segment to learn how to implement buttons, checkboxes, sliders (for floats and integers), and combo boxes. Pay close attention to how each widget function takes a C++ variable by reference to read and write its state.
Watch from 21:42 to 35:10. The presenter clearly demonstrates the function calls and the necessary C++ variables for each widget.
Let's summarize the key widgets from the video:
1. Buttons
Buttons are for triggering actions. The ImGui::Button() function returns true for the single frame in which it is clicked. This makes it perfect for use inside an if statement.
static int counter = 0;
if (ImGui::Button("Click me"))
{
    counter++; // This code runs only when the button is clicked
}
ImGui::SameLine(); // Place the next widget on the same line
ImGui::Text("Button clicked %d times", counter);
2. Checkboxes
Checkboxes are ideal for toggling boolean states. You pass a pointer to your boolean variable, and ImGui handles the rest.
static bool enable_feature = false;
ImGui::Checkbox("Enable Feature", &enable_feature);

if (enable_feature)
{
    // This code runs every frame the box is checked
    ImGui::Text("The feature is ON!");
}
3. Sliders
Sliders are used for selecting a number within a range. Like checkboxes, they take a pointer to your variable and modify it directly.
static float value = 0.5f;
// The last two arguments are the min and max values for the slider.
ImGui::SliderFloat("Value", &value, 0.0f, 1.0f);
Test your understanding!
You have a checkbox linked to a boolean variable is_enabled. You want to increment a counter every frame that the checkbox is active (ticked).
Where should you place the if (is_enabled) block to check the state?
- Inside the
if (ImGui::Checkbox(...))block. - In the main loop, after the
ImGui::Checkbox(...)call.
Show answer
The correct answer is 2. In the main loop, after the ImGui::Checkbox(...) call.
The function ImGui::Checkbox() returns true only in the frame when its state changes (i.e., when the user clicks it). To perform an action while the box is checked, you must check the state of the underlying boolean variable (is_enabled) on every frame, outside of the if statement that draws the widget.
The Ultimate Learning Tool: ImGui::ShowDemoWindow()
ImGui comes with a powerful, built-in demonstration window that showcases nearly every feature and widget available. Better yet, the complete source code for this window is in the imgui_demo.cpp file, which you already have in your project. It is the single best resource for learning how to use ImGui.
To show it, simply add this line to your render loop:ImGui::ShowDemoWindow();
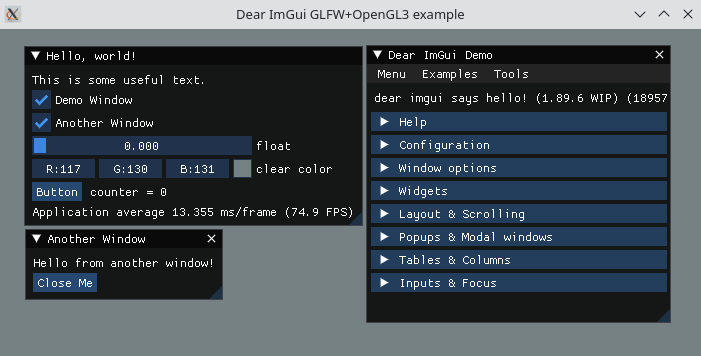
BEST WAY to make Desktop Applications in C++
The Cherno, a well-known C++ game engine developer, strongly advocates for using ImGui. In this short clip, he explains how to use the demo window to find the code for any widget you see.
Watch from 18:04 to 18:41. Notice how he finds a widget in the demo window and then searches for its title in imgui_demo.cpp to see how it's implemented.
Hands-On Practice: Building a Control Panel
Now, let's apply what you've learned. We'll create a simple control panel that changes the background color of our application window. This provides immediate, visual feedback.
-
Declare a color variable: At the top of your
mainfunction (or in a global scope), declare a static variable to hold the color.ImVec4is ImGui's four-component vector (R, G, B, Alpha) which is perfect for this.static ImVec4 clear_color = ImVec4(0.45f, 0.55f, 0.60f, 1.00f); -
Use this variable: In your render loop, find the
glClearColor()call and update it to use your new variable.// In the main while loop, before glClear() glClearColor(clear_color.x, clear_color.y, clear_color.z, clear_color.w); glClear(GL_COLOR_BUFFER_BIT); -
Create the UI: Now, create a new ImGui window and add a color editing widget that links to your
clear_colorvariable. Add a few other widgets for practice.// Inside your main while loop, after ImGui::NewFrame() ImGui::Begin("Controls"); ImGui::Text("Change the background color."); // This widget modifies the 3 float values (x, y, z) of the ImVec4 ImGui::ColorEdit3("Background Color", (float*)&clear_color); ImGui::Text("--------------------"); // A simple separator static float some_value = 0.f; ImGui::SliderFloat("A Useless Slider", &some_value, 0.f, 100.f); if (ImGui::Button("Reset Color")) { clear_color = ImVec4(0.45f, 0.55f, 0.60f, 1.00f); } ImGui::End();
Compile and run your application. You should now have a "Controls" window that allows you to change the background color in real-time!
This article provides a complete, self-contained code snippet that demonstrates exactly this pattern: creating a window with various widgets, including a color picker that controls the background.
Review the code block under the 'Quick overview' section. You'll recognize the structure immediately. Note how the clear_color variable is modified by ImGui::ColorEdit3 and then used in the application's rendering logic.
Conclusion
Congratulations! You've taken a significant step from having a blank window to creating a genuinely interactive UI. This is the foundation of the visualization suite we are building.
Key Takeaways:
- ImGui windows are defined by a pair of
ImGui::Begin()andImGui::End()calls. - Widgets like
ImGui::Button,ImGui::Checkbox, andImGui::SliderFloatare simple function calls placed inside a window block. - Most interactive widgets are linked to C++ variables by passing a pointer, allowing ImGui to directly modify your application's state.
ImGui::ShowDemoWindow()is your most valuable resource for discovering widgets and learning how to implement them by example.
What's Next?
Currently, all our UI code is sitting inside the main function. As our profiler grows, this will quickly become unmanageable. In the next lesson, we will focus on organizing our ImGui code into reusable functions and classes. This is a critical software engineering step that will keep our project clean, modular, and scalable as we build more complex visualization tools.