Hello! Welcome back to your course on building a high-performance telemetry engine.
In our last lesson, you put the final interactive touch on your plotter by implementing tooltips. Your application is now feature-complete for this phase of the project: it can capture data, process it for efficient rendering, and display it in an interactive plot.
This lesson addresses the learning outcome: Package the entire application into a single, cohesive executable. Currently, our project consists of source code and relies on several external libraries (ImGui, GLFW, etc.) that our build system fetches and compiles. To turn this into a distributable, professional portfolio piece, we need to bundle everything into one self-contained file.
Why a Single Executable?
The primary goal is portability. A single executable file can be run on any compatible machine without requiring the user to install dependencies or have specific library files (.dll on Windows, .so on Linux) in the right place. It "just works." This is the standard for professional, native applications and is exactly what we want for our telemetry engine.
To achieve this, we need to understand a fundamental step in the C++ compilation process: linking.
Linking: Assembling the Pieces
When you compile your C++ project, the compiler first translates each .cpp source file into an "object file" (.o or .obj). These object files contain machine code, but they are incomplete. If main.cpp calls a function defined in plotter.cpp, the main.o object file only contains a placeholder, or a reference, to that function.
The linker is the tool that resolves these references. It takes all your project's object files, finds the actual code for each function call, and combines them into a final executable. This process also applies to external libraries like GLFW.
There are two main ways to perform this linking: statically and dynamically.
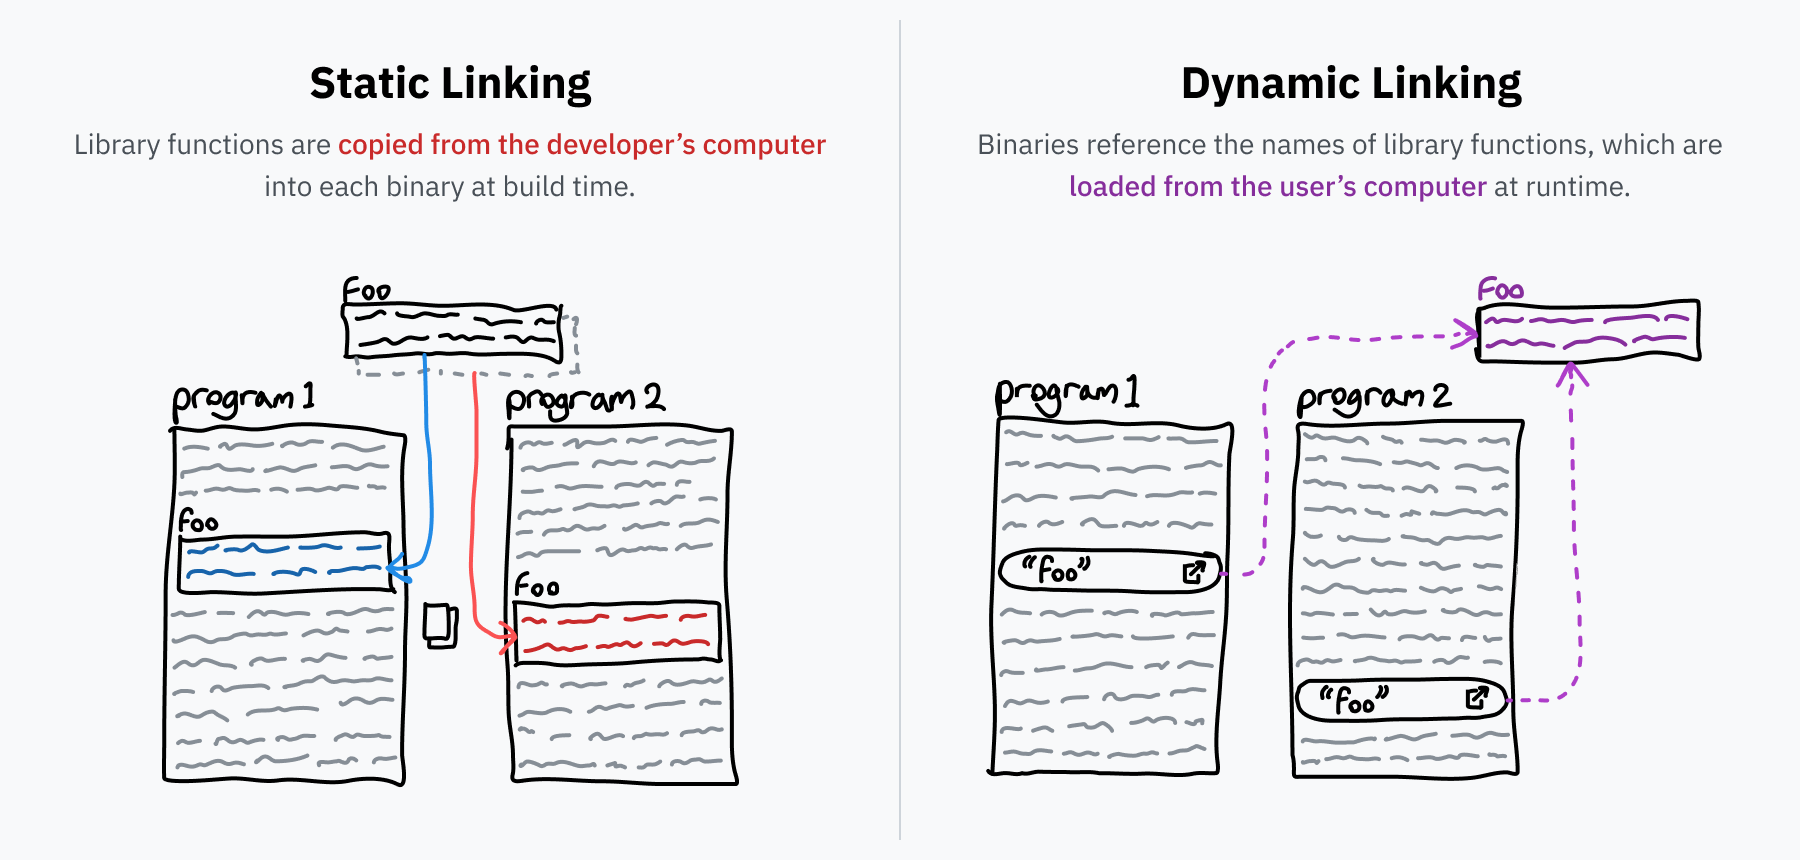
To get a solid grasp of these two approaches, the advantages of each, and how they relate to the build process, please read the following article. It provides an excellent and comprehensive explanation.
Static and Dynamic Linking Explained
The article 'Static and Dynamic Linking Explained' from the Earthly blog is a superb guide to this topic. It walks through the entire compilation process and uses clear CMake examples to demonstrate both static and dynamic linking.
Read the article from the beginning ('The Compilation Process') down to the section 'How to Choose Between Static and Dynamic Linking'. Pay close attention to the CMake examples, as they directly relate to how we will modify our own project.
Key Differences Summarized
| Feature | Static Linking | Dynamic Linking |
|---|---|---|
| When it happens | During compilation (link time). | When the program is run (runtime). |
| Result | A single, large, self-contained executable. | A smaller executable that depends on external .dll or .so files. |
| Distribution | Easy. Just copy the executable. | Must distribute the executable AND the required library files. |
| Updates | To update a library, the entire application must be re-linked and re-distributed. | The library file can be updated independently of the main application. |
| Memory | Each statically linked app has its own copy of the library in memory. | Multiple apps can share a single copy of the library in memory. |
For our goal of creating a single, cohesive executable, static linking is the clear choice.
Controlling Linking with CMake
You've been using CMake to build the project, but we've let it handle the details automatically. Now, we'll take explicit control.
CMake provides a standard way to control whether libraries are built as static or shared: the BUILD_SHARED_LIBS variable.
- If
BUILD_SHARED_LIBSisON, CMake will build libraries as shared (.dll,.so). - If
BUILD_SHARED_LIBSisOFF(the default if not set), CMake will build libraries as static (.a,.lib).
Many well-behaved open-source libraries, including GLFW, respect this variable. This gives us a powerful, top-level switch to control the entire build process.
The following resource from the official CMake tutorial explains how this works.
Step 5: In-Depth CMake Library Concepts
The official CMake tutorial, 'Step 5: In-Depth CMake Library Concepts', explains how CMake handles different library types. The first exercise is particularly relevant.
Read 'Exercise 1 - Static and Shared'. This section explains the role of the BUILD_SHARED_LIBS variable and how it provides flexibility when building projects. This is the exact mechanism we will use.
Modifying Your CMakeLists.txt for a Static Build
We can enforce static linking for our entire project, including dependencies fetched with FetchContent, by setting this variable at the top of our main CMakeLists.txt file.
Open your top-level CMakeLists.txt and add the following line near the beginning, right after your project(...) command:
cmake_minimum_required(VERSION 3.22)
project(TelemetryEngine)

# Set the default library type to STATIC for the whole project.
# This ensures that our libraries and any dependencies that respect this
# variable (like GLFW) are built as static libraries.
set(BUILD_SHARED_LIBS OFF CACHE BOOL "Build shared libraries")

# ... rest of your CMake file (add_executable, FetchContent, etc.)
By adding set(BUILD_SHARED_LIBS OFF ...):
- Any
add_library(...)calls in our project without an explicitSTATICorSHAREDkeyword will now produce static libraries. - When
FetchContentdownloads and configures GLFW, it will see thatBUILD_SHARED_LIBSisOFFand configure itself to buildglfw3.lib(orlibglfw3.a) instead of a dynamic library. - When you call
target_link_libraries(YourApp PRIVATE glfw), the linker will find the static version of GLFW and copy its necessary code directly intoYourApp.exe.
The result is a single executable with no external dependencies on GLFW.
Test your understanding!
Question: After setting BUILD_SHARED_LIBS to OFF and rebuilding your project, you move the final executable to a brand new, empty folder and double-click it. What do you expect to happen and why?
Show answer
You should expect the application to launch and run correctly. Because all dependencies like GLFW and ImGui were statically linked, their code is now part of the executable itself. The program no longer needs to find external .dll or .so files at runtime, making it fully portable.
Verifying the Result
After you rebuild your project with the change to CMakeLists.txt, you can verify that it worked:
- Check the File Size: Your final executable file (
TelemetryEngine.exeorTelemetryEngine) should be significantly larger than it was before. This is because it now contains the code from all its dependencies. - Inspect Dependencies (Linux/macOS):
- On Linux, you can run
ldd ./YourAppName. You should no longer seelibglfw.soin the list of dependencies. - On macOS, you can run
otool -L ./YourAppName. You should no longer see a reference tolibglfw.dylib.
- On Linux, you can run
- Run from a New Location: The most definitive test is to copy only the executable file to a completely separate directory and run it. If it starts up, your static linking was successful.
Conclusion
You have now mastered a critical skill in C++ development: creating a self-contained, portable application. This step transforms your project from a developer-only build into a distributable piece of software, ready to be shared or added to your portfolio.
Key Takeaways:
- Linking is the final stage of compilation, where code from different object files and libraries is combined.
- Static Linking copies all necessary code into the final executable, creating a single, portable file. This is ideal for distributing applications.
- Dynamic Linking creates smaller executables that depend on external library files (
.dll/.so) at runtime. - In CMake, the
BUILD_SHARED_LIBSvariable is the conventional way to control whether libraries are built asSTATICorSHARED. Setting it toOFFis a clean way to enforce a static build for your entire project.
What's Next?
With a fully-featured and packaged application, the next and final step in this module is to improve the quality of our codebase. In the next lesson, you will Refactor code to improve modularity, separating data capture, processing, and visualization logic. This will make your project more maintainable, easier to understand, and more professional—a crucial step before moving on to final benchmarking.