Welcome to the fourth lesson in our module on Spring Boot. In our previous lesson, we examined the bean lifecycle in detail, understanding how Spring manages individual components from instantiation to destruction. We saw how callbacks and post-processors allow for fine-grained control over this process.
Now, we will elevate our perspective from individual beans to the application as a whole, specifically in the context of a web service. This lesson addresses a fundamental question for any web application: how does an incoming HTTP request actually get handled? We will explore how Spring Boot breaks from traditional deployment models by embedding a servlet container and how it uses a sophisticated dispatching mechanism to route requests to your code. Answering this clearly is a common requirement in technical interviews.
By the end of this lesson, you will be able to explain how Spring Boot embeds a servlet container like Tomcat and walk through the entire request dispatching process, from the initial network request to the invocation of your controller method.
1. From External Servers to Embedded Dependencies
Your experience with Java web development has likely exposed you to the traditional model of deploying applications: packaging your code as a Web Application Archive (.war file) and deploying it onto a pre-installed, standalone servlet container like Apache Tomcat or JBoss.
Spring Boot revolutionizes this by popularizing the concept of an embedded server. Instead of deploying your application to a server, the server is included within your application as a library. This creates a self-contained, executable .jar file that simplifies development, testing, and deployment, a key enabler for microservices architectures.
The magic behind this is a combination of starter dependencies and auto-configuration, concepts we introduced earlier.
How Spring Boot Manages Embedded Servers: The Magic Behind spring-boot-starter-web
This article provides an excellent overview of the shift from traditional to embedded servers and explains the core mechanisms that make it possible in Spring Boot.
First, read the introduction and the section on the paradigm shift to solidify your understanding of the two deployment models. Next, focus on the "Core Mechanism" section. Read about the starter ecosystem, which explains how spring-boot-starter-web transitively includes the tomcat-embed-core library. Finally, and most importantly, study the section on auto-configuration. This part details how the ServletWebServerFactoryAutoConfiguration class uses @ConditionalOnClass and a prioritized @Import list to detect and configure Tomcat because its classes are present on the classpath.
As the reading highlights, spring-boot-starter-web is the key. When Spring Boot starts, its auto-configuration process scans the classpath. The ServletWebServerFactoryAutoConfiguration class detects the presence of Tomcat's classes (e.g., org.apache.catalina.startup.Tomcat) and, based on that, automatically configures and starts an embedded Tomcat server instance for you. If you were to exclude the Tomcat dependency and include one for Jetty, Spring Boot would seamlessly start a Jetty server instead.
2. The Heart of Spring MVC: The DispatcherServlet
Once the embedded server is running, it needs to know what to do with incoming HTTP requests. This is where the DispatcherServlet comes in. It is the cornerstone of the Spring Web MVC framework and functions as a Front Controller. This design pattern means that the DispatcherServlet is a single, centralized servlet that handles all incoming web requests for the application. It then delegates the responsibility of processing the request to other components.
The DispatcherServlet is part of a deep inheritance hierarchy rooted in the standard Java Servlet API.

When a request arrives, the DispatcherServlet orchestrates a series of steps to produce a response.
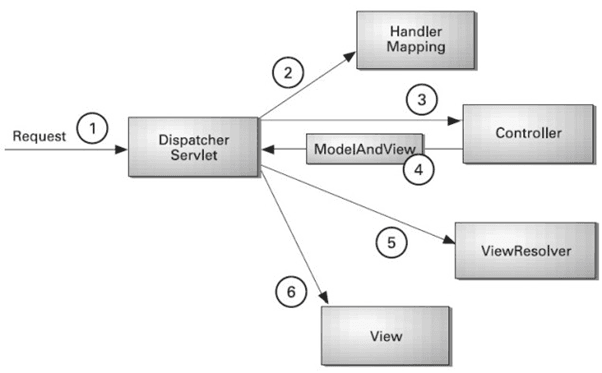
For REST APIs, which are your primary focus, the flow is slightly different as there is typically no "View" to render. Instead of a ModelAndView, the controller returns data that is converted directly into the response body (e.g., as JSON).
3. A Deep Dive into the Request Dispatching Flow
Let's trace the journey of an HTTP request from the moment it hits the server to the point where your business logic is executed. Understanding this sequence is crucial for debugging and for explaining the system's internal workings in an interview.
The process can be broken down into stages that occur in different contexts: the generic Servlet container context, the Spring framework's web context, and your own application context.
Java 23, SpringBoot 3.3.4: API Flow & Logging — Part 4 | by Araf Karsh Hamid | FAUN.dev() 🐾
This article offers a detailed, step-by-step breakdown of the request and response flow in a Spring Boot application, complete with a helpful diagram that separates the different architectural layers or contexts.
Begin by studying the diagram under the "REST API Flow" heading. Pay close attention to the color coding, which distinguishes between the Servlet Context (low-level web concerns), Spring Context (framework orchestration), and App Context (your business logic). Read the detailed breakdown of the HTTP Request Flow, from step 1 to step 9. This explains the roles of filters, the DispatcherServlet, HandlerMapping, interceptors, and AOP before the request finally reaches your @RestController. Briefly review the HTTP Response Flow to understand how the process works in reverse, with a focus on Message Conversion, which is responsible for serializing your Java objects into JSON. Finally, read the definitions of the Key Contexts to solidify your understanding of how these layers are separated.
To summarize the request flow for a typical REST API in Spring Boot:
- An HTTP request arrives at the embedded servlet container (e.g., Tomcat).
- The request passes through the
FilterChain, which can apply security, logging, or other cross-cutting concerns (this is where Spring Security does its work, which we'll cover later). - The request is handed to the
DispatcherServlet. - The
DispatcherServletconsults one or moreHandlerMappingbeans. TheRequestMappingHandlerMappingis the primary one, which inspects the request's URL path, HTTP method, headers, etc., and matches it to a specific method in one of your@RestControllerclasses. - Once the handler method is identified, the
DispatcherServletinvokes it, passing in any required arguments like path variables or request bodies. - Your controller method executes its logic, often delegating to service and repository layers.
- The controller method returns a value (e.g., a DTO).
- The
DispatcherServletprocesses the return value. If the method is annotated with@ResponseBody(which is implicit in@RestController), it uses a suitableHttpMessageConverter(likeMappingJackson2HttpMessageConverter) to serialize the Java object into a JSON string. - The
DispatcherServletsends the final HTTP response, with the JSON payload and appropriate status code, back to the client.
4. Tying It All Together: Application Startup
We've seen how the server starts and how it dispatches requests, but how are these two processes linked? This connection is established when the application first boots up within the SpringApplication.run() method.
The following video debugs this exact process, showing how Spring Boot makes decisions during startup that lead to a fully functional web server.
How Spring Boot Application Internally Works | Let's Debug and Understand run() Method Step by Step
This video from Java Guides steps through the SpringApplication.run() method, revealing the internal sequence of events during application startup.
First, watch the brief project setup from this section, where the presenter adds the spring-boot-starter-web dependency. This is the trigger for everything that follows. Next, jump to the core logic. Watch the segment from this clip. This is the crucial step where Spring Boot inspects the classpath, determines the webApplicationType is SERVLET, and decides to create an instance of AnnotationConfigServletWebServerApplicationContext. The name of this class itself tells the story: it's an ApplicationContext designed to manage a servlet-based web server. The presenter then explains that this context is responsible for creating and starting the web server. The setup and refresh of this context is shown from this section, which covers environment preparation and banner printing before the context is fully created. Finally, watch the summary at the end, which recaps the entire flow from run() to a ready application context.
The creation of the AnnotationConfigServletWebServerApplicationContext is the missing link. This specialized ApplicationContext is responsible for not only managing your beans (like services and repositories) but also for creating the ServletWebServerFactory bean (e.g., TomcatServletWebServerFactory), instantiating the DispatcherServlet, registering it with the embedded server, and starting the server itself.
Conclusion
In this lesson, we demystified the process by which a Spring Boot application goes from a simple Java program to a fully functional web server. We have traced the path from the initial main method execution to the handling of a live HTTP request.
Here are the key takeaways for your interview preparation:
- Embedded Server Model: Spring Boot bundles the servlet container (like Tomcat) inside the executable JAR, managed as a regular dependency, which contrasts with the traditional WAR deployment model.
- Auto-Configuration is Key: The
spring-boot-starter-webdependency enablesServletWebServerFactoryAutoConfiguration, which detects and starts the embedded server based on classpath contents. - Front Controller: The
DispatcherServletis the central hub for all web requests in Spring MVC. - Request Dispatching: The
DispatcherServletusesHandlerMappingto find the correct controller method, invokes it, and processes its return value (e.g., serializing it to JSON) before sending the response. - The Context Link: The
AnnotationConfigServletWebServerApplicationContextis the specific type of IoC container that manages both the web server's lifecycle and the application's beans.
Now that you understand how a Spring Boot web application starts and handles requests, a natural next question is how to manage its configuration across different environments. In our next lesson, we will explore Spring Boot profiles and externalized configuration, learning how to tailor your application's behavior for development, testing, and production without modifying your code.