Welcome to our third lesson. In our previous discussions, we covered how the Spring ApplicationContext creates and wires beans, and how Spring Boot's auto-configuration intelligently decides which beans to create based on your project's dependencies. Now, we'll shift our focus from the what to the how, exploring the precise sequence of events a bean undergoes from its creation to its disposal.
This is the Spring bean lifecycle. Understanding this process is not just academic; it's a cornerstone of deep framework knowledge that interviewers look for in senior engineers. It allows you to control object initialization, manage resources effectively, and debug complex application startup issues. In this lesson, we will trace a bean's journey from instantiation to destruction and examine the various callback hooks Spring provides along the way.
1. The Bean Lifecycle: A High-Level Overview
At its core, the Spring bean lifecycle is a series of steps that the IoC container performs to manage a bean object. While the full process is intricate, we can visualize it as a sequence of key phases.
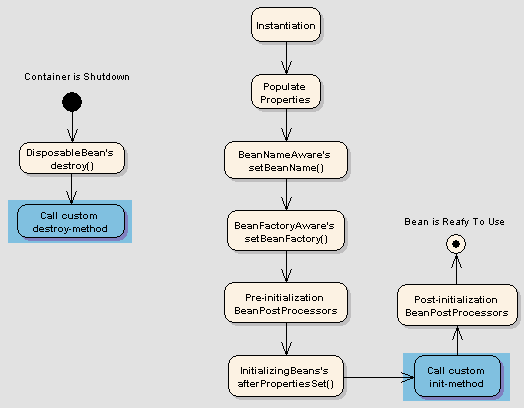
The journey for a typical singleton bean can be summarized as follows:
- Instantiation: The container creates an instance of the bean, typically by calling its constructor.
- Populate Properties: The container injects dependencies into the bean through mechanisms like setter injection (
@Autowiredon a method) or field injection (@Autowiredon a field). - Aware Interfaces (Optional): If the bean implements certain
Awareinterfaces (likeBeanNameAware), the container calls their methods to provide the bean with information about its environment (e.g., its own name). - BeanPostProcessor (Before Initialization): The container passes the bean to the
postProcessBeforeInitializationmethod of any registeredBeanPostProcessorbeans. This is a powerful hook for custom modifications before initialization callbacks are run. - Initialization Callbacks: The container invokes the bean's designated initialization methods. This is where you place logic that needs to run after all properties have been set.
- BeanPostProcessor (After Initialization): The container calls the
postProcessAfterInitializationmethod ofBeanPostProcessors. This is often used for tasks like wrapping the bean in a proxy. - Bean is Ready: The bean is now fully initialized and ready for use in the application.
- Destruction: When the application shuts down and the
ApplicationContextis closed, the container begins the destruction process for singleton beans. - Destruction Callbacks: The container invokes the bean's designated destruction methods, allowing it to release resources (e.g., close file handles or database connections).
Let's start by digging into the most common and important parts of this process: the initialization and destruction callbacks.
2. Initialization Callbacks
After a bean is instantiated and its dependencies are injected, you often need to perform some custom initialization logic. For example, you might need to establish a connection to a remote service, validate properties, or pre-calculate some values. Spring offers three primary ways to achieve this.
The following video provides a practical, code-driven demonstration of these mechanisms. It starts with a problem—a NullPointerException because a property isn't set up in the constructor—and shows how initialization callbacks solve it.
Spring bean life cycle | Bean Initialization & Destroy Callbacks | Spring boot interview prep #1
This video from Selenium Express walks through the three main ways to define initialization callbacks.
First, watch the demonstration of using the @PostConstruct annotation from this segment. This is a JSR-250 standard annotation and is generally the recommended approach because it doesn't tie your code to the Spring Framework. Next, see how the InitializingBean interface works from this section. Implementing this interface requires you to provide an afterPropertiesSet method. Notice the discussion about how this tightly couples your component to Spring. Then, observe how to use the initMethod attribute of the @Bean annotation from this part. This approach is common in Java-based configuration when you are defining beans manually. Finally, a crucial part for interviews is knowing the execution order when multiple mechanisms are present. Watch the demonstration from this clip which shows the order between @PostConstruct and InitializingBean, and then from this final clip which adds initMethod to the mix.
To solidify this, let's formally review the execution order. When multiple initialization mechanisms are configured for the same bean, they are invoked in a specific sequence:
@PostConstruct: Methods annotated with@PostConstruct.afterPropertiesSet(): The method from theInitializingBeaninterface.- Custom
init-method: The method specified via the@Bean(initMethod = "...")attribute.
The CodeGym resource provides a concise summary of these mechanisms and their execution order.
Course Module 5. Spring - Lecture: Bean lifecycle, ...
This article offers a clear, textual summary of the lifecycle callbacks and their execution order.
First, read the initial overview which introduces the three primary mechanisms. Then, jump to the section on combining mechanisms, which explicitly lists the order of execution for initialization methods.
3. Destruction Callbacks
Just as beans need setup logic, they also often require teardown logic. When the Spring container is shutting down, it gives beans a chance to clean up after themselves. This is essential for releasing resources gracefully to prevent memory leaks or dangling connections.
There are three parallel mechanisms for destruction callbacks, which mirror the initialization ones.
Spring bean life cycle | Bean Initialization & Destroy Callbacks | Spring boot interview prep #1
This video continues by demonstrating the corresponding destruction callbacks.
Watch the explanation of @PreDestroy from this segment. This is the standard, framework-agnostic way to define a destruction method. Next, see the Spring-specific DisposableBean interface in action from this clip. Then, observe the use of the destroyMethod attribute in a @Bean definition from this section. Finally, watch the important discussion on how to trigger destruction from this part. It explains why you need to explicitly close the container in a standalone application using context.close() or, preferably, context.registerShutdownHook() for a graceful shutdown managed by the JVM.
The execution order for destruction callbacks is also well-defined:
@PreDestroy: Methods annotated with@PreDestroy.destroy(): The method from theDisposableBeaninterface.- Custom
destroy-method: The method specified via@Bean(destroyMethod = "...").
It's also important to remember that the container only manages the full lifecycle for singleton beans. For beans with a prototype scope, the container creates, configures, and initializes the object, but then hands it over to the client. The container does not track the prototype instance thereafter, and thus destruction lifecycle callbacks are not called for prototype-scoped beans. The responsibility for cleaning up prototype beans falls on the application code.
4. An Interview Deep-Dive: BeanPostProcessor
For a senior-level interview, you should be prepared to discuss more advanced extension points in the lifecycle. The most significant one is the BeanPostProcessor. This interface gives you a way to plug into the lifecycle and apply custom logic to bean instances just before they are initialized and just after.
This is fundamentally different from BeanFactoryPostProcessor, which operates on bean definitions (the metadata or "recipe") before any instances are even created. Knowing this distinction is a key indicator of deep framework expertise.
The following video does an excellent job of clarifying this difference.
Spring Boot - Bean Lifecycle Interview Prep | BeanFactoryPostProcessor Vs BeanPostProcessor | #2
This video by Selenium Express provides a superb explanation of BeanPostProcessor and contrasts it with BeanFactoryPostProcessor.
First, watch the brief setup from this segment. The presenter distinguishes between a bean definition (the recipe) and the bean object (the instance). Next, see how a BeanFactoryPostProcessor is used to alter a bean definition before the bean is created from this clip. Notice how it's used to programmatically change the bean's scope from singleton to prototype. This reinforces that it works on metadata. Now for the main topic: BeanPostProcessor. Watch from this part, which introduces the postProcessBeforeInitialization and postProcessAfterInitialization methods and demonstrates exactly where they execute relative to the standard initialization callbacks (@PostConstruct, etc.). Finally, watch the critical summary from this segment where the presenter explicitly answers the question: what is the difference between BeanFactoryPostProcessor and BeanPostProcessor? This is a perfect summary for an interview answer: one works on metadata/definitions, the other works on actual object instances.
In summary:
BeanFactoryPostProcessor: Operates on bean configuration metadata. It allows you to read and modify bean definitions before the container starts to instantiate any beans.BeanPostProcessor: Operates on bean instances. It allows you to process bean objects after they've been created, with hooks before and after their initialization callbacks are invoked. Framework features like AOP proxying are implemented usingBeanPostProcessors.
Conclusion
In this lesson, we've dissected the Spring bean lifecycle, a critical concept for any serious Spring developer. Having a firm grasp of these phases empowers you to write cleaner, more robust code and to confidently explain the inner workings of the framework in a technical interview.
Here are the key takeaways:
- The Lifecycle is a Sequence: Beans go through distinct phases: instantiation, property population, initialization, and destruction.
- Three Ways for Callbacks: For both initialization and destruction, Spring provides three primary mechanisms: JSR-250 annotations (
@PostConstruct/@PreDestroy), Spring-specific interfaces (InitializingBean/DisposableBean), and@Beanattributes (initMethod/destroyMethod). - Execution Order is Fixed: The callbacks are always executed in a predictable order, with annotations first, then interfaces, then custom methods.
BeanPostProcessoris a Powerful Hook: It allows you to process bean instances before and after their initialization, enabling advanced customizations like proxying.- Destruction Requires a Shutdown Signal: For singleton beans in standalone applications, you must ensure the
ApplicationContextis closed gracefully (e.g., viaregisterShutdownHook()) for destruction callbacks to be invoked.
So far, we've focused on how Spring creates and manages individual beans. In our next lesson, we will zoom out to the web layer and investigate how Spring Boot embeds a servlet container like Tomcat and handles the request dispatching process, bridging the gap between the IoC container and a running web application.