Hello! Welcome back to your training in deconstructing the world into simple shapes.
In our last lesson, you created a "library" of simplified 3D forms for the eyes, nose, mouth, and ears. You have the individual components. Now, it's time for assembly.
Today's lesson addresses the learning outcome: Place the features onto the constructed head, ensuring they wrap around the curved surfaces correctly. We will take the Loomis head scaffold you mastered in Module 6 and attach the feature components from our last lesson. The main challenge isn't just knowing where the features go, but understanding how they conform to the 3D structure of the head. Think of it as mapping 2D textures (the features) onto a 3D model (the head), but doing it all with a pencil.
The Framework: Your Loomis Landmarks
Before we place anything, let's recall the critical construction lines of the Loomis head. These are your coordinates for placing every feature:
- The Centerline: This is the vertical line that wraps around the front of the face, dividing it into left and right halves. It's your primary guide for symmetry and orientation.
- The Brow Line: This is the horizontal line that wraps around the ball of the cranium, passing through the middle. It establishes the eye level and the main tilt of the head.
- The Side Plane: This is the ellipse we "slice" off the side of the sphere. It defines the entire side of the head and is the anchor point for the ear.

A Step-by-Step Placement Guide (3/4 View)
The three-quarter view is the most common and informative view for a portrait, so we'll use it as our primary example. The principles we cover here apply to all other angles.
Let's use a very clear, step-by-step guide to walk through this process.
How to Draw a Face from the 3/4 VIEW (Loomis Method)
The article 'How to Draw a Face from the 3/4 VIEW (Loomis Method)' from RapidFireArt provides an excellent, structured walkthrough that perfectly matches our goal. We'll be referring to its steps as we place each feature.
Please read the section titled 'How to Draw Facial Features from the 3/4 View'. Don't worry about drawing along just yet. Focus on understanding the logic of where and how each feature is placed in relation to the construction lines (Brow Line, Nose Line, Side Plane, etc.) you've already established.
Now, let's break down the placement of each feature, referencing the logic from that article.
1. Placing the Ear
The ear's location is defined almost entirely by the Loomis construction itself.
- Location: It sits in the lower-back quadrant of the Side Plane ellipse.
- Proportions: It fits vertically between the Brow Line and the Nose Line.
This is the easiest feature to place. Once your side plane is defined, you have a clear box to draw the ear into. Remember from our last lesson to simplify it into a C-shape with an inner 'Y'.
2. Placing the Eyebrows and Eyes
The eyes are what bring the portrait to life, but they must be set correctly into the head.
- Eyebrows: These are drawn directly along the curving Brow Line. As the RapidFireArt article shows, the eyebrow on the far side of the face will appear shorter due to perspective.
- Eye Sockets: Before drawing the eye itself, it's helpful to think about the socket it sits in. The sockets are recessed. Proko's video "Step by Step Portrait Construction" has a good demonstration of sculpting this area. He thinks of it as a "big cut that looks like Cyclops from the X-Men" (timestamp 13:54 in resource LINK), which creates a clear plane change for the eye sockets.
- Eye Placement: The eyes themselves are placed just below the brow line.
- Spacing: A common rule is that the distance between the eyes is equal to the width of one eye. In a 3/4 view, this is foreshortened. The eye closer to the viewer will appear slightly larger and wider than the one on the far side.
- Alignment: As the RapidFireArt guide demonstrates, a useful trick is to draw a vertical line up from the wing of the nose to find the inner corner of the near eye. The far eye is then tucked in behind the bridge of the nose. Remember to draw the eyelids wrapping around the eyeball's spherical form.
3. Placing the Nose
The nose is the central anchor of the face.
- Location: It sits on the Centerline, with its base resting on the Nose Line (the bottom of the cranium sphere).
- Construction: The best approach, as shown in the RapidFireArt article, is to first draw a simple planar wedge for the nose, as we practiced in the last lesson. Make sure this wedge is aligned with the centerline. This ensures your perspective is correct before you add details like nostrils. The bottom plane of this wedge will be more visible if the head is tilted up, and the top plane will be more visible if the head is tilted down.
4. Placing the Mouth
The mouth is tricky because it lies on a very obviously curved surface—the "tooth cylinder."
- Vertical Placement: The line between the lips is roughly one-third of the way down from the base of the nose to the chin. The bottom of the lower lip is about halfway between the nose and the chin. You can find these rules in the "How to Draw a Portrait" article (resource LINK, sections 11-13).
- Wrapping the Form: The most important thing is to make the mouth curve with the face. The Centerline you drew marks the highest point of this curve. The half of the mouth further from the viewer will be foreshortened and will curve away more sharply. The RapidFireArt guide shows this well: notice how the Cupid's bow and the center of the bottom lip are drawn slightly to one side of the true centerline to enhance the feeling of perspective.
A More "Technical" View: The Head in a Box
Given your background in graphics programming, you might appreciate a more rigid, coordinate-based way to think about this. The Loomis method is brilliant but can feel a bit "soft." Some artists combine it with a box-based approach to lock down the perspective.
This is analogous to defining an object within a bounding box in 3D graphics. If you can define the box in perspective, you can place anything inside it with confidence.
draw faces from ANY angle | a complete guide
The video 'draw faces from ANY angle' by brokendraw offers a fantastic synthesis of the Loomis method and a box construction. It will show you how to place the Loomis sphere inside a box to get the best of both worlds: structure and organic form.
Watch the section from 13:19 to 14:26. Pay close attention to how the artist first constructs a box in perspective and then fits the Loomis sphere inside it. See how they use the perspective lines of the box to guide the placement of the brow ridge, eye, and cheekbone.
This method provides an excellent way to "debug" your drawing's perspective. If you draw a Loomis head and something feels off, try enclosing it in a simple box. You will immediately see if your features are aligned with the overall perspective of the head form.
Test your understanding!
In a 3/4 view, you've placed the ear between the brow line and nose line. You've also placed the eyes along the brow line. Now, you notice the eye on the far side of the face looks too large and is not "tucked in" behind the nose bridge. What is the likely cause of this error?
Show answer
The most likely cause is that you haven't accounted for foreshortening. You might have drawn both eyes as if they were seen from the front, ignoring the fact that the far side of the face is turning away from the viewer. The far eye should be narrower, and its inner corner would likely be obscured by the form of the nose bridge.
Practice Exercise (20-25 minutes)
It's time to put all this together.
- Start by constructing a Loomis head in a three-quarter view, just as you did in Module 6. Draw the sphere, slice the side plane, and establish your centerline, brow line, and nose line.
- Following the logic from the RapidFireArt guide, begin placing the features.
- Place the ear in the back-bottom quadrant of the side plane.
- Draw the eyebrows along the brow line.
- Indicate the eye sockets, then place the eyes, paying attention to foreshortening.
- Construct a simple wedge for the nose on the centerline.
- Mark the lip lines and draw the mouth, ensuring it wraps around the curve of the face.
- Focus on construction and placement. Use light lines. The goal is a correct "wireframe," not a finished portrait. Draw through the forms to feel how they connect.
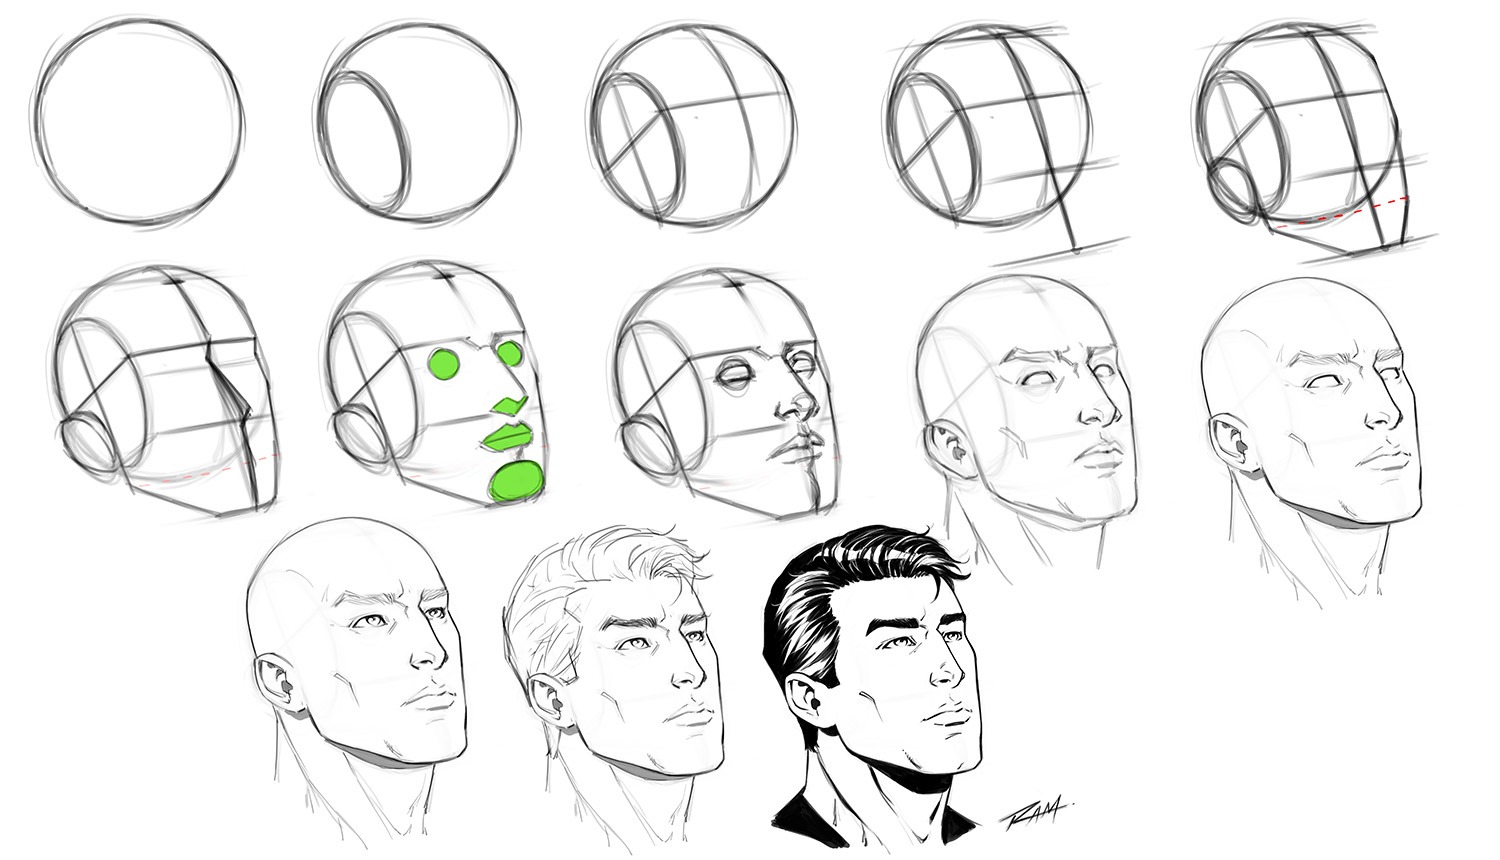
You can use the image below as a reference for how simplified features look when correctly placed on a tilted head structure. Notice the green shapes indicating the simple forms for the eyes, nose, and mouth.
Conclusion
Excellent work! You have now completed the entire construction process: building the scaffold and populating it with features. You have learned to not just place features according to a formula, but to make them belong to the 3D form of the head.
Key Takeaways:
- The Loomis landmarks (centerline, brow line, side plane) are your essential coordinates for feature placement.
- Always respect the curvature of the head; features must wrap around the form and are subject to foreshortening.
- Place features in a logical order: Ear -> Eyebrows/Eyes -> Nose -> Mouth.
- Using simplified planar forms for features (like a wedge for the nose) first helps lock in the perspective before adding detail.
- Enclosing your construction in a box can be a powerful way to verify your perspective.
Next Lesson Preview:
In our next lesson, we will begin to put this constructed head into more dynamic poses. We will focus on how to draw a constructed head tilted up or down (pitch), analyzing how the landmarks and features shift and how foreshortening becomes more extreme. Today's work has laid the perfect foundation for that next challenge.