Welcome back. In our previous lesson, we established a powerful technique for handling hydrostatic forces on curved surfaces by breaking them down into horizontal () and vertical () components. This simplified a complex vector problem into two manageable scalar calculations.
Today, we will complete this analysis. Our goal is to synthesize these components back into a single resultant force, determining both its magnitude and direction. More critically, we will learn how to find its line ofaction, the specific point through which this resultant force effectively acts. This point is known as the center of pressure. Mastering this is essential for analyzing torques and stability, a direct link to your mechanics background and a cornerstone for solving advanced problems involving gates, dams, and other submerged structures.
1. Combining the Components: The Resultant Force
Once you have calculated the horizontal and vertical force components, and , finding the resultant force, , is a straightforward application of vector addition.
The magnitude of the resultant force is given by the Pythagorean theorem:
The direction of the resultant force is described by the angle, , it makes with the horizontal:
While calculating the force vector itself is simple, determining where it acts requires a more detailed look at the principle of moments.
2. The Line of Action on a Curved Surface
To find the line of action of the resultant force , we must ensure that the moment it creates about any point is identical to the net moment created by the distributed pressure field. By Varignon's theorem, this is equivalent to stating that the moment of the resultant is the sum of the moments of its components.
To apply this, you need the individual lines of action for and :
- Line of Action of : The horizontal force acts through the center of pressure of the projected vertical area. We will derive how to find this point shortly.
- Line of Action of : The vertical force acts through the centroid of the volume of fluid directly above (or imaginarily above) the curved surface. Calculating this centroid may require integration, a skill you've developed in earlier modules.
Once you know the magnitudes and lines of action of and , you can find the line of action of by equating moments about a convenient point (like a hinge or an origin).
A Crucial Shortcut for Circular Surfaces
There is an extremely useful special case. If the curved surface is an arc of a circle (or a section of a cylinder), every differential pressure force is normal to the surface and therefore points radially inward. Since all these elemental forces point towards the center of curvature, their vector sum—the resultant force —must also pass through the center of the circle. This simple geometric fact can often bypass the need for moment calculations.
3. Locating the Center of Pressure on a Plane Surface
As we just saw, finding the line of action for on a curved surface requires us to find the center of pressure (CP) on its vertical projection. Let's formally derive the method for finding the CP on any submerged plane surface.
The resultant force on a plane surface is , where is the vertical depth of the area's centroid. The center of pressure, with coordinates , is generally not at the centroid. The pressure is greater on the deeper parts of the surface, so the CP is shifted downwards from the centroid.
The following video provides an excellent and clear derivation of the formulas for the center of pressure coordinates.
Fluid Mechanics: Topic 4.2 - Center of pressure on a plane surface
This video from CPPMechEngTutorials, titled "Center of pressure on a plane surface," systematically derives the coordinates of the center of pressure using the principle of moments and the parallel axis theorem.
Please watch the following segments: First, watch the derivation for the coordinate along the plate, yR (which we call yp). This shows how the moment from the resultant force is equated to the moment from the distributed pressure. Next, watch the corresponding derivation for the coordinate across the plate, xR (which we call xp). Finally, review the formulas for common shapes. This table of moments of inertia will be invaluable for solving problems efficiently.
The video derivations lead to these fundamental results:
- y-coordinate of CP:
- x-coordinate of CP:
Where:
- are the coordinates of the centroid of the plane area, with the y-axis pointing down along the plate from the free surface.
- is the area of the surface.
- is the second moment of area about the centroidal axis parallel to the x-axis. This term is always positive, which confirms that , meaning the center of pressure is always below the centroid.
- is the product of inertia with respect to the centroidal axes. This term is zero for shapes that are symmetric about the y-axis (like rectangles and circles).
For a deeper, text-based derivation and worked examples, you can refer to the document "HYDROSTATICS (Total Pressure on Plane Surface)".
[PDF] HYDROSTATICS (Total Pressure on Plane Surface)
This document from Annamalai University provides a rigorous, step-by-step derivation of the total pressure and center of pressure for vertically submerged plane surfaces.
Focus on the sections titled "TOTAL PRESSURE AND CENTRE OF PRESSURE FOR A PLANE SURFACE FULLY IMMERSED IN LIQUID AND HELD VERTICAL" and "Centre of Pressure". This covers the derivation starting from the setup, leading to the final expression for the depth of the center of pressure, Equation (7) (note their h is the vertical depth h_p, not the inclined distance y_p). Then, browse the worked examples that follow to see how these formulas are applied to various shapes.
4. A Complete Example: Force and Line of Action
Let's apply these concepts to find both the resultant force and its line of action on a curved surface. The following reading selection works through an example for a parabolic wall, first by direct integration and then using the component method we've been developing. We will focus on the component method.
Notes on Thermodynamics, Fluid Mechanics, and Gas ...
This excerpt from Purdue University course notes provides an excellent calculus-based analysis of the force on a curved surface, perfect for connecting the physics to the underlying mathematics.
Please read the section 2.3.2. Curved Surfaces. Start by briefly reviewing the direct integration approach from the beginning of the section until Equation (2.51) to appreciate the complexity. Then, focus your attention on the alternate method starting on page 149. This demonstrates how to find the horizontal (F_{R,x}) and vertical (F_{R,y}) force components using the projection and weight methods. Finally, study the moment balance calculation that follows, starting from this paragraph to the end of the section. This shows how the lines of action of the components are used to find the final line of action of the resultant force.
This example beautifully illustrates the full procedure:
- Calculate Components: is found from the projected rectangular area, and is found by integrating to find the weight of the parabolic fluid volume.
- Locate Component Lines of Action: The line of action for is at from the bottom of the projected rectangle. The line of action for is at the center of mass of the fluid volume, which is found to be at .
- Find Resultant Line of Action: By balancing the moments of the components against the moment of the resultant, the equation for the line of action is derived.
5. Tying it all together
Let's test your understanding with the problem from the image below. In the last lesson, you saw a diagram showing the derivation of the differential force components. This problem asks you to take the next step.
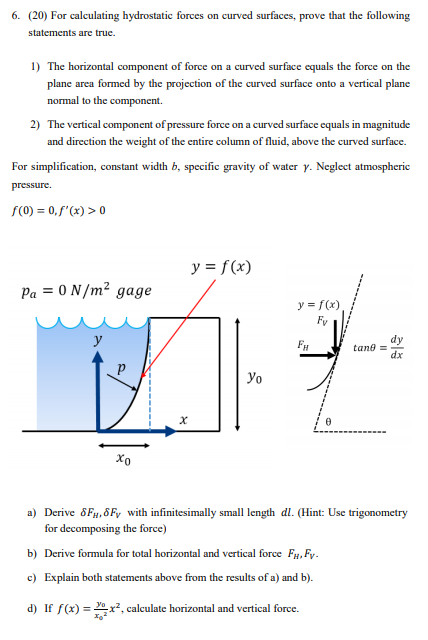
Your task:
Attempt to solve parts (a), (b), and (d) of this problem.
- Part (a) asks you to decompose the infinitesimal force into its horizontal () and vertical () components. This is a recap of the direct integration setup.
- Part (b) asks you to integrate these components to derive the general formulas for and . You should find that your results match the projection and weight methods we've discussed.
- Part (d) provides a specific parabolic shape, . Use the formulas you derived to calculate the specific horizontal and vertical forces for this gate.
Take some time to work through this. It's an excellent exercise that bridges the fundamental calculus with the practical methods used in problem-solving.
Conclusion
In this lesson, you've unified your understanding of hydrostatic forces. You now know not only how to calculate the magnitude of the force on any surface—plane or curved—but also how to pinpoint its exact line of action.
Key Takeaways:
- The resultant force is the vector sum of its horizontal () and vertical () components.
- The line of action of the resultant force on a curved surface is found by ensuring its moment equals the sum of the moments of its components.
- For a plane surface, the line of action is at the center of pressure (CP), which can be found using the formulas and .
- The center of pressure is always located deeper than the centroid of the area.
- For a surface that is a circular arc, the resultant force always passes through the center of the circle.
With this knowledge, you are now equipped to analyze not just the forces on submerged objects, but also the torques they produce, which is crucial for determining stability. In our next lesson, we will apply these ideas to the concept of buoyancy, exploring Archimedes' principle and the conditions that determine whether an object will sink or float.