Hello! Welcome back to our module on video assembly in CapCut.
Introduction
In our last lesson, you created a professional folder structure to organize all your AI-generated assets. This is a crucial first step that separates beginners from efficient creators. Now that your "ingredients" are all neatly arranged, it's time to start cooking.
Today, we'll dive into the heart of video editing. The learning outcome for this lesson is to import assets and perform basic cuts, trims, and arrangement on the CapCut timeline. You'll take your separate image, video, and audio files and begin weaving them into a cohesive story. These fundamental skills—importing, trimming, and arranging—form the backbone of every video you will ever create.
Let's get started and bring your project to life!
1. The CapCut Workspace: Importing Your Assets
First, let's get acquainted with the CapCut editing environment and bring in the assets you organized. When you open a new project, you'll primarily work with two areas:
- The Media Panel: Usually on the left, this is where you'll import and store all your project's assets (video clips, images, audio).
- The Timeline: At the bottom, this is your canvas. You'll drag assets from the Media Panel onto the timeline to build your video sequence.
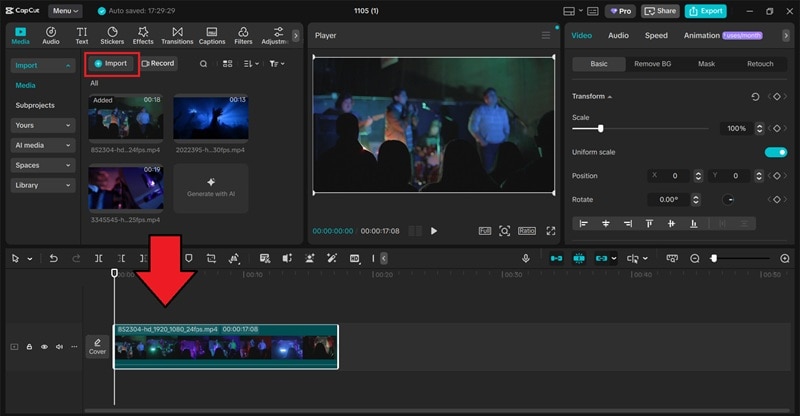
There are several ways to get your files into the Media Panel. The following video from CapCut's official channel provides a clear demonstration.
How to Use the Timeline: Import and Trim Media Like a Pro | Online Video Editing | CapCut
This clip from the 'How to Use the Timeline' tutorial demonstrates the different methods for uploading your media into a CapCut project.
Watch from 02:48 to 03:30. Pay close attention to the various import options, including drag-and-drop, which is a very fast way to work with the folders you created in the last lesson.
As you saw, you can:
- Click the Import button.
- Drag and drop files directly from your computer's folders.
- Connect to Google Drive or Dropbox.
- Scan a QR code to upload from your phone.
For now, the most straightforward method is to open the folders you created in the last lesson (03_Audio, 04_Visuals) and simply drag the files you need into CapCut's Media Panel.
2. Basic Edits: Trimming and Splitting Clips
Once your assets are on the timeline, your main job as an editor is to select the most impactful moments. You'll rarely use an entire clip from start to finish. This process of shortening and cutting is where you start shaping the narrative and pace of your video.
There are two primary ways to do this: trimming and splitting.
Trimming: Shortening the Ends
Trimming involves removing unwanted parts from the beginning or end of a clip. It's like trimming the crusts off a sandwich.
Splitting: Cutting in the Middle
Splitting allows you to cut a clip into two or more separate pieces at a specific point, indicated by the playhead (the vertical white line). This is useful for removing a mistake in the middle of a take or for inserting another clip.
The following video demonstrates both of these essential techniques.
How to Use the Timeline: Import and Trim Media Like a Pro | Online Video Editing | CapCut
Let's return to the CapCut tutorial to see trimming and splitting in action.
Watch from 04:18 to 05:16. The video first shows how to trim by clicking and dragging the ends of a clip. Then, it shows how to split a clip using the split button.
Keyboard Shortcuts for Faster Editing
While using the on-screen buttons works perfectly, learning keyboard shortcuts will dramatically speed up your workflow. The following reading provides a great overview of some powerful shortcuts.
Capcut Video Editing – Tutorial for PC
This article, 'Capcut Video Editing – Tutorial for PC', details several useful tools and their corresponding shortcuts.
Read the first five paragraphs of the 'Organizing the Timeline' section. Focus on the tools mentioned: 'Split' (shortcut B), 'Delete Left' (shortcut Q), and 'Delete Right' (which deletes the portion of the clip to the right of the playhead). These shortcuts are incredibly useful for quick edits.
To summarize the key shortcuts:
- B: Activates the Split tool (looks like a razor blade).
- Ctrl+B (or Cmd+B on Mac): Splits the selected clip at the playhead.
- Q: Deletes everything to the left of the playhead in the selected clip.
- W: Deletes everything to the right of the playhead in the selected clip.
3. Arranging Your Story on the Timeline
With your clips trimmed to perfection, the next step is arranging them in the right order to tell your story.
Reordering and The "Magnetic" Timeline
In CapCut, you can reorder clips simply by clicking, holding, and dragging a clip to a new position on the timeline.
You'll notice that when you delete a clip or move it, the other clips often "snap" into place, automatically closing the gap. This is thanks to a feature called the Main Track Magnet. The article you just read, "Capcut Video Editing – Tutorial for PC," mentions this feature. It's usually turned on by default and helps keep your main storyline seamless.
Navigating the Timeline View
As your projects become more complex with many small clips, the timeline can get crowded. You'll need to zoom in to make precise edits or zoom out to see the entire project.
CapCut Tutorial 2/9 | How to ADD CLIPS AND ORGANIZE YOUR TIMELINE | Capcut for Beginners 2024
This tutorial, 'How to ADD CLIPS AND ORGANIZE YOUR TIMELINE', has a great segment on timeline navigation.
Watch from 02:56 to 03:22. This short clip shows you how to use the 'Zoom to fit' button to see all your clips at once and the slider to zoom in and out for detailed work.
This ability to change your view of the timeline is fundamental for both high-level arrangement and detailed, frame-by-frame edits.
Pro Tip: Pre-Trimming Clips Before Adding to Timeline
Here's an efficiency tip: if you have a long video file but only need a few seconds from it, you can select that portion before you even add it to the timeline. This keeps your timeline cleaner from the start.
CapCut Tutorial 2/9 | How to ADD CLIPS AND ORGANIZE YOUR TIMELINE | Capcut for Beginners 2024
Let's watch one more clip from the 'How to ADD CLIPS...' video to learn this technique.
Watch from 00:39 to 01:37. The presenter demonstrates using the 'I' key to set an 'In' point (where the selection starts) and the 'O' key to set an 'Out' point (where it ends). When you then add the clip, only the selected portion goes to the timeline.
Conclusion
Excellent work! You've just learned the core mechanics of video editing in CapCut. Building a video is an iterative process of adding clips, trimming them down to their essential parts, and arranging them to create a compelling flow.
Key Takeaways:
- You can import assets into CapCut's Media Panel by dragging and dropping them from your organized folders.
- Trimming (dragging the ends of a clip) and splitting (using the split tool or
Ctrl+B) are the two primary methods for cutting your clips. - Learning keyboard shortcuts like Q (Delete Left) and W (Delete Right) will significantly speed up your editing.
- Clips can be easily rearranged by dragging and dropping them on the timeline. CapCut's "magnetic" timeline helps close gaps automatically.
- Use the zoom functions to navigate your timeline effectively, moving between a wide overview and a detailed view.
Next Lesson Preview:
Now that your clips are cut and arranged, the next step is to make your video more accessible and engaging, especially for social media where many people watch with the sound off. In the next lesson, we will explore how to auto-generate and style animated captions to improve viewer engagement.