Hello! Welcome back to our module on creating AI talking avatars.
In the last lesson, you learned the critical first step: how to prepare a high-quality source photograph. You now know that a clear, forward-facing image with a neutral expression is the secret ingredient for achieving great animation and lip-sync.
Today, we'll take that prepared image and bring it to life. This lesson directly addresses the learning outcome: Create a talking head video by combining a static image with a generated voiceover track. By the end of our session, you'll have created your first AI talking avatar video, a core skill for making the engaging UGC and marketing content you're aiming for.
1. The Universal Workflow of Talking Head AI
Before we dive into specific tools, it's helpful to understand the basic process, as most platforms follow a similar pattern. Creating a talking avatar almost always involves these four steps:
- Upload Your Image: You'll start with the high-quality, front-facing portrait you prepared in the last lesson.
- Provide the Audio: You'll either upload an audio file (like the voiceovers you learned to create in Module 3) or type in a script and use the tool's built-in text-to-speech (TTS) voice generator.
- Generate the Video: The AI processes the image and audio, matching the lip movements to the spoken words and adding subtle facial animations.
- Export: Once you're happy with the result, you download the final video file.
This user interface from an AI video tool shows these steps clearly: you choose an avatar (or upload your own), input the text for the speech, and then generate the video.
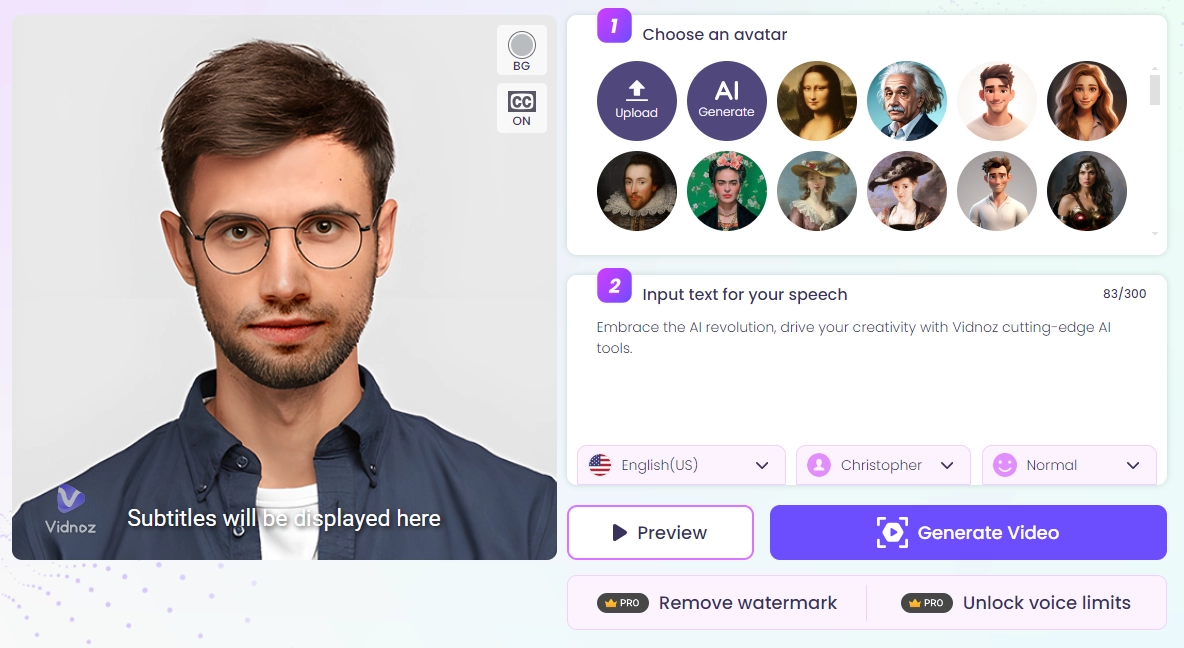
Now let's see how this workflow is implemented in some of the free tools available to you.
2. Exploring a Standalone Tool: Digen AI
There are many dedicated "talking photo" tools online, and it's worth knowing about them as they often have unique features or generous free plans. One popular and capable option is Digen AI (sometimes referred to as Den AI).
This video provides an excellent, detailed walkthrough of how to use Digen AI from start to finish. It covers uploading your image, adding your voiceover, and generating the final video.
How To Make Your Ai Images Talk For Free (Easy Methods) Better Than Google Veo 3
The video 'How To Make Your Ai Images Talk For Free' by Blessing Ezikeanyi gives a fantastic demonstration of several tools. We'll focus on the first tool she presents, Digen AI.
Please watch the section on Digen AI from 01:47 to 07:13. Pay attention to how she uploads the image, imports a pre-made voiceover, and initiates the video generation. Notice her tip about the credit system, which is quite generous for a free tool.
As you saw in the video, the process is straightforward:
- Create a new project and set your aspect ratio.
- Upload your static character image.
- Go to the "Talk" section and upload your audio file.
- Generate the video and download the result.
Digen AI is a great tool to have in your toolkit, especially for its generous daily credits that can accumulate over time. The video also shows a comparison at the end (from 17:08 onwards) between Digen and other tools, which is useful for seeing the difference in animation quality and expressiveness.
3. Your Turn: Creating a Talking Head in CapCut
Now, let's apply this process using the tool you're already familiar with: CapCut. Since CapCut is your preferred editor, learning to create talking avatars directly within its ecosystem will streamline your workflow significantly.
CapCut has a built-in feature for this, often called "AI dialogue scene" or "Photo to avatar," which works on both the desktop and mobile apps. We'll focus on the mobile workflow, as it's very accessible.
To get started, let's review a guide that walks through the exact steps.
Talking Photo AI: Create Animated Speaking Images for Free - CapCut
CapCut's official blog has a helpful guide titled 'Talking Photo AI: Create Animated Speaking Images for Free'. It provides an illustrated walkthrough of the entire process within the mobile app.
Please read the 'Step-by-step guide: How to create talking photos with CapCut App' section. Follow the images and descriptions for each step: launching the tool, uploading your photo, adding dialogue (or audio), and generating the video.
Your Task (20 minutes)
It's time to create your first talking avatar video. Follow the steps from the guide you just read.
- Open CapCut on your phone.
- Find the Tool: Navigate to "All tools" and find the "AI dialogue scene" feature.
- Upload Your Image: Use the high-quality character image you prepared in the previous lesson.
- Add Your Voiceover:
- You have two choices here:
- Tap "Or add audio" to upload a voiceover file you created in Module 3.
- Type a short script (2-3 sentences) into the "Enter dialogue" box and select an AI voice you like.
- You have two choices here:
- Generate and Export: Tap "Generate." Once the video is ready, review it. If you're happy with the lip-sync and animation, tap "Export" to save it to your phone.
This image shows what the key steps look like inside the CapCut app interface.
Congratulations! You have successfully combined a static image with a voiceover to create a talking head video.
Conclusion
In this lesson, you bridged the gap between static assets and animation, a fundamental step in creating compelling AI-driven content.
Key Takeaways:
- The workflow for creating talking head videos is consistent across most tools: upload an image, provide audio, generate, and export.
- Standalone tools like Digen AI offer powerful features and generous free plans, making them excellent options for specific projects.
- You can create talking avatars directly within CapCut using its "AI dialogue scene" feature, which is perfect for keeping your entire workflow in one place.
- You now have the practical skill to turn any character portrait into a speaking avatar for your UGC videos, ads, or animated stories.
Next Lesson Preview:
While creating an avatar from your own photo offers maximum customization, sometimes you need a different look or a quicker solution. In the next lesson, we'll explore the world of pre-made stock avatars. You will learn how to select and customize a professional stock avatar for a presentation-style video, adding another valuable technique to your AI video creation skills.