Introduction
In our previous lesson, you successfully installed Jenkins on a Linux server and completed the initial setup wizard, bringing your own automation server online. This was a crucial first step, moving from the theory of CI/CD to a practical, running environment.
Now that you have a functional Jenkins instance, it's time to get familiar with its user interface and perform some essential system configuration. This lesson will guide you through the Jenkins dashboard, your primary control center, and then show you how to configure the paths to key development tools like the Java Development Kit (JDK) and Git. Mastering these administrative tasks is fundamental, as it ensures Jenkins knows how to find the tools it needs to build, test, and deploy software. By the end of our session, your Jenkins server will be fully prepared for us to create our first automated build job.
Exploring the Jenkins Dashboard
When you log into Jenkins, the first thing you see is the dashboard. This is the main hub from which you will manage all your automation tasks. Let's take a tour of its key components to understand where everything is.
Exploring the Jenkins Server Web Interface: A Comprehensive Guide
This guide provides a clear overview of the Jenkins web interface, which is a great starting point for familiarizing yourself with the layout.
Read the introduction to understand the dashboard's role. Then, focus on the section "The Jenkins Dashboard," particularly the descriptions of the main components. Pay attention to the descriptions of the sidebar links, as we will use them frequently.
As the article describes, the dashboard is logically laid out. Let's focus on the most important parts you'll be using.
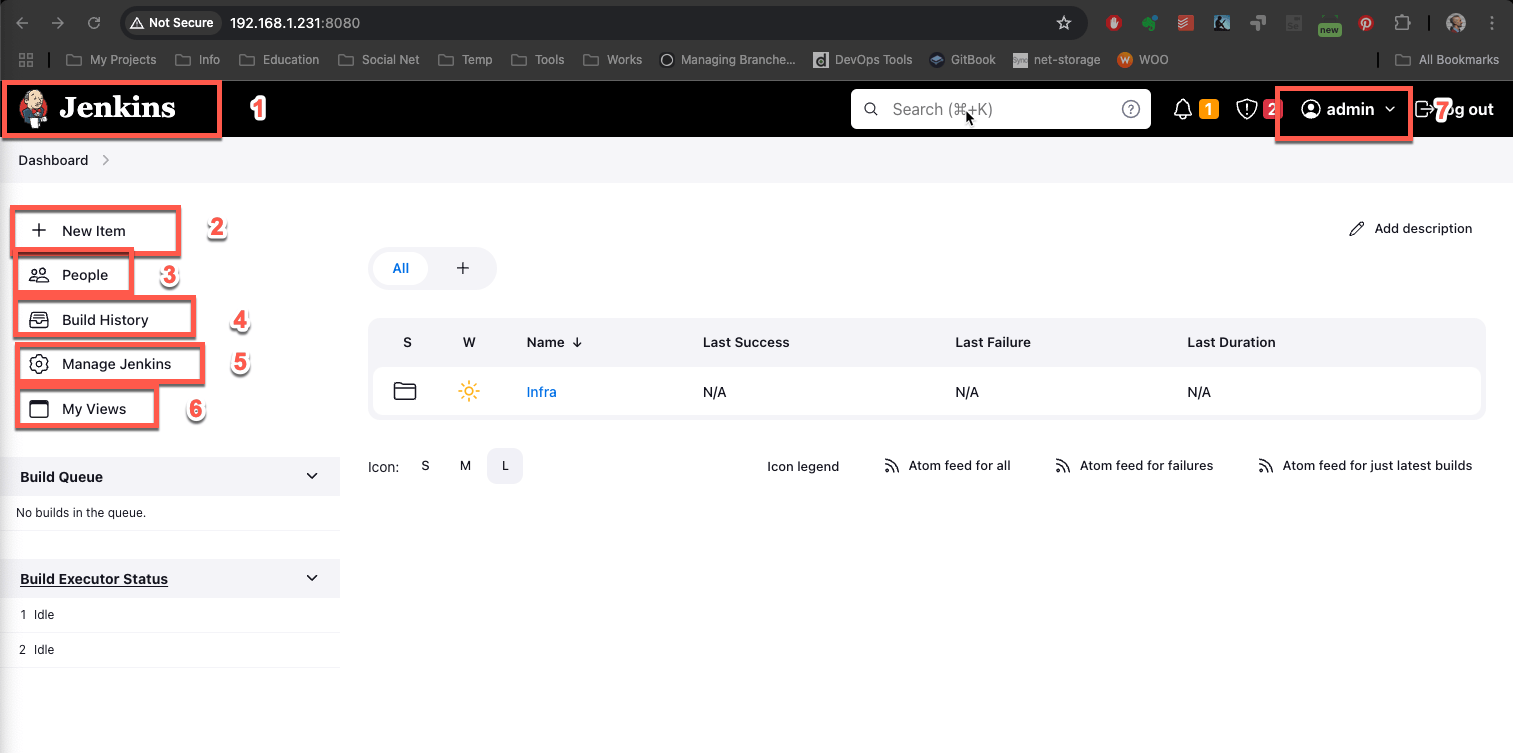
The main Jenkins dashboard, highlighting key navigation elements: (1) Top Navigation/Breadcrumbs, (2) New Item, (3) People, (4) Build History, (5) Manage Jenkins, (6) My Views, and (7) User Profile.
- Left Sidebar: This is your primary navigation menu.
- New Item: This is where you'll go to create new projects, such as Freestyle jobs or Pipelines. We will use this in our very next lesson.
- People: Shows a list of all registered Jenkins users and their roles.
- Build History: Provides a chronological view of all builds that have run on the server across all projects.
- Manage Jenkins: This is the administrative heart of Jenkins. You'll come here to configure system settings, install plugins, manage user security, and define the tools Jenkins can use. We will explore this in depth shortly.
- Main Content Area: This central panel is currently empty, but once you create jobs, they will be listed here, showing their names and status at a glance.
- Top Navigation (Breadcrumbs): As you navigate deeper into Jenkins (e.g., into a specific job's configuration), this breadcrumb trail helps you quickly get back to previous pages or the main dashboard.
For a dynamic tour of the interface, you can watch the following video segment.
Learn Jenkins! Complete Jenkins Course - Zero to Hero
The "DevOps Journey" channel offers a comprehensive course on Jenkins. This part of the video walks through the dashboard UI right after the initial setup.
Watch the segment from the UI overview, where the presenter explains the purpose of the breadcrumbs and each item in the left sidebar.
Take a few moments to click around your own Jenkins dashboard to get a feel for the navigation. The two links you will use most often are New Item and Manage Jenkins.
Configuring Essential Tools
Before Jenkins can build a project, it needs to know where to find the necessary build tools on the server. For example, to compile a Java application, it needs a JDK, and to check out code from a repository, it needs Git. You define the locations of these tools in the Global Tool Configuration.
First, let's navigate to the main administrative page.
- On the Jenkins dashboard, click Manage Jenkins.
You are now on the main configuration page. This page can seem overwhelming at first, but it's organized into logical sections.
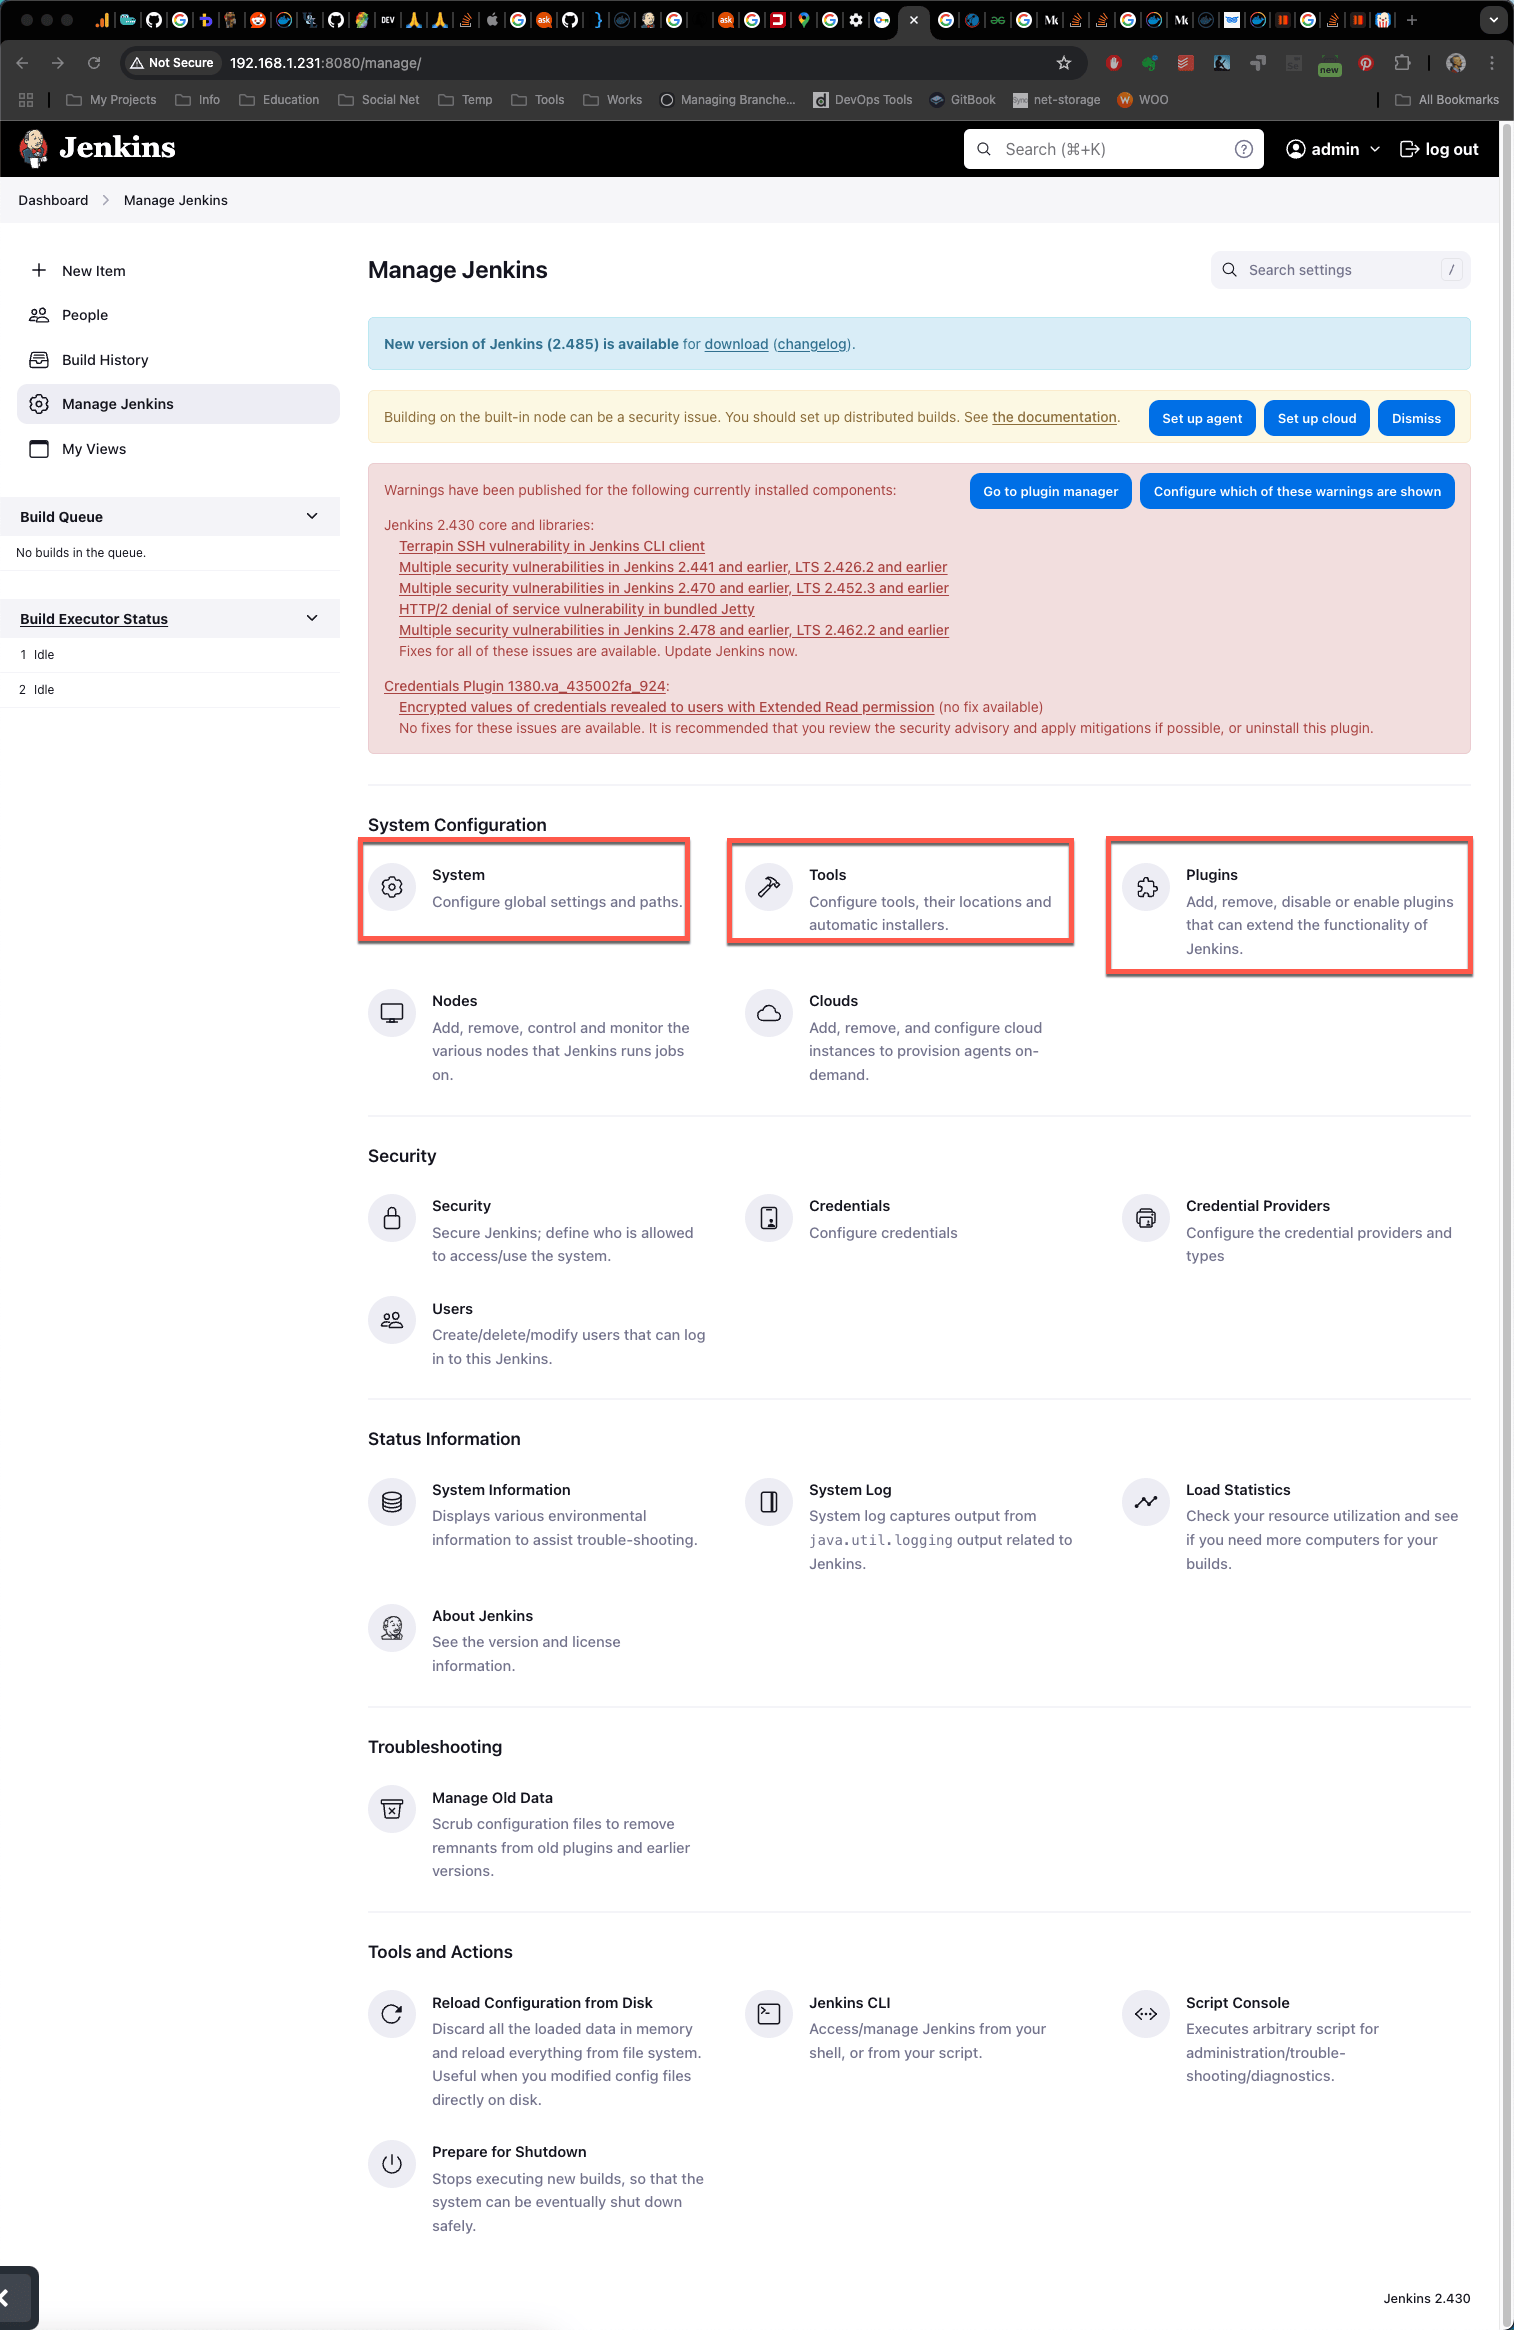
The 'Manage Jenkins' page, which serves as the central hub for all system-wide administration and configuration.
The three most important sections for a Jenkins administrator are:
- System Configuration: Contains
System(formerly Configure System) andTools(formerly Global Tool Configuration) for setting up global properties and tool paths. - Security: For managing users, credentials, and access control.
- Plugins: For adding, removing, and updating Jenkins plugins to extend functionality.
Let's dive into the Tools section to configure our JDK and Git.
The Complete Jenkins Tutorial You Will Ever Need
This DEV Community article provides a concise overview of Jenkins configuration, including the global tool settings.
Read the sections on Global Configuration and Tool Configuration. This will give you a clear idea of where to find the settings we are about to change.
Step 1: Install the JDK on Your Server
In the previous lesson, you installed the Java Runtime Environment (JRE) to run Jenkins itself. However, for compiling code, you need the full Java Development Kit (JDK). Let's install it on your server now.
Connect to your Linux server via SSH and run the following command:
sudo apt update
sudo apt install openjdk-17-jdk
Once installed, Jenkins needs to know the path to this JDK. On Ubuntu, the default installation path is typically /usr/lib/jvm/java-17-openjdk-amd64.
Step 2: Configure JDK and Git in Jenkins
Now, let's tell Jenkins where to find the JDK and the git executable.
-
From the Manage Jenkins page, click on Tools. (This might be called "Global Tool Configuration" in older Jenkins versions).
-
Scroll down to the JDK section and click Add JDK.
-
Give it a descriptive Name, for example,
JDK-17. -
Uncheck "Install automatically".
-
In the JAVA_HOME field, enter the path to your JDK installation:
/usr/lib/jvm/java-17-openjdk-amd64.Configuring a JDK installation in Jenkins by providing a name and the path to JAVA_HOME.
-
Next, scroll down to the Git section. The Git plugin was installed as part of the "suggested plugins" during setup, so this section should be available.
-
The default path for Git is often just
git, which relies on the executable being in the system'sPATH. To be explicit and avoid potential issues, it's better to provide the full path. -
On your server's terminal, find the path to Git by running:
which gitThis will likely return
/usr/bin/git. -
Back in Jenkins, under Git installations, click Add Git.
-
Give it a Name like
Default-Git. -
Uncheck "Install automatically".
-
In the Path to Git executable field, enter the path you found, e.g.,
/usr/bin/git.Configuring a Git installation in Jenkins by providing a name and the full path to the Git executable.
-
Scroll to the bottom of the page and click Save.
Your Jenkins instance is now configured with the locations of the essential tools it needs to start building projects.
Conclusion
In this lesson, you took a guided tour of the Jenkins dashboard and performed your first critical administrative tasks. You are now equipped with the foundational knowledge to navigate the UI and manage system-wide tool configurations.
Here are the key takeaways:
- The Jenkins dashboard is your main control panel, with New Item for creating jobs and Manage Jenkins for administration being the most important areas.
- The Manage Jenkins page is the central hub for all system settings, including security, plugins, and tools.
- The Global Tool Configuration (or Tools) section is where you tell Jenkins the location of external build tools like the JDK and Git.
- Explicitly defining tool paths is a best practice that makes your Jenkins setup more robust and predictable.
With your server's environment and tools properly configured, you are now fully prepared to create your first automated job. In the next lesson, we will put this setup to use by creating a Freestyle project to check out code from a Git repository and run a simple build script.