Hello! Welcome to the first lesson of Module 2, "Visual Blueprint: Storyboarding and Shot Planning."
In the last lesson, you created a solid story outline for a 1-minute video about our lonely robot, Bolt. You now have the "what" of your story—the plot, the beats, and the timing. Today, we'll start translating that blueprint into a visual language. We'll focus on the fundamental building block of visual storytelling: the shot.
Your goal for this lesson is to learn how to select appropriate shot types (e.g., wide, medium, close-up) to convey narrative information and emotion. Choosing the right shot is like choosing the right word; it can completely change the meaning and feeling of a moment. Mastering this will allow you to guide the audience's attention and tell your story with much greater impact, a crucial skill for planning your AI video projects.
Let's dive into the filmmaker's toolbox.
The Three Families of Shots
Before we look at every single shot type, it's helpful to group them into three main "families." Each family has a primary job in storytelling.
A great way to think about this comes from the resource "7 Basic Shot Types" by Digital Cinematography. It links each shot type to a fundamental storytelling question:
| Shot Family | Associated Shots | Primary Job: Answers the question... |
|---|---|---|
| Wide | Extreme Wide Shot, Wide Shot | Where and When is the story happening? |
| Medium | Medium Wide Shot, Medium Shot, Medium Close-Up | What is the character doing and with whom? |
| Close-Up | Close-Up, Extreme Close-Up | Who is this character and why do they feel this way? |
This framework is your first guide to making intentional choices. Are you trying to establish the vast, empty junkyard? You're in the Wide Shot family. Do you need to show Bolt's hands carefully assembling a new friend? That's a job for the Medium Shot family. Do you want to show the flicker of hope in his eyes? That's a Close-Up.
A Visual Guide to Shot Sizes
Now, let's get specific. The terms for shot sizes are standardized in filmmaking, and knowing them will be essential for both planning your storyboards and writing effective AI prompts.
Below is an excellent "Shot Size Cheatsheet" that gives you a clear visual reference for the most common shot types.
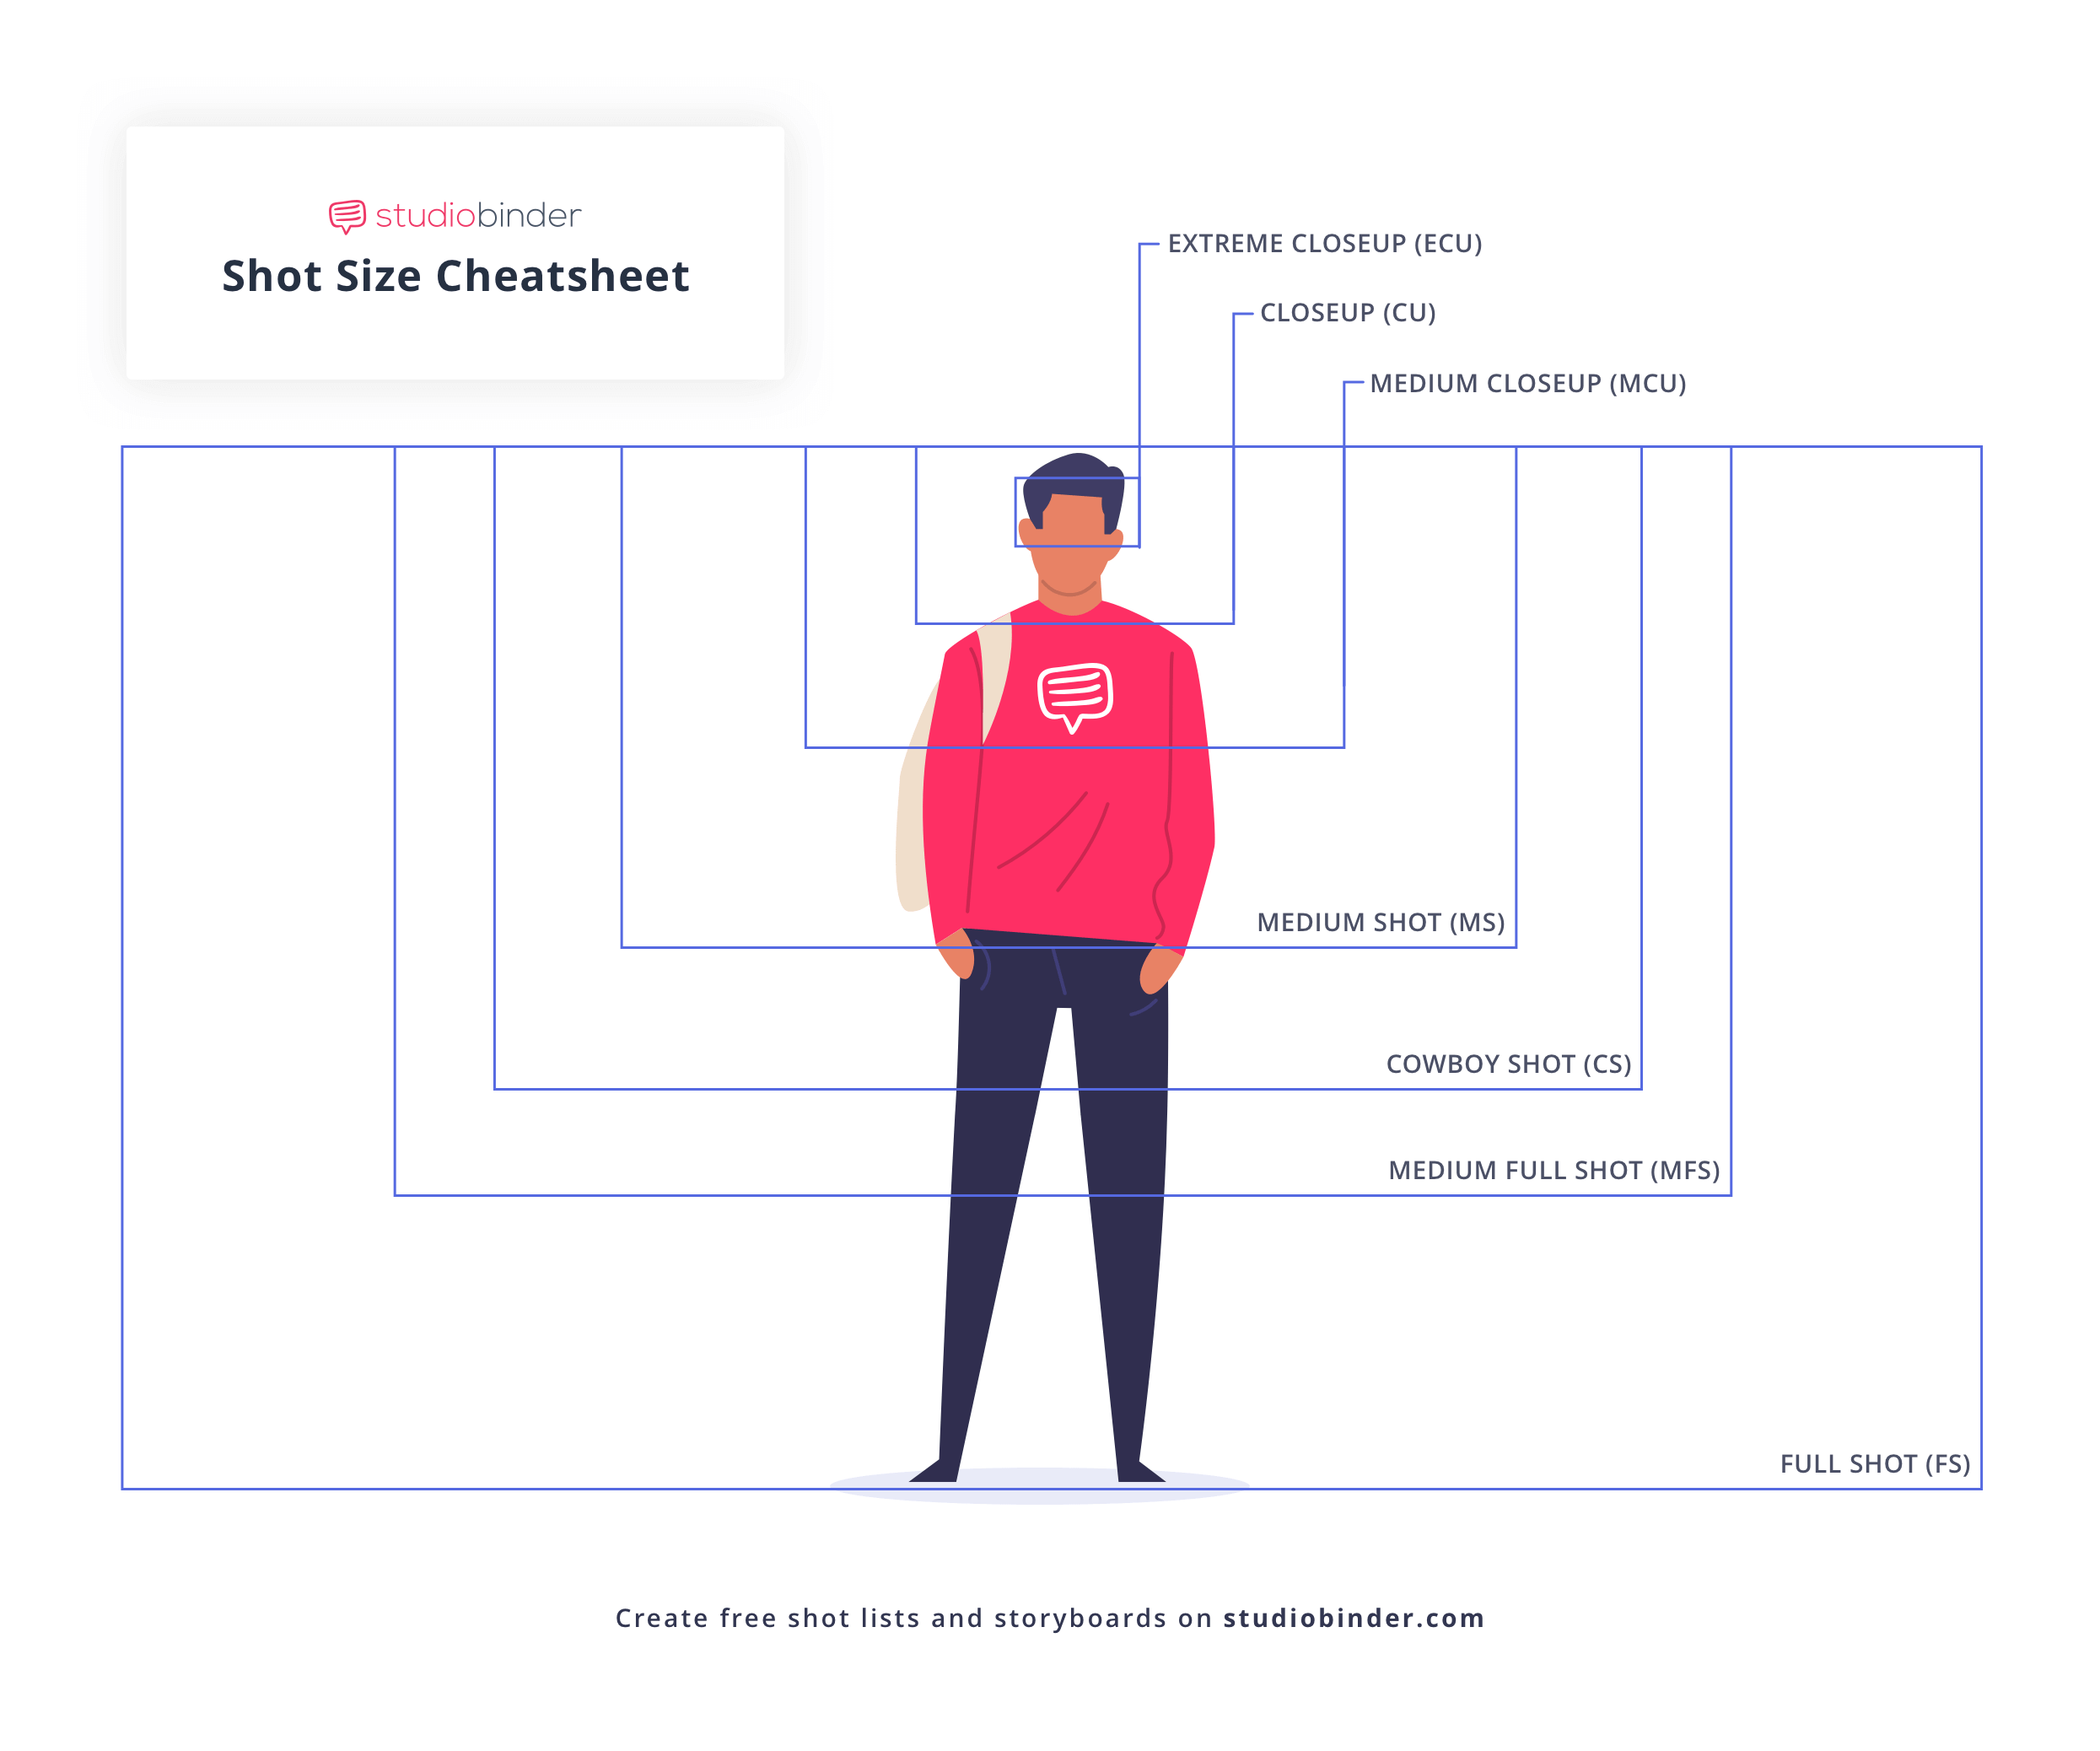
To see these shots in action and understand their emotional power, we'll watch a comprehensive video guide from StudioBinder. It uses examples from well-known films to demonstrate not just what each shot is, but what it does for the story.
Ultimate Guide to Camera Shots: Every Shot Size Explained [The Shot List, Ep 1]
This video, 'Ultimate Guide to Camera Shots', is a fantastic introduction to the language of cinematography. It will walk you through the essential shot sizes and explain their storytelling value.
Watch the video from 01:23 to 11:55. As you watch, pay attention to the name of each shot and the director's purpose for using it. Notice how a change in shot size can alter the feeling of a scene entirely.
Unpacking the Storytelling Power of Each Shot
That video covered a lot of ground. Let's synthesize that information into a clear guide you can use for your own projects.
1. The Wide Shots: Setting the Stage
These shots are your story's foundation, giving the audience a sense of place and scale.
-
Establishing Shot / Extreme Wide Shot (EWS):
- What it is: Shows the location from a distance. The subject is either not visible or is a tiny speck in the environment.
- Narrative Job: Establishes geography, time of day, and mood. Answers: "Where are we?"
- Emotional Impact: Can create a sense of grandeur, scale, or isolation and loneliness.
- Example for Bolt: An EWS of the vast, sprawling junkyard under a grey sky to establish his lonely world.
-
Wide Shot (WS) / Long Shot (LS):
- What it is: Shows the character's full body from head to toe, with their environment still being a major part of the frame.
- Narrative Job: Shows the character's relationship to their surroundings. Answers: "Where is our character within this location?"
- Emotional Impact: Can make a character seem small, overwhelmed, or empowered by their environment.
2. The Medium Shots: Observing the Action
This is the most common family of shots, mirroring how we often see people in real life. They are excellent for showing action and interaction.
-
Full Shot (FS):
- What it is: The character fills the frame from head to toe. Less emphasis on the background than a Wide Shot.
- Narrative Job: Focuses on the character's full body language, posture, and action (e.g., walking, dancing).
-
Medium Wide Shot (MWS) / Cowboy Shot:
- What it is: Frames the character from roughly the knees or mid-thighs up.
- Narrative Job: A great balance between showing facial expression and body language/action. The "Cowboy" name comes from Westerns needing to show the gun holster. It often feels confident or confrontational.
- Example for Bolt: A shot from Bolt's knees-up as he stands proudly next to the friend he just built.
-
Medium Shot (MS):
- What it is: Frames from the waist up. The "bread and butter" of dialogue scenes.
- Narrative Job: A neutral, conversational shot that focuses on a character and what they are doing with their hands, without losing the context of their location.
- Example for Bolt: A Medium Shot showing Bolt from the waist up as he attaches an arm to his new friend.
3. The Close-Ups: Feeling the Emotion
These shots bring the audience into the character's personal space, creating intimacy and highlighting emotion or important details.
-
Medium Close-Up (MCU):
- What it is: Frames a character from the chest up.
- Narrative Job: Fills the screen with the character, minimizing distractions and focusing us on their facial expressions. It's intimate, but with a little more breathing room than a full close-up.
-
Close-Up (CU):
- What it is: Fills the screen with a part of the subject, usually their face.
- Narrative Job: Shows detailed emotion and reaction. Connects the audience directly with the character's internal state. Answers: "How do they feel?"
- Emotional Impact: Creates intimacy, empathy, and dramatic tension.
- Example for Bolt: A Close-Up of Bolt's face showing his profound sadness at the start of the story.
-
Extreme Close-Up (ECU) / Insert Shot:
- What it is: Isolates a very specific detail—a character's eye, a ticking watch, a finger pressing a button.
- Narrative Job: Directs the audience's attention to a critical object or a minute facial detail. Creates emphasis and drama.
- Example for Bolt: An ECU on the lifeless eyes of the newly built robot, emphasizing that it lacks power.
Test your understanding!
Let's go back to your story outline for Bolt. Consider the beat: "Bolt spots a blinking light on a distant, unstable junk pile."
You want to show two things: Bolt's realization (an internal moment) and the object he sees (a narrative detail). Which two shots would you use in sequence to tell this story beat most effectively? Explain your choices.
Show answer
A great combination would be:
- A Close-Up (CU) on Bolt's face. This would capture the moment his expression changes from defeated to hopeful as his eyes notice something. It connects the audience to his internal emotional shift.
- An Extreme Close-Up (ECU) or Insert Shot of the blinking light. This shot tells the audience exactly what he's looking at and establishes it as an object of great importance.
Using these two shots together creates a powerful "point-of-view" sequence where we feel the character's discovery.
Translating Shot Types into AI Prompts
This theory is great, but how do you actually create these shots using AI? Since you're familiar with AI generators like Nano Banana, you'll be glad to know you can use this exact terminology in your prompts.
Let's watch a video that demonstrates this in practice. The creator uses an AI tool to generate different camera angles and shots for a character, starting from a single image. This is very similar to the "anchor image" workflow you're interested in.
The NEW Way to Create Every Camera Angle in Nano Banana PRO
This video by Tao Prompts, 'The NEW Way to Create Every Camera Angle in Nano Banana PRO', is a practical guide to controlling the camera in AI generation. It directly translates the film concepts we've discussed into prompt language.
Watch from the beginning to 06:39. Pay close attention to the specific words the creator uses in his prompts, like 'full body shot,' 'close-up shot on the hand,' and 'extreme close-up shot on her left eye.'
As you saw, you don't need to be vague. You can be direct and specific.
- To get a Wide Shot or Full Shot, use prompts like:
full body photo of a lonely robot standing in a vast junkyard
- To get a Medium Shot, you can try:
medium shot of a robot from the waist up, tinkering with spare parts
- To get a Close-Up, be explicit:
close-up photo of a robot's face, looking sad
- For an Extreme Close-Up, name the detail:
extreme close-up on the robot's mechanical eye
By using the correct terminology, you gain immense creative control over your AI-generated visuals.
Conclusion
In this lesson, you've learned the fundamental language of visual storytelling: the shot size. You can now make deliberate choices to guide your audience's focus and evoke specific emotions.
Here are your key takeaways:
- Shot sizes can be grouped into three families: Wide (for context), Medium (for action), and Close-up (for emotion).
- Each specific shot type—from an Extreme Wide Shot to an Extreme Close-Up—has a distinct narrative purpose.
- You can and should use this standard filmmaking terminology directly in your AI prompts to control the camera distance and framing of your generated clips.
You now have the vocabulary to start planning your visuals. In our next lesson, we'll build on this by learning how to plan a shot sequence for a scene, including camera movements and estimated durations. We'll take the individual shots you now understand and string them together to create a dynamic and coherent visual narrative.