Hello! Welcome back to our second lesson in the "Visual Blueprint" module.
In our last session, we broke down the fundamental "words" of visual language: the different shot sizes. You learned how to choose between a wide shot, a medium shot, and a close-up to establish context, show action, or convey emotion.
Today, we're going to start assembling those words into powerful sentences and paragraphs. We'll move from individual shots to dynamic shot sequences. The goal for this lesson is to learn how to plan a shot sequence for a scene, including camera movements and estimated durations.
This is a critical step that bridges your story outline and the actual AI generation process. By planning your sequences, you're not just creating a series of images; you're choreographing the viewer's experience, building suspense, and telling a story with rhythm and flow.
Why Sequence Matters: Guiding the Viewer
A sequence is a series of shots that work together to communicate a unified idea or piece of the story. The order and type of shots you choose can dramatically change the meaning of a scene, a principle famously known as the Kuleshov Effect.
A great way to think about sequencing is as a conversation with your audience. Each shot should either pose a question or provide an answer.
To see this in action, let's watch a segment from filmmaker Jesse Driftwood. He explains this "questions and answers" principle and breaks down a sequence from one of his own videos.
Keep them watching - Tips for better story telling!
In this video, 'Keep them watching - Tips for better story telling!', you'll learn why sequencing is a foundational element of visual storytelling.
Watch from the beginning (00:04) to 04:34. Pay close attention to the 'questions and answers' concept and how he applies it to his opening sequence. Notice how each shot—snow, gloves, tires, wide warehouse—either asks a new question or answers a previous one.
As you saw, a well-crafted sequence builds intrigue and clarity.
- Question: We see snow falling. (Where are we? What's the mood?)
- Answer/Question: We see gloved hands unlocking something. (Someone is here. But who, and what are they unlocking?)
- Answer/Question: We see van tires rolling in. (They arrived in a van. But where is 'here'?)
- Answer: A wide shot reveals a large warehouse. (This is the location.)
This deliberate flow guides the audience, making them active participants in discovering the story.
The Filmmaker's Plan: The Shot List
To plan these sequences methodically, filmmakers use a shot list. Think of it as a detailed checklist or a recipe for your scene. It translates your script or outline into a series of concrete, actionable steps for filming—or in our case, for AI prompting.
A good shot list contains several key components. This article from Vimeo provides a clear breakdown.
How to Make a Shot List for Video Production, Plus 4 Free ...
Let's read a short section from 'How to Make a Shot List for Video Production' on the Vimeo blog. It clearly defines what a shot list is and what essential information it should contain.
Read the sections 'What is a shot list?' and 'Key components every video shot list should include'. Take note of the components listed, especially Camera details and Durations, as we'll be focusing on those next.
As the article highlights, your plan for each shot should include not just the shot size (from our last lesson) but also camera movement and estimated duration.
Adding Motion: Basic Camera Movements
Static shots are useful, but adding camera movement can make your scenes much more dynamic and immersive. When you write your AI prompts, using the correct terminology for these movements is key. Here are some of the most fundamental ones.
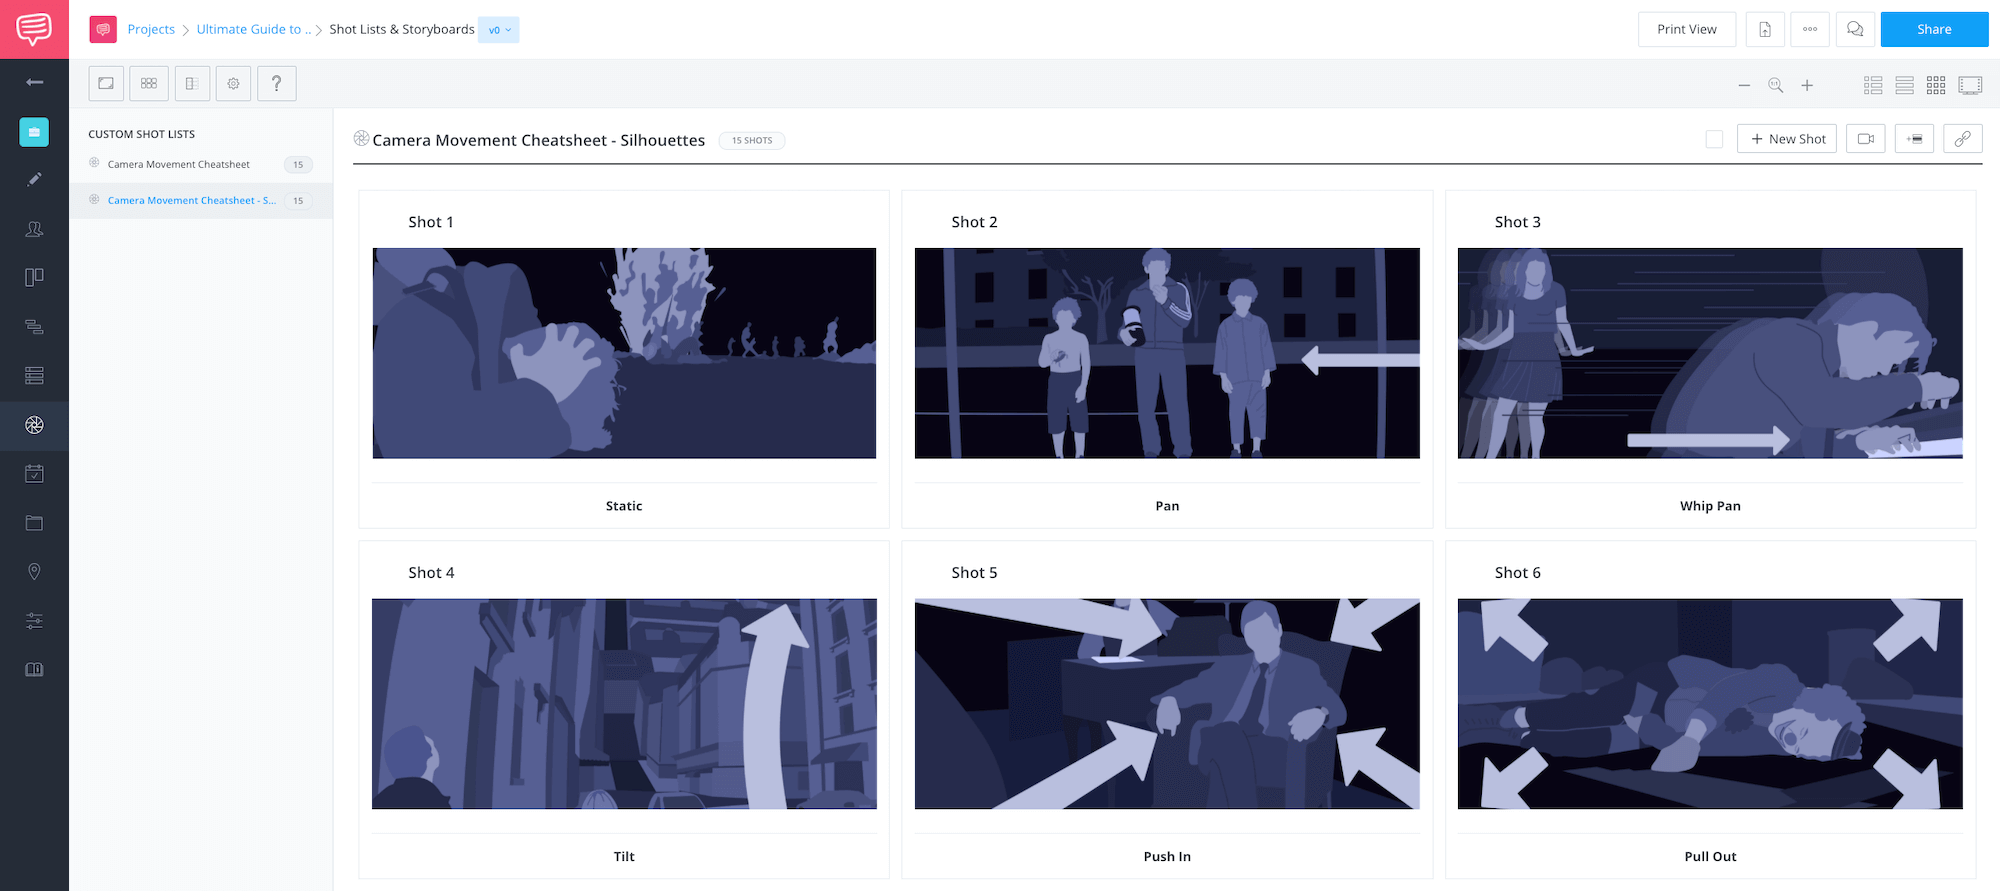
- Pan: The camera swivels horizontally (left or right) from a fixed position. Use it to follow a character or reveal a wide landscape.
- Tilt: The camera swivels vertically (up or down). Use it to reveal something's height or look up/down at a character.
- Push In / Dolly In: The entire camera moves forward, toward a subject. This increases focus and intimacy.
- Pull Out / Dolly Out: The entire camera moves backward, away from a subject. This can reveal the larger context or create a sense of emotional distance.
- Zoom: The lens magnifies the image to get closer (zoom in) or wider (zoom out). This can feel more abrupt or artificial than a dolly movement.
- Tracking Shot: The camera moves alongside a subject.
Thinking Like a Director: Planning in Practice
Now, let's see how all these elements—shot size, sequence, and camera movement—come together in a real-world planning process. We'll watch a filmmaker break down a page from the script for the movie 1917 and build a shot list from scratch.
How filmmakers choose shots for their movies.
This video, 'How filmmakers choose shots for their movies,' offers a fantastic look inside a creator's mind. You'll see how story goals influence every decision in a shot sequence.
Watch from 01:37 to 06:43. Notice how he starts with the scene's main idea ('the calm before the storm') and then selects shots to represent that visually. Pay attention to his reasoning for using a high angle, a pan, and close-ups to introduce the characters.
This thought process is exactly what you'll be doing for your own projects. You start with the beat from your outline ("Bolt feels lonely"), determine the feeling you want to convey, and then design a sequence of shots to create that feeling.
Estimating Duration and Pacing
A crucial but often overlooked part of your shot list is the estimated duration. How long should each shot be? This decision directly impacts the pacing and rhythm of your video.
- Fast-paced action scenes often use a series of very short shots (1-2 seconds).
- Emotional or contemplative moments benefit from longer takes (5-10 seconds or more).
When planning, think about what's happening in the shot.
- Action: How long does it take for the character to perform the action?
- Dialogue: How long does it take to say the line?
- Emotion: How long do we need to hold on a character's face for the emotion to register?
The filmmaker in the 1917 video mentioned using a stopwatch to time out the scene in his head. The Vimeo article you read earlier also gives this advice in its FAQ section (LINK, section 3).
For AI video generation, planning shot duration is especially important. Since many tools have a maximum length for each generated clip, your shot list tells you if a single planned shot needs to be generated as multiple clips and edited together.
Here is an example of what this plan looks like when laid out visually in a storyboard. Notice the "Duration" field for each panel.

From Shot List to AI Prompt
So, how does this detailed plan translate into a better AI prompt? Your shot list gives you all the ingredients for a powerful, specific prompt.
Let's say your shot list has this entry:
- Shot #3: Medium Close-Up (MCU)
- Action: Bolt looks up, his eyes widening with hope.
- Movement: Slow push-in on his face.
- Duration: 4 seconds.
Instead of a simple prompt like "robot looks up," you can now write a much more effective one:
Medium close-up of a lonely robot in a junkyard. His head tilts up slowly, and his mechanical eyes widen with a hopeful glow. Slow push-in camera movement emphasizing his expression. Cinematic, dusty atmosphere.
This level of detail, planned in your shot list, is precisely what gives you control over the AI's output. The "AI Video Prompt Guide" from LTX Studio has excellent examples of this. The guide emphasizes specifying camera movement, direction, and speed to get better results, and warns against common pitfalls like ignoring timing or making sequences too complex in a single prompt. This reinforces our approach: plan shots individually, then generate them.
Test your understanding!
Let's apply this to your story about Bolt the robot. Consider this story beat: "Bolt finds the scattered, broken parts of another robot in a corner of the junkyard and decides to rebuild it."
Your task is to plan a 3-shot sequence for this beat. For each shot in the sequence, create a shot list entry specifying:
- Shot Type (e.g., Wide, MCU)
- Camera Movement (if any)
- Action Description
- Estimated Duration
Think about the "question and answer" flow. How can you reveal this discovery to the audience step-by-step?
Show answer
Here is one possible way to plan this sequence:
Shot 1: The Discovery
- Shot Type: Medium Shot (MS)
- Camera Movement: Tracking shot, following Bolt.
- Action: Bolt is walking through a narrow aisle of junk. He stops abruptly, his head tilting down toward something off-screen.
- Duration: 4 seconds.
- Question: What did he see?
Shot 2: The Object
- Shot Type: Close-Up (CU) from Bolt's point of view.
- Camera Movement: None (static).
- Action: A pile of broken robotic parts—an arm, a leg, a faceplate with one eye—lies half-buried in the dirt.
- Duration: 3 seconds.
- Answer: He found another robot.
Shot 3: The Decision
- Shot Type: Medium Close-Up (MCU) on Bolt's face.
- Camera Movement: Slow push-in.
- Action: Bolt looks down at the parts, then his expression shifts from surprise to determination. He kneels down, reaching a hand out.
- Duration: 5 seconds.
- Answer: He's going to do something about it.
Conclusion
Today you've learned how to think like a director, planning not just individual shots but entire visual sequences. This process is the key to creating videos that are dynamic, coherent, and emotionally resonant.
Here are your key takeaways:
- A shot sequence is a series of shots that work together to tell a mini-story, often using a "question and answer" flow to guide the viewer.
- The shot list is your primary tool for planning a sequence, detailing the shot type, camera movement, action, and estimated duration for every shot.
- Camera movements like pans, tilts, and push-ins add dynamism and help direct the audience's attention.
- Estimating shot duration is vital for controlling the pace of your story and for the practicalities of generating clips with AI tools.
- All this planning translates directly into more specific and powerful AI video prompts.
You now have a complete paper plan for a scene. In our next lesson, we'll bring that plan to life. We will create simple storyboard frames to serve as keyframe anchors for AI generation. This is where you'll create the "anchor images" you mentioned, taking the first big step toward ensuring visual consistency in your project.