Hello! Welcome back to our module on dialogue and lip-syncing.
In our last lesson, you learned how to set up your video editing timeline by importing your character's silent animation and their AI-generated dialogue as separate tracks. Your project now has all the raw ingredients. The character is on screen, and we can hear their voice, but the two aren't connected.
Today, we'll perform the magic that truly brings your characters to life. This lesson is dedicated to our learning outcome: Use lip-syncing tools to match character mouth movements to the audio track. We'll explore the core concepts, survey the most popular tools available, and understand the different workflows you can use to make your characters speak.
The Science of Sync: How AI Lip-Sync Works
At its heart, lip-syncing is about matching specific mouth shapes to the sounds of speech. In linguistics, the smallest unit of sound is a phoneme (like "f", "m", or "o"). In animation, the corresponding visual mouth shape is called a viseme.
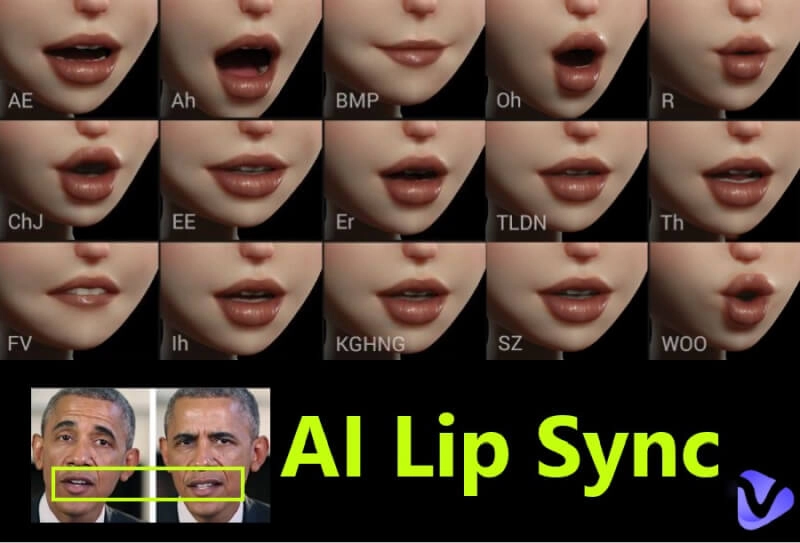
Instead of an animator manually creating these shapes frame by frame, AI lip-sync tools analyze your audio file, detect the phonemes, and animate your character's mouth to match. More advanced tools also animate surrounding facial features, like cheeks and eyebrows, to create a more natural and expressive performance.
The Two Core Lip-Sync Workflows
When you start using lip-sync tools, you'll find they generally fall into two categories based on the visual input they require:
- Image-to-Lip-Sync: You provide a static image of your character.
- Video-to-Lip-Sync: You provide a silent video clip of your character.
Understanding the difference is key to choosing the right tool and planning your production.
The following video provides an excellent survey of the current landscape of AI lip-sync tools and clearly demonstrates both workflows. We will refer to it throughout the lesson.
Best AI Lip-Sync Tools in 2025 (Most Realistic)
The video 'Best AI Lip-Sync Tools in 2025' from Tao Prompts is a comprehensive comparison of the most popular platforms. We'll start by watching a segment that showcases the Image-to-Lip-Sync workflow using the tool Dzine.
Please watch from 04:36 to 08:35. As you watch, notice: The simple inputs: a static image and an audio file. How the AI generates not only the lip movements but also the character's head and hand motions. The quality of the final result and the discussion of how it's expressive without being overly expressive.
As you saw, the Image-to-Lip-Sync workflow is powerful. You give the AI a character portrait and a voice, and it handles the entire animation.
- Pros: Often produces very accurate lip movements and can add subtle, lifelike head and body motion. It's great for creating talking-head style videos from a single image.
- Cons: You have less control over the character's specific actions. The AI decides how the character moves, which may not fit your scene's requirements.
Now, let's look at the second approach, which builds directly on our previous lesson.
Best AI Lip-Sync Tools in 2025 (Most Realistic)
Now, let's watch a segment from the same video that demonstrates the Video-to-Lip-Sync workflow, this time using Pixver.
Please watch from 25:55 to 27:43. Pay attention to how this process differs: The inputs are now a pre-existing video clip and an audio file. The AI's job is to animate the mouth within the existing video, preserving the original character motion and background. The presenter notes that this method gives you more control over the scene's action.
The Video-to-Lip-Sync workflow is what you'll use when you've already generated a specific silent performance for your character.
- Pros: You maintain complete creative control over the character's actions and the environment. You direct the silent movie first, then add the dialogue.
- Cons: The quality of the lip-sync can sometimes be lower than the image-to-video method, as the AI has to work within the pixels of an existing video. You might see more visual artifacts.
Test your understanding!
You want to create a scene where a detective, sitting in her car, watches a building and then says into a radio, "He's on the move." For the shot where she speaks, which workflow would give you the most predictable result for her action of raising the radio to her mouth?
Show answer
The Video-to-Lip-Sync workflow would be the better choice. It allows you to first generate a silent video clip of the exact action you want (the detective raising the radio). You can then upload that specific video along with the audio file ("He's on the move") to a tool that supports this workflow. Using an Image-to-Lip-Sync tool would be a gamble, as the AI might generate a different, unwanted movement.
A Landscape of Lip-Sync Tools
The market for AI lip-sync tools is expanding rapidly. Knowing which tool to use depends on your specific needs regarding quality, cost, speed, and features. The resources below provide an excellent overview.
10 Best AI Lip Sync that supports VEO, Sora, Kling and ...
This article, '10 Best AI Lip Sync that supports VEO, Sora, Kling and ...', offers a fantastic written summary of the top tools. It's a great reference to have bookmarked.
Please read two sections of this article: '10 Best AI Lip Sync Tools': Skim through the descriptions of the 10 tools (like HeyGen, Runway ML, Dzine, etc.) to get a feel for the variety of options. 'How to Choose the Right Lip Sync Tool': Read this section carefully. It provides a strategic framework for selecting a tool based on your project type, budget, and quality needs.
To summarize the key decision factors from the article and video, consider these questions:
- Quality vs. Cost: Do you need the absolute highest quality, or is a "good enough" result acceptable for a lower price? The "Best AI Lip-Sync Tools" video suggests Higsfield for top quality and Dzine for cost-effectiveness.
- Workflow: Do you prefer starting with a static image (HeyGen, Hedra, D-ID) or an existing video (Pixver, Runway ML)?
- Features: Do you need extra features like multi-speaker detection (Vozo AI, Dzine) or integration with professional editing software (Runway ML)?
- Ease of Use: Are you a beginner looking for a simple interface (D-ID) or a more advanced user who needs fine-grained control?
A Practical Walkthrough and Best Practices
Let's see the process in action within a specific tool. The following video from ElevenLabs (a tool you've seen for text-to-speech) shows their integrated lip-sync feature.
How to Lip Sync any Audio to Video with any AI Model (Wan 2.6, Omnihuman 1.5, etc...)
The video 'How to Lip Sync any Audio to Video' by ElevenLabs provides a concise demonstration of the process inside a single platform. It clearly shows the core steps common to most image-to-lip-sync tools.
Please watch the entire video (it's short, under 4 minutes). Focus on: The simple interface: upload image, add speech, generate. The comparison between different AI models within the same tool, showing how model choice affects the final look (movement, expression, quality).
Regardless of which tool you choose, following a few best practices will significantly improve your results.
How To Create Good Lip Syncing With AI
The article 'How To Create Good Lip Syncing With AI' contains a great section on best practices that are universally applicable.
Please read the section 'Best Practices for Quality Results'. These four tips are crucial for getting clean, believable lip-sync animations.
Here is a summary of those key best practices:
- Use Clear, High-Quality Audio: The AI relies on a clean audio signal to identify phonemes. Background noise, music, or muffled recordings will lead to inaccurate lip movements.
- Favor Frontal or Three-Quarter Face Angles: Most AI models are trained on faces that are clearly visible. Extreme side profiles or shots where the mouth is obscured will be challenging for the AI to track.
- Test with Short Clips First: Before processing a long monologue, sync the first 5-10 seconds. This allows you to check the quality and settings without wasting time or credits on a result you won't use.
- Match the Voice to the Character: The performance isn't just about the lips; it's about the whole face. A voice that sounds angry should be paired with an animation that looks angry. Some tools allow you to prompt for emotion, while others infer it from the tone of the audio.
Conclusion
You now have a solid understanding of how to take your separate video and audio components and merge them into a single, synchronized performance. This is the moment your characters truly start to speak.
Key Takeaways:
- AI lip-sync works by mapping audio phonemes to visual visemes (mouth shapes).
- You can choose between two main workflows: Image-to-Lip-Sync (for generating talking videos from a static image) and Video-to-Lip-Sync (for adding dialogue to an existing silent video).
- The market is full of tools with different strengths. Your choice depends on balancing quality, cost, workflow, and features.
- Achieving high-quality results depends on providing clean audio and clear, well-composed video of your character's face.
Preview of the Next Lesson:
You've generated your talking clip! But how does it feel in the context of a full scene? A conversation is a dance of words, pauses, and reactions. In our next lesson, we will focus on the art of editing these clips together. You'll learn how to adjust the timing of dialogue and non-verbal reactions for a naturalistic performance, turning a series of talking clips into a compelling and believable scene.