Hello! Welcome to the final lesson in our module on advanced dialogue techniques.
In our last session, we focused on the art of making conversations feel natural by adjusting the timing of dialogue and reactions using J-cuts and L-cuts. We operated under the assumption that your audio and video were already perfectly synchronized.
Today, we tackle the less glamorous but absolutely essential flip side of that coin: what to do when your audio and video are not in sync. This lesson is about becoming a digital detective—learning how to diagnose the root cause of a sync problem and apply the right technical fix. Our learning outcome is to troubleshoot and correct common audio/video synchronization errors. By the end, you'll have a systematic approach to solving one of the most frustrating problems in video editing.
Part 1: Diagnosing the Problem - Why is My Audio Out of Sync?
Before you can fix a sync issue, you need to understand what kind of problem you're facing. Broadly, there are two types of synchronization errors: Audio Lag, where the sound happens after the action, and Audio Lead, where the sound happens before the action.
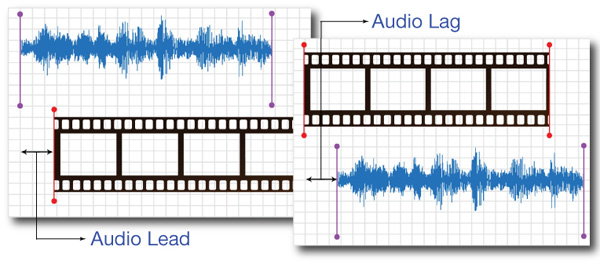
These errors manifest in two primary ways on your timeline:
- Simple Offset: The audio is out of sync by the exact same amount throughout the entire clip. The beginning is off by 100 milliseconds, and the end is also off by 100 milliseconds.
- Audio Drift: The audio starts in sync (or close to it) but becomes progressively more out of sync over time. By the end of a long clip, the lag or lead is significant.
To effectively troubleshoot, it's crucial to understand the common technical culprits behind these issues.
How to Resync Audio and Video Like a Pro
The article 'How to Resync Audio and Video Like a Pro' from MyKaraoke.video provides an excellent breakdown of why sync problems happen. Understanding these causes is the first step to solving them.
Please read the following sections: Start with 'So, Why Is My Audio and Video Out of Sync Anyway?' and 'The Usual Technical Suspects'. This introduces the core concepts. Review the table under 'Common Causes of Audio Sync Issues'. This is a great diagnostic cheat sheet. Read the FAQ sections 'My Audio Drifts Further Out of Sync...' and 'What's This 'Variable Frame Rate'...'. These reinforce the most common and confusing issues.
As the article explains, the two most common causes you will encounter are:
- Variable Frame Rate (VFR): This is the number one cause of audio drift. Your phone and screen recording software use VFR to save file space, but professional editing software expects a Constant Frame Rate (CFR). This mismatch causes the video and audio to drift apart over time.
- Separate Recording Devices: When you record video on a camera and audio on a separate microphone (e.g., connected to a laptop), their internal clocks are slightly different. Over a long recording, these tiny differences accumulate, also causing audio drift.
Part 2: Prevention - Your First and Best Line of Defense
The most effective way to "fix" a sync issue is to prevent it from happening in the first place. Adopting a few key habits during recording and file preparation can save you hours of frustration.
How to Resync Audio and Video Like a Pro
Let's continue with the same article, which outlines the best preventative measures.
Please read these two sections: 'Preparing Your Files for a Flawless Sync': This explains the crucial step of converting VFR footage to CFR before editing. 'An Ounce of Prevention...': This details the importance of creating a manual sync point (like a hand clap) and ensuring your device settings match.
To summarize the key preventative workflow:
- Create a Sync Point: Before you start your main performance, clap your hands once, clearly on camera. This creates a sharp visual (hands meeting) and a sharp audio spike in the waveform, giving you a perfect reference point.
- Align Your Settings: If using multiple devices, ensure they are all set to the same frame rate (e.g., 30 fps) and the same audio sample rate (48 kHz is the standard for video).
- Convert to CFR: If you're using footage from a phone, always convert it from VFR to CFR using a tool like HandBrake before importing it into your video editor. This single step eliminates most audio drift problems.
Part 3: The Correction Toolkit
Even with the best preparation, you'll sometimes need to perform manual corrections. Here are the essential techniques, from simple to advanced.
Method 1: Manual Track Sliding
This is your go-to method for fixing a simple offset or audio drift when you have a good sync point. The principle is simple: unlink the audio and video tracks and slide one until it aligns with the other.
How To Sync Audio And Video In CapCut PC (Automatic And Manual Methods - 2025 Tutorial)
The video 'How To Sync Audio And Video In CapCut PC' by Ted's Tricks provides a clear, practical demonstration of how to do this manually. While he uses CapCut, the principles are identical in any video editor.
Please watch from 06:28 to 10:42. Focus on these key steps: How he increases the track height and waveform size to see the audio spikes clearly. How he uses the hand clap spikes as the anchor point. How he zooms in on the timeline for frame-by-frame accuracy. How he deletes the original, unwanted audio track after syncing.
This manual alignment is the fundamental skill for correcting sync. Find your anchor (the clap), zoom in, and nudge the tracks into place.
Test your understanding!
You have a 5-minute clip where the dialogue is perfectly synced at the start, but by the end, the audio is about a full second ahead of the actor's lips. You remember you filmed it on your smartphone. What is the most likely cause of this issue, and what should have been your first step before editing?
Show answer
The most likely cause is audio drift due to a Variable Frame Rate (VFR) recording from your smartphone. Your first step before starting the edit should have been to use a tool like HandBrake to convert the video file to a Constant Frame Rate (CFR).
Method 2: Time-Stretching Audio
Sometimes the overall clip is in sync, but a specific line of AI-generated dialogue is a little too fast or slow for the character's mouth movements. You can't just slide the track, because that would desynchronize everything else. The solution is to stretch or compress just that one audio clip.
How to Seamlessly Sync AI Voiceovers with Video (AI ...
The article 'How to Seamlessly Sync AI Voiceovers with Video' from Kukarella explains a professional technique for this exact scenario. It's a powerful tool for fine-tuning AI dialogue.
Please read the section 'Workflow 2: The 'Manipulate-the-Audio' Method'. Pay special attention to the final point: 'Master Time-Stretching (The "Rubber Band" Tool)'.
This time-stretching (often called "Rate Stretch" in editors like Premiere Pro) allows you to change the duration of an audio clip without altering its pitch. If an AI-generated line finishes half a second before the character closes their mouth, you can "stretch" the audio by a small percentage (e.g., 105%) to make it fit perfectly.
Method 3: Lip-Sync Specific Troubleshooting
Finally, what if the sync is generally correct, but the AI lip-sync tool itself is producing odd results like unnatural mouth shapes or robotic timing?
How to AI Lip Sync Consistent Characters (Full Tutorial)
The video 'How to AI Lip Sync Consistent Characters' by Tim Explains AI offers some excellent, targeted advice for troubleshooting the AI generation process itself.
Watch from 12:28 to 15:28. At the end of this segment (around 14:45), the creator gives a rapid-fire summary of key troubleshooting tips. Listen closely to these.
Here are the key takeaways from that video for when the lip-sync AI is the problem:
- Movements look delayed or laggy? The cause may be low-quality audio. Try re-generating your voiceover at a higher quality setting.
- Mouth shapes look wrong? The problem is likely poor face detection. Go back to your lip-sync tool and be more precise when selecting the character's face and jawline.
- Timing feels robotic? The issue is in the source audio. As we learned in the last lesson, you need to edit your script to add small, natural pauses (
<break time="0.2s" />) before generating the voice. - One specific word looks bad? A great pro tip is to generate an audio clip of just that single word or phrase, run it through the lip-sync tool, and then splice that tiny fixed segment into your main video edit.
Conclusion
You have now completed the entire dialogue and lip-sync module. You can not only craft a naturalistic performance but also diagnose and fix the technical errors that can derail it.
Key Takeaways:
- Diagnose First: Identify if you have a simple offset or a progressive audio drift. This will determine your fix.
- Prevention is Key: Always create a clap-sync point, match your device settings, and convert VFR footage to CFR before editing.
- Master the Slide: Use your editor's timeline to manually slide tracks into alignment using your sync point as a reference.
- Use Time-Stretching: For AI dialogue that doesn't quite fit, use your editor's time-stretch tool to adjust the audio's duration without changing its pitch.
- Troubleshoot the Source: For bad lip-sync results, investigate the quality of your source image (face selection) and audio (pauses, quality).
Preview of the Next Lesson:
With the technical and artistic aspects of scene creation now in your toolkit, we are ready to zoom out and think about how to structure a complete story. In our next module, "Scaling the Narrative," we will begin by learning how to expand the 3-act structure for a 3-5 minute narrative by adding a midpoint or subplots. This will be the first step toward your goal of creating longer, more ambitious video projects.