Hello! Welcome to the next lesson in our module on UI and Regression Testing.
In our last session, we focused on using element queries and assertions in XCUITest to verify application logic and state. We confirmed that after an action, the correct data appears, counts are right, and elements are enabled or disabled as expected. This is crucial for catching functional regressions.
However, XCUITest is not designed to catch visual regressions. A test can pass with flying colors even if a button is misaligned, a color is wrong, or a font size has changed. These bugs can slip through code reviews and functional testing, degrading the user experience.
Today, we'll address this gap. Our learning outcome is to implement snapshot testing to prevent unintended UI regressions. We will learn how to capture pixel-perfect images of our UI components and automatically compare them against a "golden" reference to catch any visual changes, intended or not.
What is Snapshot Testing?
Snapshot testing is a technique where you take a screenshot of a UI component in a known-good state and save it as a reference image. In the future, every time you run your tests, a new screenshot is taken and compared, pixel by pixel, to the reference image. If there are any differences, the test fails.
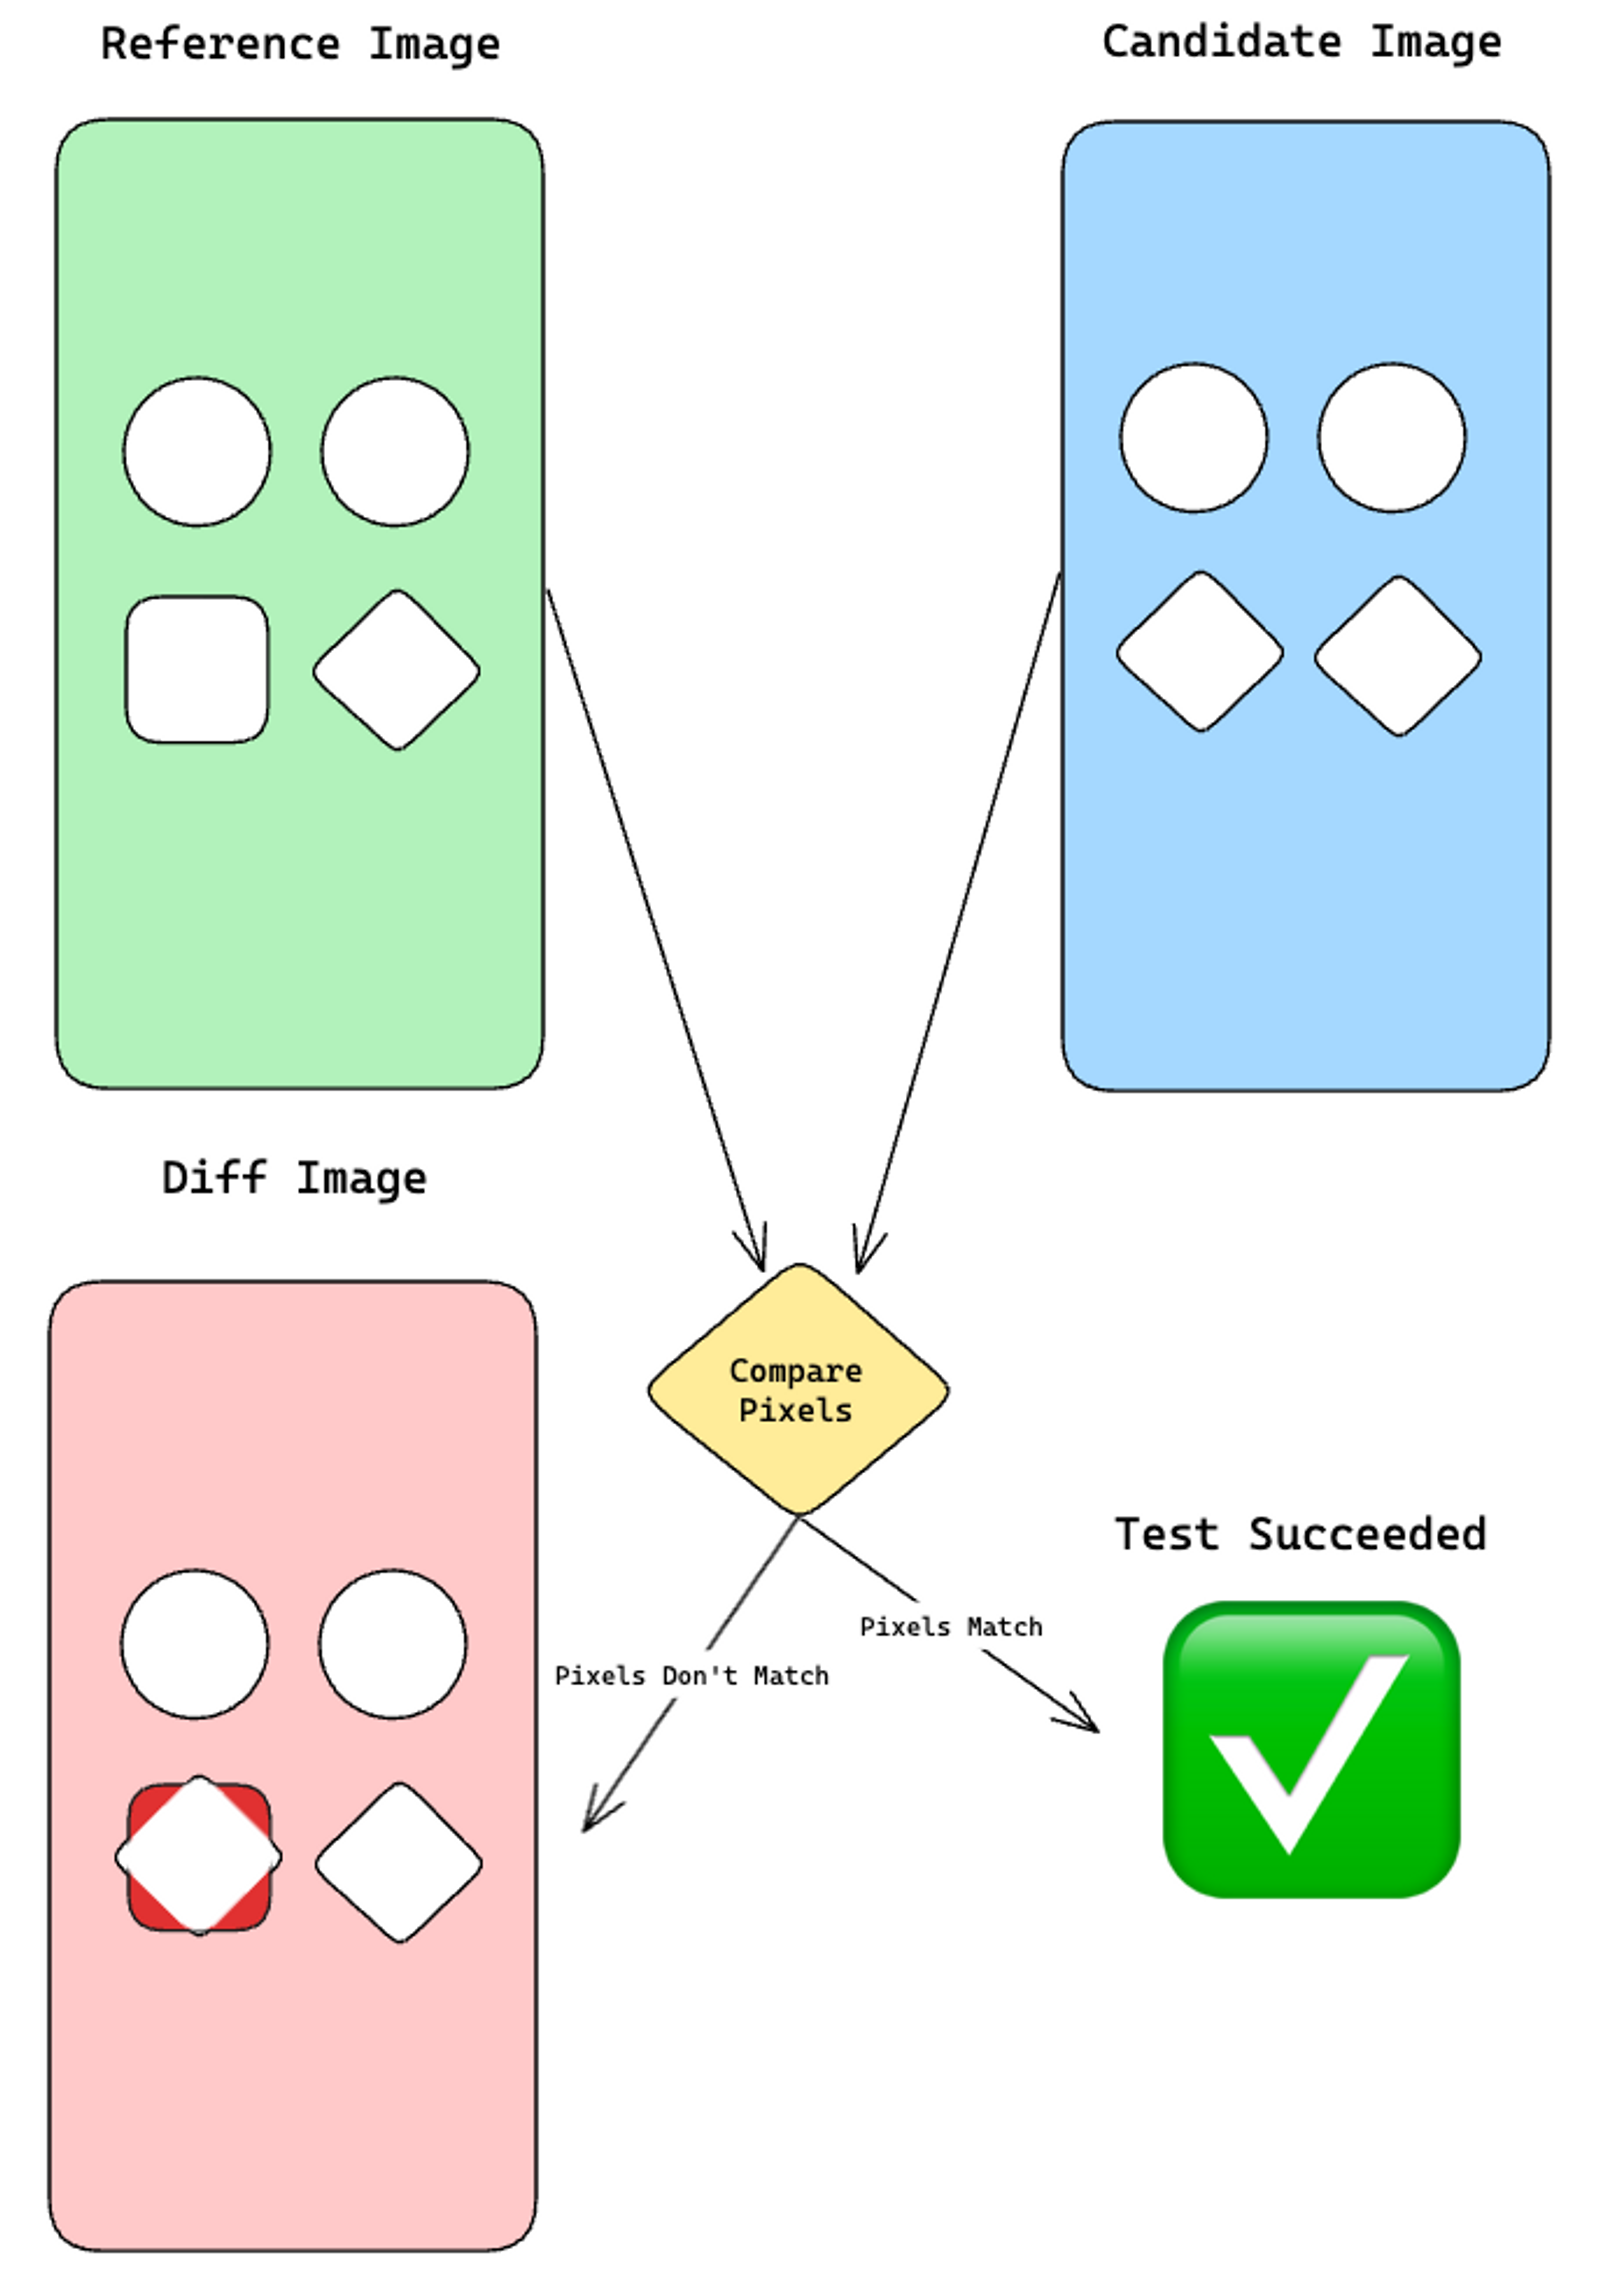
This acts as a powerful safety net, especially when refactoring UI code or working in a team where someone might inadvertently alter a shared component.
Let's start by reading a brief, high-quality introduction that distinguishes snapshot testing from the UI testing we learned about previously.
Snapshot Testing – Capturing Your Code's Best Side
This article from Infinum provides an excellent overview of snapshot testing and its role.
Read the introduction, stopping at the section "The secret magic of snapshot testing". Pay close attention to how it complements other forms of testing rather than replacing them.
Setting Up for Snapshot Testing
Unlike XCUITest, snapshot testing is not built into Xcode. We need to rely on a third-party library. The most popular and well-maintained library for this is swift-snapshot-testing by Point-Free.
The following video will guide you through adding this library to a project using Swift Package Manager (SPM) and writing your very first snapshot test. The setup process contains a crucial step that often trips up developers, so pay close attention.
This video by Kelvin Fok provides a clear, practical guide to getting started. We'll begin with the project setup.
Watch from 05:14 to 08:34. The most important part is ensuring you add the package dependency to your Test Target, not your main application target. The video clearly explains why this is necessary and what happens if you get it wrong.
The Snapshot Testing Workflow
Snapshot testing follows a distinct three-phase workflow: Record, Verify, and Update.
- Record: The first time you run a test for a view, there's no reference image to compare against. You run the test in "record mode" to generate and save this initial reference snapshot.
- Verify: In all subsequent runs, the test is in "verify mode." It generates a new snapshot and compares it to the saved reference.
- Update: If a visual change was intentional (e.g., a design update), you simply run the test in record mode once more to update the reference snapshot to the new correct version.
Let's see this entire workflow in action.
We'll continue with the same video. This segment demonstrates the fundamental record-verify-update cycle.
Watch from 08:30 to 12:45. Follow along as the presenter: Writes a test and sets record = true to generate the initial snapshot. Removes the record flag and runs the test again to see it pass. Makes a deliberate change to the UI, causing the test to fail. Updates the snapshot by re-enabling record mode to accept the new design.
When a test fails, the library provides output that includes the file paths for the reference image, the failed image, and a "diff" image that highlights the differences, making it easy to spot the regression.
Testing Components in Different States
The real power of snapshot testing shines when you test a single component under various conditions. A professional developer doesn't just test the "happy path" look; they test all important permutations.
For example, a user profile cell might look different if the user has a long name, no profile picture, or is an administrator. A login button might be disabled until a form is filled out. Snapshot testing is perfect for capturing all these states.
This next segment demonstrates this by testing a custom UITableViewCell that has a normal state and an error state.
This part of the video shows a best practice: creating separate test cases for different permutations of a single view.
Watch from 15:25 to 19:34. Notice how he creates two distinct test functions, test_withoutError and test_withError. Each one configures the cell differently before asserting the snapshot. This is a robust pattern for ensuring all visual states of a component are correct.
Advanced Techniques for Robust Snapshots
To use snapshot testing effectively in a professional environment, you need to handle a few more real-world scenarios.
Testing Across Device Sizes and Appearances
Your UI needs to look great on an iPhone SE as well as an iPhone Pro Max, and in both light and dark mode. The swift-snapshot-testing library provides powerful configuration options to create snapshots for all these scenarios.
Let's see how to test for dark mode.
iOS Dev 32: Getting Started with Snapshot Testing | Swift 5, XCode 13
This video from Emmanuel Okwara demonstrates how to test for different UI appearances, specifically dark mode.
Watch from 23:34 to 25:36. The key is to configure your view or view controller for the desired state (e.g., setting a boolean isDarkMode property) before calling assertSnapshot. This will generate a separate reference image for the dark mode appearance.
You can use a similar approach for device sizes. The library includes pre-defined configurations for different devices. You can pass these into the assertion method to generate device-specific snapshots.
// Example from the Infinum blog post
assertSnapshot(
  of: myView,
  as: .image(layout: .device(config: .iPhoneSe(.portrait))),
  named: "iPhoneSE"
)

assertSnapshot(
  of: myView,
  as: .image(layout: .device(config: .iPhone13ProMax(.portrait))),
  named: "iPhone13ProMax"
)
This creates two named snapshots, one rendering the view as it would appear on an iPhone SE and another for an iPhone 13 Pro Max.
The "Precision Trap": Handling Flaky Tests
You may find that snapshot tests sometimes fail on a different machine (e.g., a teammate's Mac or a CI server), even when no code has changed. This can be due to tiny rendering differences between operating systems or hardware (like Intel vs. Apple Silicon).
Forcing a 100% pixel-perfect match can lead to fragile, flaky tests. The library provides a solution for this.
Snapshot Testing – Capturing Your Code's Best Side
Let's return to the Infinum article to understand how to make our tests more robust by adjusting precision.
Read the section titled "The precision trap in snapshot testing". This is a crucial concept for professional use. It explains the precision and perceptualPrecision parameters, which allow you to tolerate minor, imperceptible differences in rendering.
A common and safe practice is to set a precision slightly less than 1.
// Allow for up to 2% of pixels to differ
assertSnapshot(of: view, as: .image(precision: 0.98))
This makes your tests resilient to minor environmental differences without hiding real visual regressions.
Conclusion
You have now added a powerful tool for preventing visual regressions to your testing toolkit. While XCUITest validates your app's function, snapshot testing validates its form. Using them together provides comprehensive coverage and confidence.
Key Takeaways:
- Purpose: Snapshot testing catches unintended visual regressions by comparing UI screenshots against a stored reference.
- Workflow: The process involves an initial Record run to create the reference, subsequent Verify runs to check for changes, and an Update run (by re-recording) when a change is intentional.
- Test Permutations: The greatest value comes from testing a component in its various states (e.g., error, loading, empty, different data) and configurations (e.g., dark/light mode, different device sizes).
- Manage Precision: To avoid flaky tests caused by minor rendering differences across machines, use the
precisionparameter to allow for a small tolerance (e.g., 98-99% similarity).
Preview of the Next Lesson:
We've now covered unit tests, UI tests, and snapshot tests. But how do you know if your tests are actually covering the important parts of your codebase? Are there critical logic paths that are completely untested? In our next lesson, we will learn how to interpret a code coverage report to identify untested areas in the codebase, giving you a data-driven way to improve your testing strategy.