Hello! Welcome to the final lesson in our module on memory and performance.
In our last session, you mastered the Time Profiler to pinpoint the exact code causing UI hangs on the main thread. We saw that the solution often involves moving that heavy work to a background thread. Now, it's time to learn how to do that effectively using Swift's modern concurrency system.
Today's lesson directly addresses that need. Our learning outcome is to apply modern Swift Concurrency (async/await) to move expensive operations off the main thread. We'll cover the fundamental syntax of async/await, understand how Swift manages background work, and learn the correct patterns to ensure your app remains responsive, even when performing intensive tasks.
This is a crucial skill for any professional iOS developer, bridging the gap between identifying a performance problem and implementing a robust, modern solution.
1. From Completion Handlers to async/await
As a developer with several years of experience, you've almost certainly worked with Grand Central Dispatch (GCD) and completion handlers to manage asynchronous operations. This pattern, while functional, often leads to deeply nested, hard-to-read code (the "pyramid of doom") and makes error handling cumbersome.
Swift's modern concurrency model, centered around async/await, was introduced to solve these very problems. It allows you to write asynchronous code that reads like synchronous, sequential code, making it dramatically cleaner and less error-prone.
Let's begin by understanding the core concepts from Apple's perspective.
WWDC25: Embracing Swift concurrency | Apple
This video from Apple's WWDC provides a fantastic introduction to Swift Concurrency. It explains what concurrency is, why it's vital for app responsiveness, and how async/await allows you to handle high-latency operations without blocking the main thread.
Watch from the beginning to 9:50. As you watch, focus on: The role of the main thread and the need for asynchronous code. How the await keyword marks a "suspension point," where your function can pause and let the system do other work, keeping the UI responsive. The concept of a Task, which is the unit of work for an asynchronous operation.
The key idea is that async marks a function as being able to be suspended, and await marks the specific point where it might suspend. While suspended, the thread is freed up to do other things, like responding to user input.
2. Creating an Asynchronous Task
You cannot call an async function from a regular, synchronous function. The entry point into the asynchronous world of Swift is by creating a Task. A Task creates a context where you can call async functions.
In SwiftUI, this is often done in response to a UI event, like a button tap or when a view appears.
Let's see a practical example of creating a Task to perform a network request and fetch an image.
How to use Task and .task in Swift | Swift Concurrency #4
This video from the 'Swiftful Thinking' channel provides a clear, code-driven example of how to use a Task to fetch an image asynchronously. It's a great practical demonstration of the concepts we just learned.
Watch from 01:33 to 06:03. Notice how they: Define an async function fetchImage() that performs a URLSession data task. Use try await to call the asynchronous URLSession method. In the SwiftUI view, create a Task inside .onAppear to call fetchImage().
This pattern—creating an async function for the heavy work and launching it within a Task—is the fundamental building block of Swift Concurrency.
3. Ensuring Work Executes on a Background Thread
Here's a critical point that trips up many developers: simply wrapping code in a Task or using async/await does not guarantee it will run on a background thread.
As we saw teased in the previous lesson's WWDC video, a task can inherit the context of where it was created. Since SwiftUI views and their modifiers (like .onAppear and the .task closure) are part of the UI, they are isolated to the Main Actor. The Main Actor is a special part of Swift's concurrency system that ensures its code always runs on the main thread. Therefore, a task created in a SwiftUI view will, by default, also run on the Main Actor.
So, how do we actually move the work off the main thread?
The solution is to call a function that is nonisolated. This keyword tells the compiler that the function is not part of any specific actor (including the Main Actor), allowing the Swift runtime to schedule it on the general-purpose Cooperative Thread Pool—a pool of background threads managed for optimal performance.
This flow is nicely illustrated in the diagram below. Our goal is to direct our heavy computation to the "Default Concurrent Executor" which uses this thread pool.
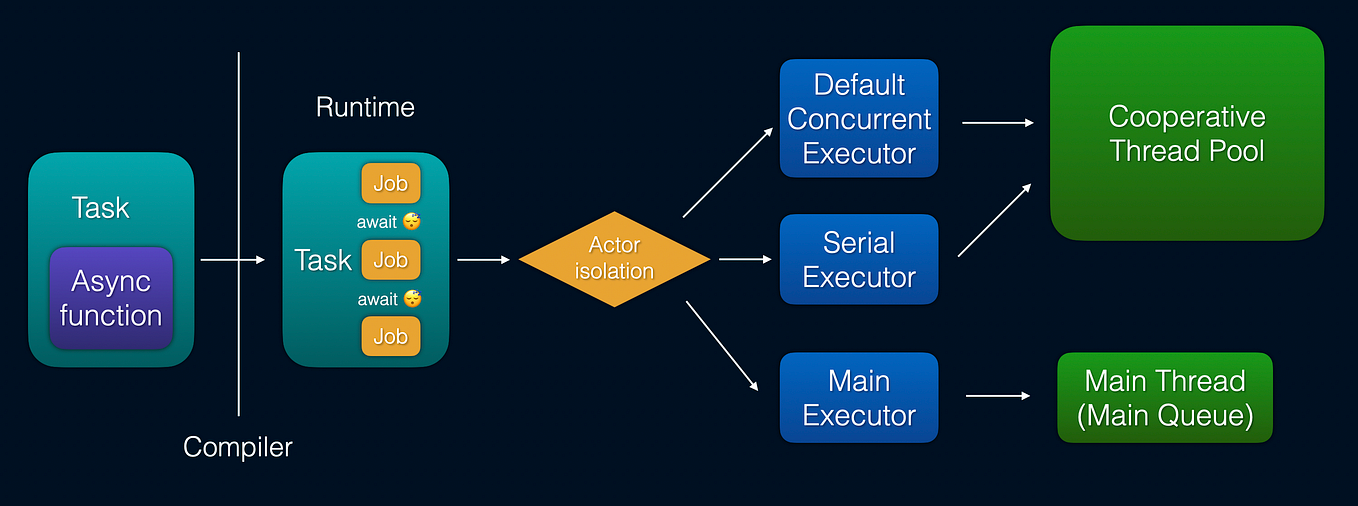
Let's walk through Apple's official guide on how to implement this fix.
Ensuring work executes on a background thread
This developer tutorial from Apple, 'Ensuring work executes on a background thread', provides the definitive solution. It explains exactly why the work stays on the main thread and shows the code changes needed to fix it.
Please read Section 3: 'Use async functions to allow execution off of the main actor'. Pay close attention to: The explanation of why the .task modifier's closure inherits the main actor context. The solution: adding the async keyword to the makeThumbnail function. Because this function is already nonisolated, making it async allows the Swift runtime to execute it on the background concurrent thread pool. The corresponding change at the call site, where await is now required.
This is the core pattern for offloading CPU-intensive work:
- Identify the long-running function (e.g.,
makeThumbnail). - Ensure it's
async. - Ensure it's
nonisolatedfrom the Main Actor (struct methods and global functions arenonisolatedby default). awaitits result from yourTask.
After making this change, you can re-profile with Instruments and use the Swift Tasks instrument to verify that the work is now running on background threads, as shown in Section 4 of the same tutorial (LINK).
4. Returning to the Main Thread for UI Updates
You've successfully moved your expensive computation to a background thread. The computation finishes and you have a result (like a UIImage). Now what?
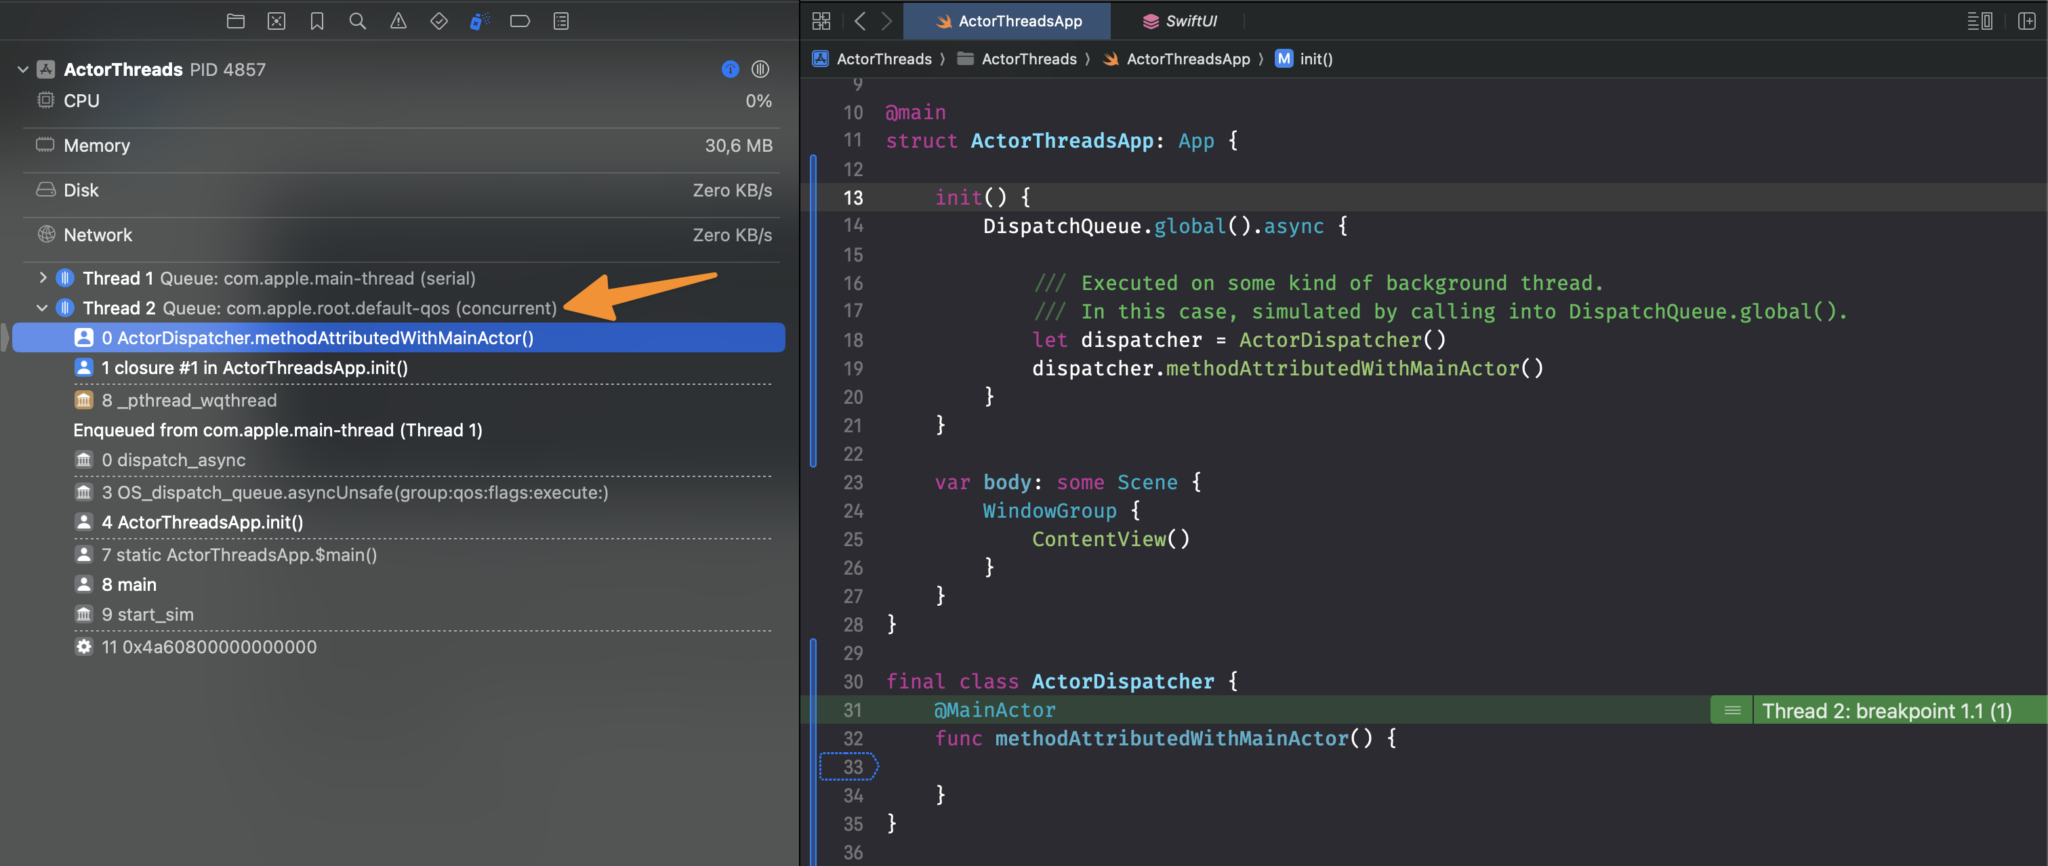
Crucially, all UI updates must happen on the main thread.
Attempting to update a @State property or modify a UIView from a background thread will lead to crashes or unpredictable UI behavior.
Swift Concurrency makes this easy. After awaiting the result from your background function, the code execution resumes within your Task. If that Task was started from the Main Actor (e.g., in a SwiftUI view), you are automatically back on the main thread!
.task {
    // We are on the main thread here.

    // 'calculateComplexValue' is a nonisolated async func.
    // The task suspends here, and the work runs on a background thread.
    let result = await calculateComplexValue()

    // Execution resumes here, back on the main thread!
    // It is now safe to update the UI.
    self.myStateProperty = result
}
If you need to be explicit or are in a context that isn't guaranteed to be on the main thread, you can use @MainActor to mark a function or property, or use await MainActor.run { ... } to execute a block of code on the main thread.
5. Best Practice: The .task View Modifier
In the examples so far, we've used .onAppear { Task { ... } }. There's a much better way in SwiftUI: the .task view modifier.
The .task modifier does two critical things for you:
- It automatically creates and runs an asynchronous
Taskwhen the view appears. - It automatically cancels the task if the view disappears before the task is finished.
This second point is huge. It prevents your app from doing unnecessary work (like fetching images for a screen the user has already left) and prevents potential bugs where a completed task tries to update a view that no longer exists.
How to use Task and .task in Swift | Swift Concurrency #4
Let's return to the 'Swiftful Thinking' video to see a practical demonstration of the .task modifier and its automatic cancellation behavior. This is a key pattern for writing robust, professional SwiftUI code.
Watch from 25:31 to 31:02. This segment compares the manual cancellation approach with the much simpler and safer .task modifier. This directly replaces the .onAppear/.onDisappear pattern for managing tasks.
Test your understanding!
You have a view that fetches and displays detailed data for an item. The fetching process, fetchItemDetails(), is a nonisolated async function that can take several seconds. If the user navigates to this view and then immediately navigates back, what is the difference in behavior between these two implementations?
Implementation A:
var body: some View {
    Text(viewModel.details)
        .onAppear {
            Task {
                viewModel.details = await fetchItemDetails()
            }
        }
}
Implementation B:
var body: some View {
    Text(viewModel.details)
        .task {
            viewModel.details = await fetchItemDetails()
        }
}
Show answer
In Implementation A, when the user navigates away, the Task continues to run. The fetchItemDetails() function will complete, and the code will then attempt to update viewModel.details. This is wasted work and could cause issues if the viewModel has been deallocated.
In Implementation B, when the user navigates away, SwiftUI automatically cancels the Task. The fetchItemDetails() operation will be stopped (provided it checks for cancellation internally), saving system resources and preventing attempts to update a view that is no longer on screen. This is the more robust and professional approach.
For long-running tasks that involve loops, it's good practice to periodically call try Task.checkCancellation() inside the loop. If the task has been cancelled, this will throw an error, allowing your function to exit early.
Conclusion
Congratulations! You've completed the "Memory Management and Performance Foundations" module. You now have the skills to not only find performance bottlenecks but also to fix them using the latest and most effective tools Swift provides.
Key Takeaways:
async/awaitallows you to write non-blocking, asynchronous code that is easy to read and maintain.- A
Taskis the entry point for running asynchronous code. - To move CPU-intensive work off the main thread, call a
nonisolated asyncfunction from your task. The Swift runtime will schedule it on a background thread from the cooperative pool. - All UI updates must be dispatched back to the main thread. In a
Taskstarted from a SwiftUI view, you are automatically back on the main thread after anawait. - Always prefer the
.taskview modifier in SwiftUI for its automatic task lifecycle management, especially its cancellation behavior.
Preview of the Next Module:
With a solid foundation in performance, we are now ready to tackle application architecture. Our next module, "Modern Architecture with MVVM," will begin by exploring the separation of concerns in the Model-View-ViewModel pattern and how it provides a clean structure for placing business logic—including the asynchronous calls you've just learned to write.