Welcome to the next stage of our deep dive into the mathematical foundations of AI. In our last lesson, you peeled back the layers of PyTorch's autograd engine, understanding how reverse-mode automatic differentiation on dynamic computational graphs makes modern deep learning possible. You now know the theory behind loss.backward(). Today, we move from being a user of this powerful system to an architect.
This lesson is dedicated to making PyTorch your own. You will learn how to extend its automatic differentiation capabilities by implementing a custom torch.autograd.Function. This involves manually defining both the forward computation and, crucially, the backward pass that calculates the gradients. Mastering this skill is a significant step toward your goal of moving beyond APIs, as it allows you to implement novel operations for research or create highly optimized components for production systems.
1. The Anatomy of a Custom Function
When PyTorch's extensive library of operations isn't sufficient—either because you're designing a new mathematical function or because you need to fuse operations for performance—you can create your own by subclassing torch.autograd.Function.
This process has a clear and logical structure, requiring you to implement two static methods:
forward(ctx, *args): This method executes the forward computation. It receives a context objectctxas its first argument, followed by the input tensors. Inside this function, you perform your calculations and must save any tensors needed for the backward pass usingctx.save_for_backward(). Theforwardmethod runs in ano_gradcontext, meaning PyTorch does not build a graph of the operations within this method. Instead, the function itself becomes a single node in the larger computational graph.backward(ctx, *grad_outputs): This is where you implement the gradient calculation. It receives thectxobject and the incoming gradients from the subsequent parts of the network (grad_outputs). You can retrieve the tensors you saved in the forward pass viactx.saved_tensors. Your task is to compute the gradient of the loss with respect to each of the inputs of theforwardfunction and return them in the same order.
Let's ground this in the chain rule you're familiar with. If your function is , the grad_outputs argument is the upstream gradient, . Your backward method must calculate the local gradient, , and return the product: .
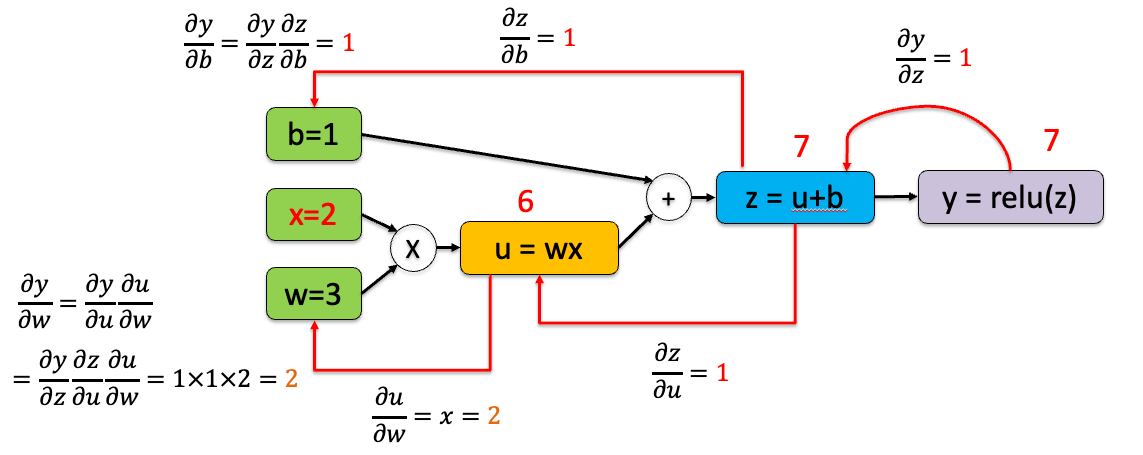
2. Implementing a Custom Activation Function
To make this concrete, let's implement a "Clipped ReLU" function. This function will act like a standard ReLU, but it will be capped at a maximum value. The formula is:
The derivative with respect to has three regions:
Here is the implementation in PyTorch. Notice how we must return a gradient for every input to forward, even those that don't require one (in which case we return None).
import torch

class ClippedReLUFunction(torch.autograd.Function):
    @staticmethod
    def forward(ctx, x, clip_val):
        """
        Forward pass for Clipped ReLU.
        - ctx: context object to store information for backward pass.
        - x: input tensor.
        - clip_val: the maximum value to clip to.
        """


        # Save the input tensor for the backward pass.
        # We don't need to save clip_val if it's not a tensor that requires gradients.
        ctx.save_for_backward(x, torch.tensor(clip_val))


        # Apply the clipped relu operation.
        return torch.clamp(x, min=0, max=clip_val)

    @staticmethod
    def backward(ctx, grad_output):
        """
        Backward pass for Clipped ReLU.
        - ctx: context object with saved tensors.
        - grad_output: gradient of the loss with respect to the output of this function.
        """


        # Retrieve the saved input tensor and clip_val.
        x, clip_val = ctx.saved_tensors


        # Create a copy of the incoming gradient.
        grad_x = grad_output.clone()


        # Create a mask for the derivative.
        # The gradient is 1 only where 0 < x < clip_val, and 0 otherwise.
        mask = (x > 0) & (x < clip_val)


        # Apply the mask. We can simply multiply because the derivative is 0 or 1.
        grad_x = grad_x * mask.float()


        # We must return a gradient for each input of forward.
        # Since clip_val is a fixed parameter, its gradient is None.
        return grad_x, None


# A simple wrapper to make it easier to use.
def clipped_relu(x, clip_val=6.0):
    return ClippedReLUFunction.apply(x, clip_val)


# --- Example Usage ---
# Create a tensor that requires gradients
a = torch.tensor([-2.0, 0.5, 3.0, 7.0], requires_grad=True)
clip_value = 6.0


# Apply our custom function
b = clipped_relu(a, clip_value)
print(f"Input: {a.data}")
print(f"Output: {b.data}") # Expected: [0., 0.5, 3., 6.]


# Calculate some dummy loss and backpropagate
loss = b.sum()
loss.backward()


# Check the gradients
print(f"Gradient of loss w.r.t. a: {a.grad}") # Expected: [0., 1., 1., 0.]
Run this code and analyze the output. The gradient a.grad should be [0., 1., 1., 0.], perfectly matching the derivative we defined. You have successfully taught PyTorch a new operation!
3. Advanced Mechanics and Common Pitfalls
The ctx object and save_for_backward have subtleties that are crucial for writing correct and robust functions, especially when considering higher-order gradients (gradients of gradients).
The main rule is that save_for_backward should only be used for input or output tensors of the forward function. Saving an intermediate result calculated inside forward can lead to incorrect gradients during a second backward pass, because the operations that created that intermediate result were not tracked by autograd.
Double Backward with Custom Functions - PyTorch
This PyTorch tutorial provides excellent, focused examples of how save_for_backward works and what to avoid.
First, read the examples for the Square and Exp functions in the sections Saving the Inputs and Saving the Outputs. These show the standard, correct usage where you save an input or an output tensor. Next, and most importantly, read the section What not to do. Pay close attention to the SinhBad example and the resulting visualization. It demonstrates why directly saving an intermediate result that is not an input or output breaks the computational graph for higher-order derivatives. This is a common mistake and understanding why it's wrong is key to deep expertise.
The tutorial also presents a workaround for when you need to save intermediate results: you can include them as extra outputs of the forward function. This ensures they are part of the computational graph, allowing autograd to correctly track their history for higher-order gradients.
4. From Custom Math to High-Performance Engineering
Your motivation to become a senior AI engineer requires looking beyond just correctness to performance. While custom autograd functions are great for novel mathematics, their most common industrial application is for performance optimization. Python's overhead can be a bottleneck. By implementing the forward and backward passes in C++ or CUDA, you can fuse multiple operations into a single, highly optimized kernel.
Pleasingly, the torch.autograd.Function structure remains the same. You simply wrap the calls to your high-performance C++ code inside the familiar forward and backward static methods.
Custom C++ and CUDA Extensions - PyTorch Tutorials
This tutorial demonstrates how to build a custom nn.Module backed by a C++ implementation. The core of this integration is an autograd.Function.
Focus on the Python code in the section titled Using Your Extension. Observe the LLTMFunction class. You'll see the exact same pattern: a subclass of torch.autograd.Function with forward and backward methods. The only difference is that instead of performing the computations in Python, they call out to the compiled C++ functions (lltm_cpp.forward and lltm_cpp.backward).
This powerfully illustrates how the concept you learned today is the bridge between Python-level deep learning logic and high-performance, low-level implementations—a critical intersection for any senior AI engineer.
5. The Vector-Jacobian Product in Practice
Finally, let's briefly revisit the mathematics to formalize what the grad_output argument in the backward method represents. As you learned previously, reverse-mode AD is fundamentally about computing vector-Jacobian products. The grad_output is the "vector" in this product.
This official PyTorch video recaps the concept of vector-Jacobian products (VJP) and shows how it applies to the .backward() call.
Watch the segment explaining the mathematical formulation of VJP, which connects a model function (f(x)) and a loss function (g(y)). Then, observe how a non-scalar output requires an explicit vector to be passed to .backward(). This vector is precisely what your custom backward method receives as grad_output.
Your backward function's role is to manually implement the "Jacobian-product" part of the VJP for your specific operation. It takes the incoming gradient vector and multiplies it by the local Jacobian of your function to produce the gradient with respect to the inputs.
Conclusion
In this lesson, you've transitioned from a consumer to a creator within the PyTorch ecosystem. You now have the tools and understanding to extend the framework's core capabilities.
Key takeaways include:
- Custom operations are built by subclassing
torch.autograd.Functionand implementing staticforwardandbackwardmethods. - The
forwardmethod computes the output and usesctx.save_for_backwardto store tensors needed for the gradient calculation. - The
backwardmethod implements the chain rule, usingctx.saved_tensorsand the incominggrad_outputto compute and return the gradients for each of theforwardmethod's inputs. - This pattern is central to both implementing novel mathematical operations and to integrating high-performance C++/CUDA code for production-level optimization.
- Understanding this mechanism is fundamental to debugging, extending, and optimizing deep learning models at an expert level.
You are now equipped to not only use the building blocks of deep learning but to design and forge your own. This is a crucial skill that will serve you throughout your journey.
In our next lesson, we will broaden our scope from building a single custom component to architecting the entire training process. You will build a custom PyTorch training loop from scratch, giving you full control over every step of model optimization.