Welcome to the next stage of our journey through the human skeleton. In our last lesson, we completed our study of the axial skeleton by examining the thoracic cage. You learned how the sternum and ribs protect the vital organs of the chest. We ended by noting the clavicular notch on the sternum, the point where the collarbone attaches. This specific joint, the sternoclavicular joint, serves as the critical bridge connecting the axial skeleton to the upper limbs.
Today, we cross that bridge into the appendicular skeleton. Our focus will be on the pectoral girdle, which you know more commonly as the shoulder girdle. Your goal for this lesson is to identify the bones of the pectoral girdle—the clavicle and the scapula—and their key landmarks. Understanding this anatomy is fundamental for a nurse, as it provides the framework for assessing the shoulder, locating sites for injections, and understanding common injuries like fractures and dislocations.
The Pectoral Girdle: An Overview
The primary function of the pectoral girdle is to attach the upper limb to the axial skeleton and serve as a stable base from which the arm can move. Unlike the sturdy and rigid pelvic girdle that supports our body weight, the pectoral girdle is built for mobility, allowing for the incredible range of motion we have in our shoulders.
It consists of two bones on each side of the body:
- The clavicle (collarbone), which is located anteriorly.
- The scapula (shoulder blade), which is located posteriorly.
These two bones work together as a unit. To get a foundational understanding of their relationship and overall function, let's start with a brief reading.
The Pectoral Girdle | Anatomy and Physiology I
This introductory text from Lumen Learning provides a concise overview of the pectoral girdle, defining its components and explaining its role in upper limb mobility.
Please read the first four paragraphs of the text, starting from the beginning and ending just before the "Clavicle" heading. As you read, focus on how the pectoral girdle's structure allows for more mobility compared to other parts of the skeleton.
As you read, you likely noticed that the right and left pectoral girdles don't attach to each other posteriorly. This "open" design, combined with the single, highly mobile attachment point at the sternum, is what grants the shoulder its remarkable freedom of movement.
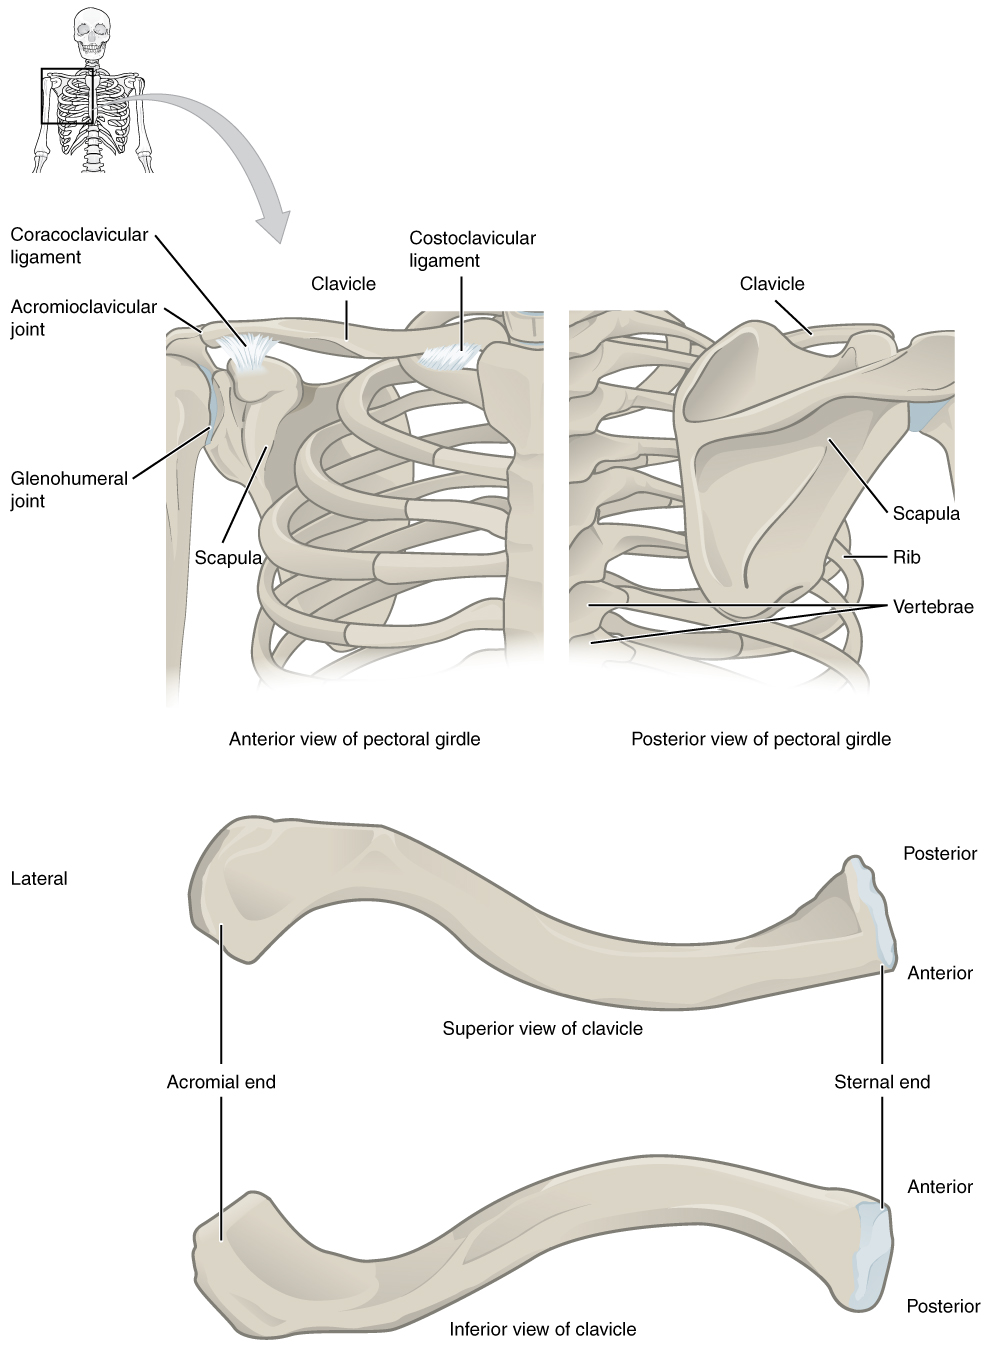
The Clavicle: The Collarbone
The clavicle is a slender, S-shaped bone that you can easily feel just below the neck. Despite its delicate appearance, it plays several crucial roles: it acts as a strut to hold the arm away from the body, transmits physical forces from the upper limb to the axial skeleton, and protects the underlying nerves and blood vessels.
For a detailed walkthrough of the clavicle's features, we'll turn to a video created by a fellow nursing professional. Her explanations often include clinical pearls that you will find useful.
Clavicle and Scapula Anatomy: The Pectoral Girdle
This video, "Clavicle and Scapula Anatomy" from the RegisteredNurseRN channel, clearly explains the important bony landmarks of the clavicle.
Please watch the section covering the clavicle, from the beginning of the description. Pay close attention to the two ends of the bone and the landmarks that serve as attachment points for ligaments.
To reinforce what you just saw, let's summarize the key landmarks of the clavicle:
- Sternal end: The triangular, medial end that articulates with the manubrium of the sternum. This forms the sternoclavicular joint.
- Acromial end: The flattened, lateral end that articulates with the scapula. This forms the acromioclavicular (AC) joint.
- Conoid tubercle and Trapezoid line: These are rough patches on the inferior surface of the bone that serve as attachment points for strong ligaments that anchor the clavicle to the scapula, providing stability to the shoulder.
Clinically, the clavicle is one of the most frequently fractured bones in the body. This often happens from a fall onto an outstretched hand or a direct blow to the shoulder. Because of the strong ligaments at each end, the bone itself usually breaks, typically in the middle third.
The Scapula: The Shoulder Blade
Now, let's move to the posterior component of the girdle: the scapula. This is a large, triangular, flat bone that rests on the posterior surface of the thoracic cage. It is a complex bone with numerous projections, angles, and depressions that serve as attachment points for the muscles that move the shoulder and arm.
We will continue with the same video, as it provides an excellent, systematic tour of the scapula's many features.
Clavicle and Scapula Anatomy: The Pectoral Girdle
The video continues with a detailed examination of the scapula, breaking it down by its anterior and posterior surfaces, as well as its borders and angles.
Please watch the remainder of the video, from the start of the scapula section to the end. The presenter uses the "rule of threes" (three borders, three angles, three fossae) to help organize the landmarks, which you may find helpful. Focus on identifying the key processes and the glenoid cavity.
The scapula has many landmarks, but we can organize them logically. The image below provides a clear, labeled guide.

Let's review the most critical landmarks of the scapula:
Borders and Angles:
- Medial (vertebral) border: The long edge closest to the spine.
- Lateral (axillary) border: The edge closest to the armpit.
- Superior border: The top edge.
- Inferior angle: The bottom point of the scapula. This is an important landmark as several muscles attach here.
Projections (Processes):
- Spine of the scapula: A prominent ridge on the posterior surface that you can easily feel.
- Acromion: The flattened, lateral extension of the spine that articulates with the acromial end of the clavicle. It forms the "tip" of your shoulder.
- Coracoid process: A hook-like projection on the anterior surface, located just below the clavicle. It serves as an attachment point for several muscles and ligaments.
Depressions (Fossae):
- Glenoid cavity (or fossa): A shallow, socket-like depression on the lateral angle. This is one of the most important landmarks, as it articulates with the head of the humerus to form the main shoulder joint.
- Supraspinous fossa: A depression superior to the spine on the posterior side.
- Infraspinous fossa: A broad depression inferior to the spine on the posterior side.
- Subscapular fossa: The large, shallow depression that covers most of the anterior surface.
These fossae are not just empty spaces; they provide broad surfaces for the attachment of the rotator cuff muscles, which are vital for shoulder movement and stability. The video also made an excellent clinical point: when listening to lung sounds on a patient's back, you must work around the scapulae, as the bone will muffle the sounds.
Conclusion
In this lesson, we successfully made the leap from the axial to the appendicular skeleton. You have learned to identify the two bones of the pectoral girdle—the clavicle and the scapula—and their essential bony landmarks. This knowledge forms the anatomical foundation for the entire upper limb.
Key Takeaways:
- The pectoral girdle consists of the anterior clavicle and the posterior scapula. It is designed for mobility.
- The clavicle is an S-shaped bone with a medial sternal end (articulating with the sternum) and a lateral acromial end (articulating with the scapula).
- The scapula is a triangular bone with key landmarks including the posterior spine, the acromion (tip of the shoulder), the anterior coracoid process, and the shallow glenoid cavity.
- The glenoid cavity is the articulation point for the arm, forming the shoulder joint.
Having established the anchor point of the upper limb, our next lesson will move distally to the first bone of the arm itself: the humerus. We will see how its head fits perfectly into the glenoid cavity of the scapula to form the glenohumeral joint, the most mobile joint in the human body.