Welcome to your first lesson! We're kicking off your journey into game development with Godot and GDScript. Today, our goal is to get you comfortable with your primary tool: the Godot editor. Since you're eager to get hands-on and start building, we'll dive right into the software, skipping the abstract theory.
By the end of this lesson, you will be able to navigate the main panels of the Godot editor. We will focus on three crucial areas: the Scene panel, where you'll assemble your game worlds; the FileSystem, which holds all your project's assets; and the Inspector, which lets you modify the properties of everything you create. Mastering this layout is the essential first step before we can start programming your top-down adventure game.
Getting Started: The Project Manager
Before we can explore the editor, we need a project. When you first open Godot, you're greeted by the Project Manager. This is your hub for creating new projects or opening existing ones.
The following video provides a clear, beginner-friendly walkthrough of creating your first project. It also gives a great initial tour of the editor interface we'll be dissecting.
Godot 4 Editor Explained & 2D Workflow Basics
Watch this segment from the video "Godot 4 Editor Explained & 2D Workflow Basics" by Brett Makes Games.
Please watch from the beginning until the end of the introduction. The creator will guide you through: Creating a new project and choosing a location to save it. Selecting a "renderer." For our 2D game, choosing Compatibility is an excellent choice as it's optimized for 2D and works on a wide range of devices. The four main "workspaces" at the top of the editor: 2D, 3D, Script, and AssetLib.
After following these steps, you should have a new, empty project open and be looking at the main Godot editor interface. It might seem like there's a lot going on, but we'll break it down into manageable parts.
A Tour of the Godot Editor
The Godot editor is intelligently designed, with different panels dedicated to specific tasks. For our 2D game, we'll spend most of our time in the 2D workspace. The interface is primarily composed of a central viewport (where you see your game world) surrounded by panels, which Godot calls "docks."
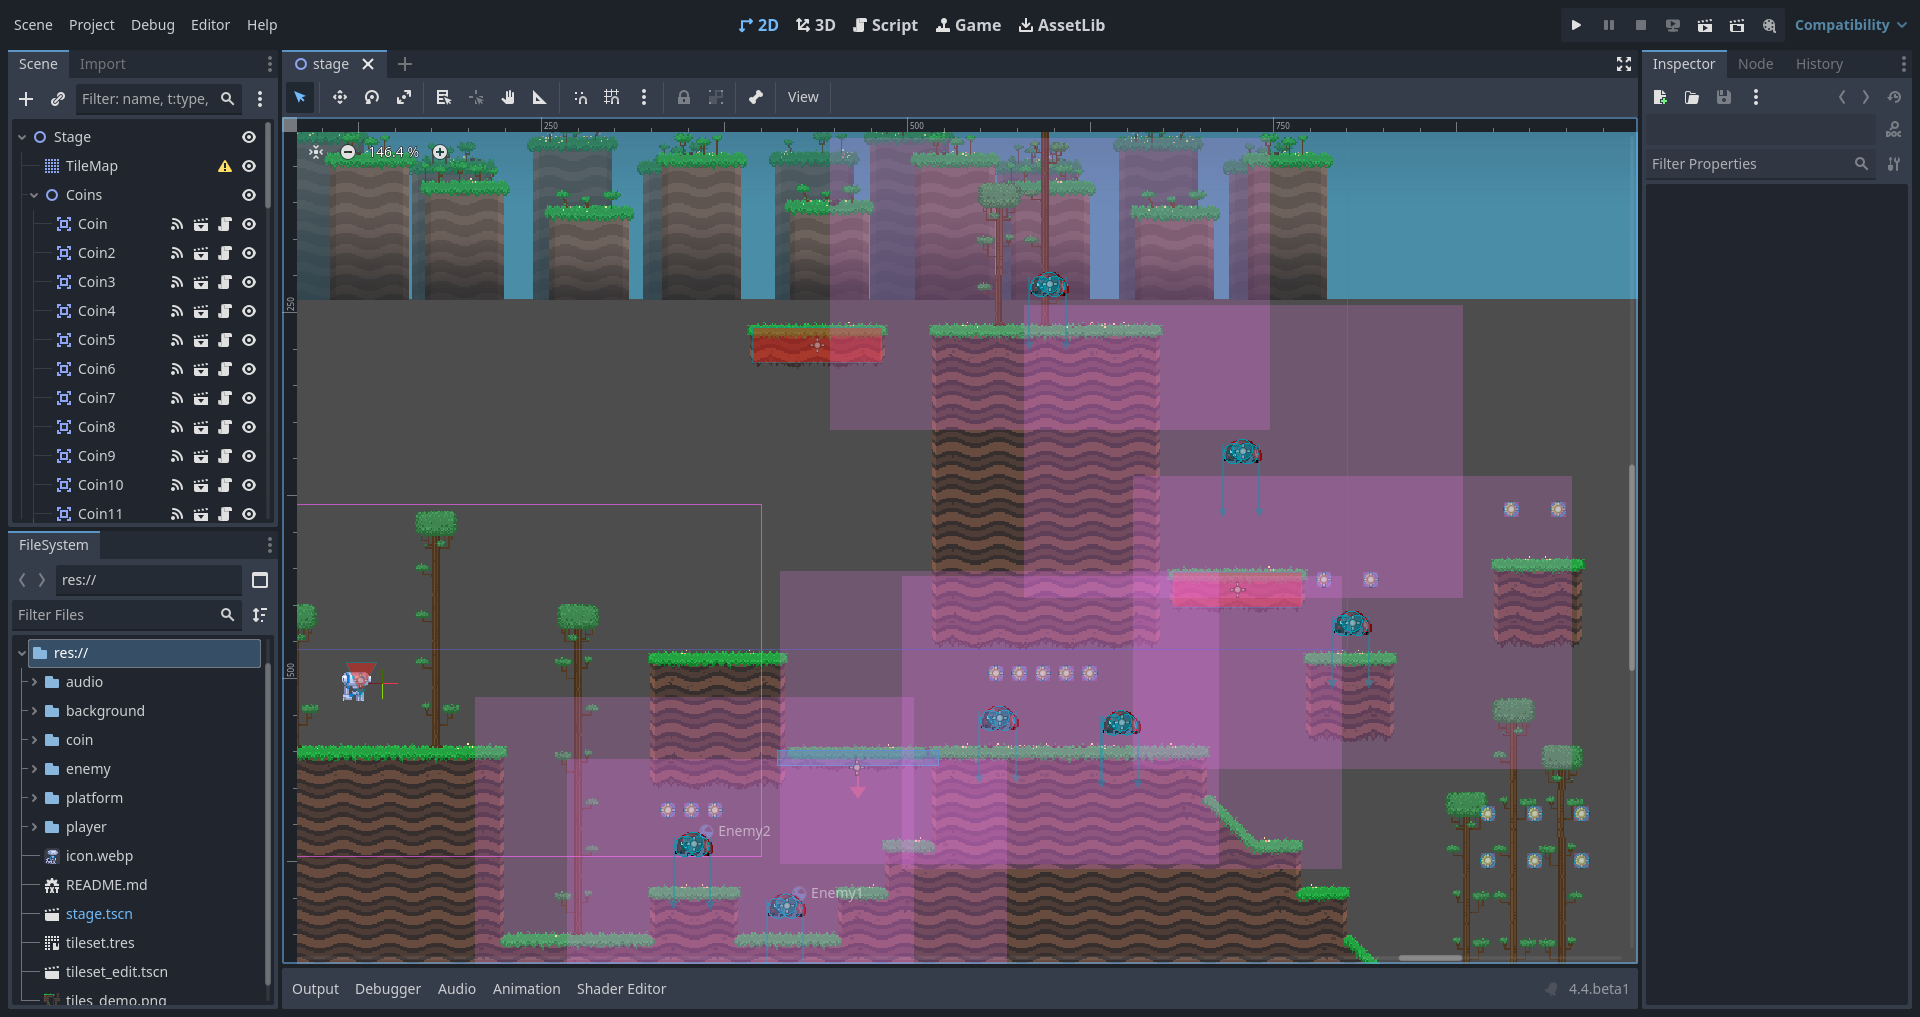
Let's focus on the three panels that form the backbone of the development workflow.
The article "Let's Learn Godot 4 by Making an RPG" provides a fantastic written overview of these panels. It uses many helpful images to point out exactly where everything is.
Let's Learn Godot 4 by Making an RPG - Part 1 - DEV Community
This article will give you a solid reference for the layout of the editor. As you read, try to locate each panel in your own Godot window.
Focus on these three sections: Read the description of the Scene Dock. Find the text that starts with this sentence. This panel is where you will organize the contents of a single game screen or character. Next, scroll down to the FileSystem panel. Read the paragraph that begins with this line. This is your project's folder, containing all your art, code, and scene files. Finally, find the description of the Inspector Panel on the right side of the editor. Read the short paragraph starting here. The Inspector is context-sensitive; it shows you the editable properties of whatever you have currently selected.
The Three Core Panels Explained
To solidify your understanding, let's connect these concepts. These three panels work together constantly.
-
The FileSystem Panel: Think of this as your project's inventory. Every asset—character art, sound effects, and the files that define your levels (which are called "scenes")—lives here. You can create folders to stay organized, just like you would on your computer's desktop. By default, you'll see a file named
icon.svg. This is the Godot logo, which is included in every new project. -
The Scene Panel: If the FileSystem is your inventory, the Scene panel is your workbench. This is where you assemble assets from your inventory into something functional. For example, you might build a player character by combining a sprite (for the visuals) and a collision shape (for physics). These individual building blocks are called nodes. The Scene panel shows you all the nodes that make up your currently open scene, arranged in a hierarchy.
-
The Inspector Panel: This is your multi-tool. Whenever you select an item—either a file in the FileSystem or a node in the Scene panel—the Inspector immediately updates to show you all of its editable properties. If you select a sprite node, the Inspector will show you properties like its position, rotation, and scale. If you select an audio file, it will show properties like its volume.
Let's see this in action. The video you watched earlier has a perfect demonstration of how these three panels interact.
Godot 4 Editor Explained & 2D Workflow Basics
Let's return to the "Godot 4 Editor Explained" video.
Watch the segment from 6:05 to 7:41. The creator demonstrates: Dragging the icon.svg from the FileSystem into the main viewport. Notice how this automatically creates an Icon node in the Scene panel. When the Icon node is selected, its properties (like Transform, which contains Position and Scale) appear in the Inspector. Changing a value in the Inspector (like position) moves the icon in the viewport. Feel free to follow along and try this in your own project! At the very end of the video, from 16:07 to 16:15, the creator provides a concise summary of these core components.
This simple, interactive loop—selecting assets in the FileSystem, arranging them as nodes in the Scene, and modifying them with the Inspector—is fundamental to how you will build your game in Godot.
Conclusion
In this lesson, we took our first crucial step by familiarizing ourselves with the Godot editor. You learned how to create a new project and, most importantly, you can now identify and understand the purpose of the three main panels you'll be using every day:
- FileSystem: Manages all your project's files and assets.
- Scene: Organizes the nodes that make up your game objects and levels.
- Inspector: Allows you to view and edit the properties of any selected file or node.
You've established a solid foundation for everything that comes next.
In our next lesson, we will build on this by formally creating our first "scene." You'll learn how to add different types of nodes and arrange them in a parent-child hierarchy, which is the core principle for building complex objects and characters in Godot.