Hello! Welcome back to our final module, The Final Proofing Stage.
In our previous lesson, we focused on what to look for on a typeset page. You learned to identify the three main categories of errors that are a proofreader's responsibility: typographical, formatting, and layout errors (including those tricky widows, orphans, and runts).
Today, we shift from the "what" to the "how." Our goal is to use digital annotation tools to efficiently mark corrections and queries on a PDF proof. By the end of this lesson, you'll know which tools to use in Adobe Acrobat—the industry standard software—to communicate your findings clearly and professionally to a typesetter. This is the practical skill that brings your proofreading analysis to life.
1. From Paper to Pixels: The Logic of Annotation
For centuries, proofreading was done by hand on paper printouts. Editors used a standardized set of symbols, known as proofreaders' marks, to indicate corrections in the margins and in the text itself.
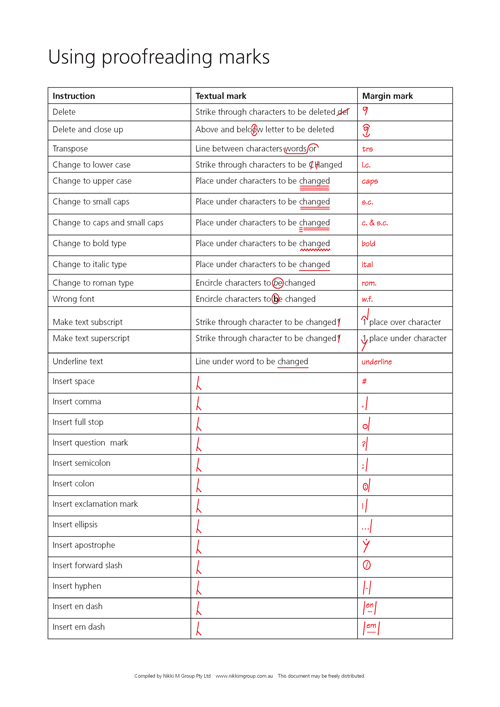
Today, this process has almost entirely moved to digital workflows using PDF files. However, the fundamental principle remains the same. As the Chicago Manual of Style article "PDF Proofreading Markup" explains, when you mark a PDF, you are not changing the file directly. Instead, you are annotating it—creating a clear set of instructions for a typesetter, who will then make the changes in the original design file (like Adobe InDesign).
This is a critical concept to keep in mind: your digital marks are a dialogue with the designer. Clarity and efficiency are paramount.
2. Best Practices for Digital Markup
Before we dive into the specific tools, let's establish some ground rules for making your annotations as clear and effective as possible. The goal is to avoid ambiguity and help the typesetter work quickly and accurately.
[PDF] How to Mark up PDF Files Using Annotations Tools in Adobe
The professional organization Editors Canada provides an excellent guide on annotating PDFs. It opens with some 'best practices' that are essential for any proofreader to internalize.
Please read the first part of this document, from the beginning through the section 'Use Sticky Notes for Instructions'. Pay close attention to the advice on keeping annotations simple and using the correct tool for the job (e.g., replacing a word with a single annotation).
The key takeaways from that reading should be:
- Be concise: Use the simplest, most direct annotation for the correction.
- Use the right tool: For example, use a single "replace text" command instead of a separate "delete" and "insert."
- Distinguish instructions from text: Use comments (Sticky Notes) for instructions to the typesetter to prevent them from being accidentally added to the book's text.
3. A Guided Tour of Acrobat's Comment Tools
Now let's get acquainted with the tools themselves. The primary tools you will use are located in Adobe Acrobat's Comment toolbar. These tools are available in all recent versions of Acrobat, including the free Acrobat Reader (provided the PDF has commenting enabled).
This video provides a clear, concise walkthrough of the most common comment and markup tools.
How to Use the Comment and Markup Tools in Adobe Acrobat
Erin Wright's tutorial is a focused demonstration of Acrobat's annotation features, perfect for an editorial professional.
Please watch from 02:15 to 08:58. This covers: how to access the comment tools, a walkthrough of each tool's function, and bonus tips like changing colors and deleting markups. Focus on the function of tools like Strikethrough, Note to Replace Text, and Insert Text at Cursor.
4. Core Proofreading Actions and Their Tools
As you saw in the video, Acrobat offers a variety of tools. For proofreading, however, you will rely on a small handful for the vast majority of your work. Let's map these tools to the corrections you learned to identify in the last lesson.
| Action | Primary Tool(s) | Description |
|---|---|---|
| Delete text | Strikethrough Tool | Select the text you want removed. Acrobat will draw a red line through it. |
| Insert text | Insert Text at Cursor Tool | Place your cursor where you want to add text. A blue caret (^) will appear, and a comment box will open for you to type the new text. |
| Replace text | Note to Replace Text Tool | This is the most efficient way to correct a typo. Select the incorrect text and simply type the correct text in the comment box. Acrobat will strike through the old and show the new. |
| Query or Instruct | Highlight Tool + Comment | Highlight the relevant text (e.g., a potential bad break, a widow). Then, right-click the highlight and add a comment to ask your question or give an instruction (e.g., "Query: Please fix widow."). |
| General Comment | Sticky Note Tool | Use this to place a general note on the page that isn't tied to specific text. Useful for queries about images or overall layout. |
| Marking Layout | Drawing Tools (Pencil/Shapes) | For non-textual instructions, like "close up space" or "center this heading," you can use the drawing tools to add traditional marks. |
5. The Power of the Comments Pane
Perhaps the most important feature of the digital proofreading workflow is the Comments Pane. This is the list that appears on the right side of your screen, documenting every single annotation you make.

Why is this so powerful?
- It's a complete record. No mark is too small to be missed. Even a tiny insertion caret for a missing comma gets its own entry in the list. This removes the fear that a subtle mark might be overlooked.
- It's interactive. The typesetter can click on each item in the list, and Acrobat will automatically jump to that location in the document.
- It's a progress tracker. Typesetters can use the status feature (e.g., marking a correction as "Completed") to keep track of their work, ensuring every change is made.
To see a more detailed explanation of how this pane works in practice, let's turn to the article that accompanies the image above.
PDF Proofreading Markup - CMOS Shop Talk
This article from CMOS Shop Talk provides a superb overview of applying digital marks and explains the central role of the comments list in the workflow.
Please read the sections titled 'Proofreading in Acrobat' and 'Keeping Track'. This will reinforce how the tools are used for specific corrections and why the comments list is so crucial for communicating with the typesetter.
Conclusion
You now have the foundational knowledge to mark up a PDF proof like a professional. You understand not just which buttons to click, but the logic behind the annotations and how they fit into the collaborative publishing workflow.
Key Takeaways:
- Digital proofreading uses annotation tools in Adobe Acrobat to create instructions for a typesetter; you are not editing the file directly.
- The most common tools are for inserting, deleting, and replacing text, as well as highlighting and commenting to ask questions (queries).
- Always aim for clarity and efficiency by using the right tool for the job (e.g., using "Replace Text" for a simple correction).
- The Comments Pane is a proofreader's safety net and a typesetter's checklist, ensuring that every correction is logged and addressed.
Next Up:
Now that you can identify errors and have the tools to mark them, the next lesson will broaden the scope. We will move on to the next outcome: Perform a quality check on a full proof set, including front matter, back matter, and running heads. This involves applying your skills systematically across an entire book proof, not just isolated pages.