Introduction
Welcome back! In our last session, we distinguished between the three main types of MQL5 programs and concluded that to build an automated trading system, we need to create an Expert Advisor (EA). You learned that an EA is the only program type that can both analyze the market continuously and execute trades automatically.
Today, we transition from theory to practice. This lesson is your first hands-on step in programming. You will learn how to use the MQL5 Wizard within MetaEditor to create the basic project file for our future Heikin Ashi trading bot. This generated file will serve as the "skeleton" upon which we will build all of our trading logic.
Your First Project: The Expert Advisor Template
Our goal is to create a clean, understandable foundation for our EA. The MQL5 Wizard offers two ways to create an Expert Advisor: Expert Advisor (template) and Expert Advisor (generate).
- Generate: This option builds a complex EA by piecing together pre-made code modules. It's powerful but can be confusing for a beginner as it hides a lot of the underlying code.
- Template: This option creates a single, simple file with the most basic structure. This is perfect for us because it allows us to write and understand every piece of our EA from the ground up.
For learning purposes, we will always use the Expert Advisor (template) option. Let's get started.
Step-by-Step: Creating Your EA Project
We'll now walk through the process of creating your project file. The following short video gives a great visual overview of the process. While the narrator chooses a slightly different path (generate), the initial steps of opening the wizard and the final step of compiling are exactly the same.
MQL5 Tutorial 6 Create your first Expert Advisor in 2 minutes
Watch this video from MQL5 Tutorial to see the MQL5 Wizard in action. Pay attention to how the wizard is opened and how the code is compiled at the end.
Watch the video from the beginning to 0:36 to see how to start a new project. Then, you can skip to 1:33 and watch to the end (2:02) to see the compilation step.
Now, follow these steps in your MetaEditor.
1. Launch the MQL5 Wizard
First, make sure you have MetaEditor open. You can open it from your MT5 terminal by clicking the IDE icon (it looks like a small book with the MQL5 logo on it) or by pressing the F4 key.
In MetaEditor, start a new project by clicking the "New" button in the top-left corner, or by pressing Ctrl+N. This will open the MQL5 Wizard.
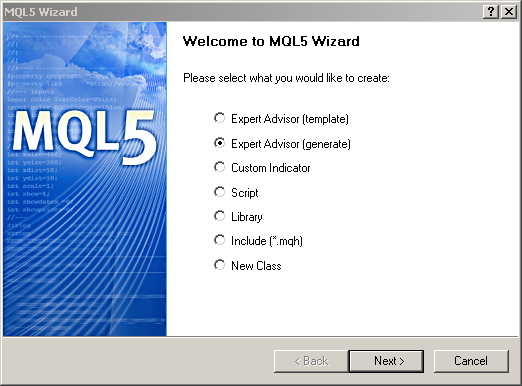
2. Select "Expert Advisor (template)"
On this first screen, you'll see several options. As we discussed, we want to build our EA from a clean slate.
- Select Expert Advisor (template) and click Next.
The article below reinforces why this is the best choice for anyone new to MQL5.
Master MQL5 from Beginner to Pro (Part VI): Basics of Developing ...
The author of 'Master MQL5 from Beginner to Pro' explains the difference between the 'template' and 'generate' options and strongly recommends the template for beginners.
Read the section titled 'Expert Advisor Template'. Focus on the author's reasoning for choosing the first option ('from a template') over the 'generated' version.
3. Name Your Expert Advisor
The next screen asks for some general properties.
- Name: Give your EA a name. Let's call it
MyHeikinAshiEA. - Copyright/Link: You can put your name in the copyright field and an email or website in the link field. These are just comments in the code and don't affect how the EA runs.
- Click Next.
4. Skip Additional Events
The wizard now offers to add several advanced "event handlers". These are functions that respond to specific events, like a trade being placed or a chart object being clicked. Our minimal template already includes everything we need for now.
- Leave all boxes on this screen unchecked and click Next.
- If you see another screen for "tester event handling functions," leave those unchecked as well and click Finish.
5. Review Your New EA File
Congratulations! You have successfully created your first EA project. MetaEditor will now show you a new file named MyHeikinAshiEA.mq5 containing some starter code.
It should look something like this:
//+------------------------------------------------------------------+
//|                                                MyHeikinAshiEA.mq5 |
//|                                                     Your Name Here |
//|                                                                  |
//+------------------------------------------------------------------+


#property copyright "Your Name Here"
#property link      ""
#property version   "1.00"

//+------------------------------------------------------------------+
//| Expert initialization function                                   |
//+------------------------------------------------------------------+
int OnInit()
  {
//---
   return(INIT_SUCCEEDED);
  }
//+------------------------------------------------------------------+
//| Expert deinitialization function                                 |
//+------------------------------------------------------------------+
void OnDeinit(const int reason)
  {
//---

  }
//+------------------------------------------------------------------+
//| Expert tick function                                             |
//+------------------------------------------------------------------+
void OnTick()
  {
//---

  }
//+------------------------------------------------------------------+
This is your EA's basic structure. Don't worry about understanding every line just yet. For now, just recognize the three main functions the wizard created for us:
OnInit(): Runs once when the EA first starts. Used for setup tasks.OnDeinit(): Runs once when the EA stops. Used for cleanup.OnTick(): This is the heart of the EA. The code inside this function runs every time a new price quote (a "tick") arrives for the chart symbol. This is where our main trading logic will go.
The following video provides a good explanation of these three core functions.
Complete Beginners Guide: Start Creating Your Own Trading Robot Expert Advisor (MetaTrader 5)
The 'Complete Beginners Guide' video explains the purpose of the three event handlers that are automatically created in your new EA template.
Watch the clip from 06:14 to 06:59. The presenter explains the role of the OnInit, OnDeinit, and OnTick functions.
6. Compile Your Code
The code you've written is human-readable, but the computer needs it in a different format to execute it. The process of converting your .mq5 source code into an executable .ex5 file is called compiling.
- Click the Compile button (a blue and grey diamond icon) in the toolbar, or press the
F7key.
After compiling, look at the "Toolbox" window at the bottom of MetaEditor. On the "Errors" tab, you should see a message confirming a successful compilation, like: 0 error(s), 0 warning(s).

You have now created and compiled an empty but functional Expert Advisor. It doesn't do anything yet, but the foundation is in place.
Conclusion
In this lesson, you took a significant practical step forward. You moved from theory to action by creating the actual file that will become your trading robot.
Key Takeaways:
- The MQL5 Wizard helps create new program files.
- For learning, it's best to use the
Expert Advisor (template)option to create a clean, minimal starting point. - The template automatically includes three primary event functions:
OnInit(),OnDeinit(), andOnTick(). - Compiling (F7 key) is the essential step that turns your written code into a program that MT5 can run.
Preview of the Next Lesson:
Our new EA is empty. The next logical step is to make it do something. In the next lesson, we will write our very first line of MQL5 code. You will learn how to use the Print() function inside the OnTick() event handler to make your EA send a simple message to the "Experts" log in MetaTrader 5. This is the "Hello, World!" of EA programming and a fundamental skill for debugging.