Hello! Welcome back to our journey into Kubernetes administration.
In our last lesson, you successfully initialized your control plane with kubeadm init and installed the Calico CNI, bringing your first node to a Ready state. You now have the "brain" of a Kubernetes cluster. However, a cluster isn't very useful without worker nodes to run applications.
This lesson focuses on expanding your cluster by adding worker nodes. We will use the kubeadm join command to securely connect these new nodes to the control plane. By the end of this session, you'll have a multi-node Kubernetes cluster, ready to schedule and run workloads.
1. The kubeadm join Process: Establishing Trust
Adding a new node to a cluster isn't as simple as just connecting it to the network. A crucial security challenge must be solved: bidirectional trust.
- The new node must trust the control plane. How does the worker node know it's connecting to the legitimate API server and not a malicious imposter?
- The control plane must trust the new node. How does the API server know the joining node is authorized and not an intruder trying to gain access to the cluster?
kubeadm solves this "chicken-and-egg" problem through a two-part process: Discovery and TLS Bootstrap.
To understand these concepts in detail, let's turn to a well-written article that breaks down the theory.
Building a Kubernetes Cluster with kubeadm - Medium
The following article section from "Building a Kubernetes Cluster with kubeadm" provides an excellent explanation of the trust problem and how kubeadm join solves it through Discovery (the node validating the control plane) and TLS Bootstrap (the control plane validating the node).
Please read the section titled "6. Worker Node Join (kubeadm join)". Focus on understanding the concepts under the subheadings "The Trust Problem", "Discovery: The Node Validates the Control Plane", and "TLS Bootstrap: The Control Plane Validates the Node". You can stop reading at "The cluster-info ConfigMap".
To summarize and reinforce the key points from the article:
-
Discovery (Node -> Control Plane Trust): The worker node verifies the control plane's identity. The default and most secure method is CA Pinning.
- The
kubeadm joincommand includes a hash of the cluster's root Certificate Authority (CA) public key (--discovery-token-ca-cert-hash). - The joining node fetches the CA certificate from the control plane and calculates its hash.
- If the calculated hash matches the one provided in the join command, the node trusts the control plane. This prevents man-in-the-middle attacks.
- The
-
TLS Bootstrap (Control Plane -> Node Trust): The control plane verifies the worker node's identity using a temporary bootstrap token.
- The join command includes a short-lived token (
--token). - The new node uses this token to make its first authenticated request to the API server.
- Once temporarily authenticated, the node's
kubeletgenerates a new private key and submits a Certificate Signing Request (CSR) to the API server. - The control plane's controller manager automatically approves this CSR.
- The
kubeletreceives a unique, long-term client certificate, which it stores in/etc/kubernetes/kubelet.confand uses for all future secure communication. The bootstrap token is no longer needed for this node.
- The join command includes a short-lived token (
For a formal overview of the kubeadm join command, its workflow, and different discovery methods, the official Kubernetes documentation is the definitive source.
The official documentation for kubeadm join provides the most authoritative information on the command's purpose, workflow, and options.
Scan through these sections of the documentation. Don't worry about memorizing every flag. Instead, focus on: The general synopsis and workflow. The description of the three discovery methods: Token-based with CA pinning (the default), token-based without CA pinning (insecure), and file-based discovery.
Test your understanding!
A kubeadm join command typically looks like this: kubeadm join 192.168.1.10:6443 --token <some_token> --discovery-token-ca-cert-hash sha256:<some_hash>.
Which part of this command enables Discovery, and which part enables TLS Bootstrap?
Show answer
- The
--discovery-token-ca-cert-hash sha256:<some_hash>part enables Discovery. It allows the joining node to verify the identity of the control plane by matching the CA certificate hash. - The
--token <some_token>part enables TLS Bootstrap. It provides the temporary credential the new node uses to authenticate itself to the control plane long enough to request its own permanent identity (client certificate).
2. Hands-On: Adding a Worker Node
Now, let's put the theory into practice and add a worker node to your cluster.
Prerequisites on the Worker Node
First, ensure your worker node is prepared just as the control-plane node was. This means:
- Swap is disabled.
- Kernel modules (
br_netfilter,overlay) are loaded andsysctlparameters for networking are set. containerd,kubelet, andkubeadmare installed.
These steps were covered in the lesson prior to initializing the control plane.
Obtaining the Join Command
In the last lesson, the output of kubeadm init provided the exact kubeadm join command needed. If you saved it, you're ready to go.
If you lost the command or the token has expired (they are valid for 24 hours by default), you can easily generate a new one. Run this command on your control-plane node:
sudo kubeadm token create --print-join-command
This will output a new, valid kubeadm join command.
Executing the Join
Now, log in to your worker node and execute the kubeadm join command as the root user or with sudo.
Let's watch a demonstration of this process.
How to Install Kubernetes with Kubeadm (2025 Update) | Full Cluster Setup Walkthrough
This video from the KubeSkills channel provides a concise walkthrough of running the kubeadm join command on a worker node and then verifying its status from the control plane.
Watch the segment from 06:22 to 07:00. Notice how the command saved from the init step is run on the worker node, and then kubectl get nodes is immediately used on the control plane to see the result.
The command you run will look like this:
# Run this on your WORKER node
sudo kubeadm join <control_plane_ip>:6443 --token <token> \
    --discovery-token-ca-cert-hash sha256:<hash>
Upon successful execution, you will see output confirming the node has joined the cluster.
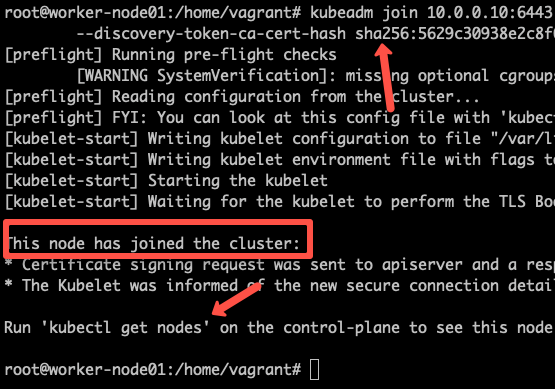
Verifying the Cluster State
Switch back to your control-plane node. Check the status of your nodes:
kubectl get nodes
You should now see your new worker node in the list. Initially, its status might be NotReady, but after a minute or two, it should transition to Ready.
NAME           STATUS   ROLES           AGE   VERSION
controlplane   Ready    control-plane   25m   v1.30.x
workernode1    Ready    <none>          90s   v1.30.x
Why does the node become Ready?
This happens automatically because of the CNI plugin (Calico) you installed in the previous lesson. The Calico components run as a DaemonSet, which ensures that its networking agent (calico-node) is automatically deployed to any new node that joins the cluster. Once the CNI agent is running, the kubelet on the worker node reports its network as ready, and the node's status changes to Ready.
You can verify that the CNI and kube-proxy pods are running on your new worker node:
# Run this on the control-plane node, replacing <worker-node-name>
kubectl get pods --all-namespaces -o wide | grep <worker-node-name>
The output should show pods for kube-proxy and calico-node running on the worker node's IP address.
3. Troubleshooting Common Join Issues
In a perfect world, kubeadm join always works. In reality, you may encounter issues. Knowing how to troubleshoot is a key skill for a Kubernetes administrator.
The most common failure is the command hanging indefinitely during preflight checks.
Building a Kubernetes Cluster with kubeadm - Medium
Let's revisit the Medium article, which has a very practical troubleshooting section for the most common kubeadm join problem.
Read the section titled "kubeadm join hangs at preflight checks". It provides a clear, step-by-step diagnostic process that is invaluable in real-world scenarios.
Here is a summary of the diagnostic flow for a hanging kubeadm join:
-
Test Connectivity: From the worker node, try to reach the API server's health endpoint.
curl -k https://<control_plane_ip>:6443/healthzIf you get
ok, connectivity is fine. If the command hangs or fails to connect, you have a network problem. -
Check Firewalls: If the
curlcommand fails, the most likely culprit is a firewall on the control-plane node blocking incoming traffic on port 6443.- On CentOS/RHEL/Rocky:
sudo systemctl status firewalld - On Ubuntu/Debian:
sudo ufw status - If a firewall is active, you must configure it to allow TCP traffic on port 6443.
- On CentOS/RHEL/Rocky:
-
Check API Server Binding: On the control plane, ensure the API server is listening on its public IP, not just localhost.
ss -tlnp | grep 6443You should see it listening on
0.0.0.0:6443or<control_plane_ip>:6443, not127.0.0.1:6443.
Conclusion
In this lesson, you successfully expanded your Kubernetes cluster from a single node to a multi-node environment capable of distributing workloads.
Here are your key takeaways:
- The
kubeadm joincommand securely adds worker nodes to an existing cluster. - The process relies on a bidirectional trust model: Discovery (via CA hash) for the node to trust the control plane, and TLS Bootstrap (via bootstrap token) for the control plane to trust the node.
- You can generate a new join token and command at any time from the control plane using
kubeadm token create --print-join-command. - A successful join can be verified with
kubectl get nodeson the control plane. The automatic deployment of CNI pods via aDaemonSetis what allows new nodes to becomeReady.
You now have a proper, multi-node Kubernetes cluster. The foundation is built. In our next lesson, we will shift focus from building the cluster to using it. You'll learn how to use kubectl to inspect the state of your cluster and its resources, starting with the get and describe commands.