Hello! Let's dive into the exciting part: bringing your Kubernetes cluster to life.
In our last lesson, you meticulously prepared your nodes by disabling swap, configuring kernel parameters, and installing the container runtime (containerd) and the core Kubernetes toolset (kubeadm, kubelet, kubectl). Those steps were the necessary groundwork. Today, we'll build upon that foundation.
This lesson focuses on initializing the control plane on one of your prepared nodes. You will use the kubeadm init command to bootstrap the cluster's "brain" and then install a critical component—the Pod network—to make it fully functional. By the end of this session, you will have a running, single-node Kubernetes cluster.
1. The kubeadm init Workflow: A Look Under the Hood
Before we run the command, it's important to understand what kubeadm init actually does. It's not just a single action; it's a sequence of orchestrated steps that transforms a generic server into a Kubernetes control plane.
To get a detailed overview of this process, please watch the following video segment. It breaks down the internal workings of kubeadm init.
Setup Kubernetes Cluster Using Kubeadm [Multi-node]
This segment from the DevopsCube channel explains the step-by-step process that kubeadm follows during initialization, from pre-flight checks to generating join tokens.
Watch the video from 03:05 to 04:35. Pay close attention to the sequence of events: pre-flight checks, image downloads, certificate generation, kubeconfig creation, and static pod manifest generation.
As the video explains, kubeadm init performs a series of automated tasks:
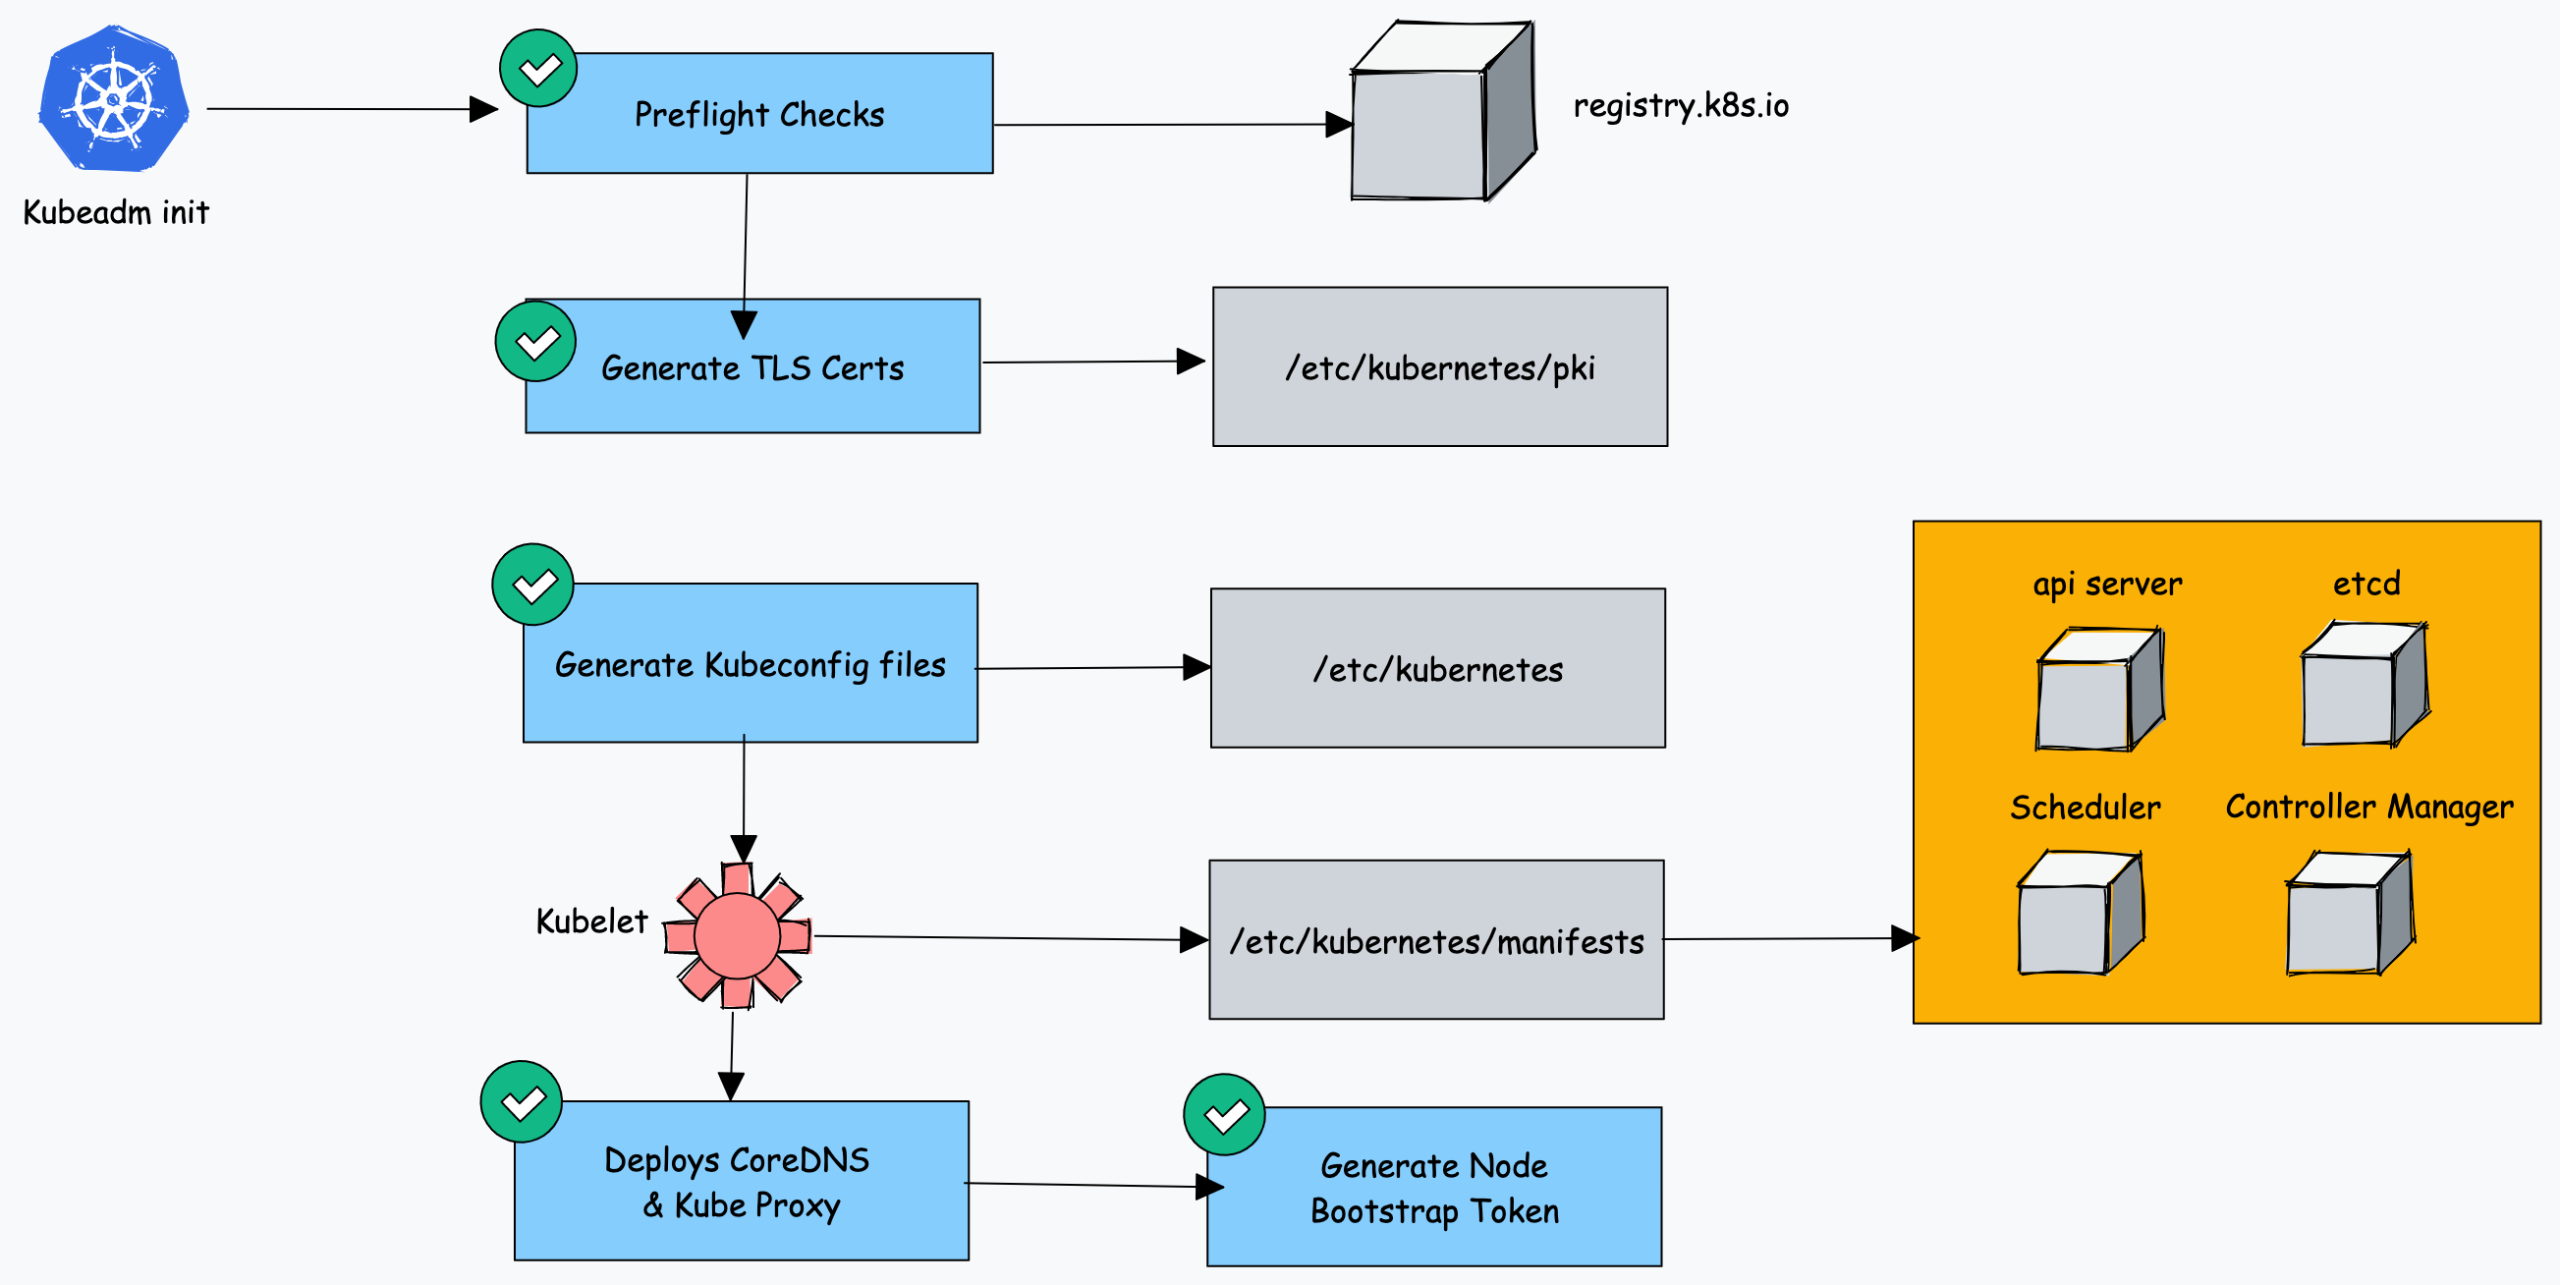
- [Preflight Checks]: It verifies that the machine meets all prerequisites (e.g., swap is off, required ports are free, a compatible container runtime is installed).
- Generates Certificates: It creates a full Public Key Infrastructure (PKI) with self-signed certificates for all control plane components to communicate securely. These are stored in
/etc/kubernetes/pki. - Generates Kubeconfig Files: It creates configuration files (
.conf) for the scheduler, controller-manager, andadminto connect to the API server. These are stored in/etc/kubernetes/. - Pulls Control Plane Images: It pulls the container images for the API server, etcd, scheduler, and controller-manager from the official
registry.k8s.iorepository. - Generates Static Pod Manifests: It writes YAML manifests for the control plane components into
/etc/kubernetes/manifests/. Thekubeleton the node monitors this directory and automatically creates these components as "static pods". - Installs Add-ons: It installs essential add-ons like CoreDNS (for cluster DNS) and kube-proxy (for service networking).
- Generates Join Token: It creates a bootstrap token that worker nodes will use to securely join the cluster.
2. Initializing the Control-Plane Node
Now, let's execute the command. This command should only be run on the node you've designated as your control plane.
The kubeadm init command requires a few important flags:
--apiserver-advertise-address=<ip_address>: This specifies the IP address that the API server will advertise to other members of the cluster. This should be the main IP address of your control plane node.--pod-network-cidr=<ip_range>: This defines the IP address range from which Pods will get their IPs. This range must not overlap with your node IP addresses. A common choice is10.244.0.0/16for Flannel/Weave or192.168.0.0/16for Calico. The choice of CIDR depends on the network plugin you plan to use.--cri-socket <path>: While often detected automatically, explicitly tellingkubeadmwhere to find the container runtime interface socket is good practice. Forcontainerd, the path isunix:///var/run/containerd/containerd.sock.
Let's watch a practical demonstration of this command.
How to Install Kubernetes with Kubeadm (2025 Update) | Full Cluster Setup Walkthrough
This clip shows the kubeadm init command in action, including the flags we just discussed.
Watch from 04:49 to 06:22. Notice the command used and the output it produces. The output is very important, as it contains the next steps you need to take.
Based on the video and our understanding, here is the command you will run on your control plane node. We will use the CIDR for Calico, which we will install later.
# Replace <your_control_plane_ip> with the actual IP of your node
sudo kubeadm init --apiserver-advertise-address=<your_control_plane_ip> --pod-network-cidr=192.168.0.0/16 --cri-socket=unix:///var/run/containerd/containerd.sock
After the command completes successfully, you will see output similar to this:
Your Kubernetes control-plane has initialized successfully!

To start using your cluster, you need to run the following as a regular user:

  mkdir -p $HOME/.kube
  sudo cp -i /etc/kubernetes/admin.conf $HOME/.kube/config
  sudo chown $(id -u):$(id -g) $HOME/.kube/config

You should now deploy a pod network to the cluster.
Run "kubectl apply -f [podnetwork].yaml" with one of the options listed at:
  https://kubernetes.io/docs/concepts/cluster-administration/addons/

Then you can join any number of worker nodes by running the following on each as root:

kubeadm join <control_plane_ip>:6443 --token <token> \
    --discovery-token-ca-cert-hash sha256:<hash>
This output is critical.
- The first block of commands is for configuring
kubectl. - The last command,
kubeadm join ..., is what you will use in our next lesson to add worker nodes. Save this command now. The token is only valid for 24 hours by default.
3. Configuring kubectl
The kubeadm init process generates a file at /etc/kubernetes/admin.conf. This file contains the credentials kubectl needs to communicate with the API server. Let's configure your user account to use it.
Execute these commands on your control-plane node:
mkdir -p $HOME/.kube
sudo cp -i /etc/kubernetes/admin.conf $HOME/.kube/config
sudo chown $(id -u):$(id -g) $HOME/.kube/config
Now, you should be able to communicate with your cluster. Let's verify:
kubectl get nodes
You should see your control-plane node listed, but with a status of NotReady.
NAME           STATUS     ROLES           AGE   VERSION
controlplane   NotReady   control-plane   2m    v1.30.x
Test your understanding!
Why is the node's status NotReady? What essential piece is missing from the cluster?
Show answer
The node is NotReady because no network plugin (CNI) has been installed. The kubelet knows that without a CNI, it cannot fulfill its networking responsibilities for Pods (like assigning IP addresses or connecting them), so it reports a NotReady status to the API server. This prevents any user workloads from being scheduled on this node until the networking is functional.
4. Installing a Pod Network Add-on (CNI)
A Kubernetes cluster is not complete without a Container Network Interface (CNI) plugin. The CNI is responsible for the networking layer of your Pods, handling IP address assignment and enabling Pod-to-Pod communication across the cluster.
There are many CNI providers, but we'll use Calico, which is a popular choice known for its performance and support for network policies.
Installing a CNI is typically done by applying its manifest file directly to the cluster using kubectl.
How to Install Kubernetes with Kubeadm (2025 Update) | Full Cluster Setup Walkthrough
This short clip demonstrates how to install the Calico CNI plugin and verify that the nodes become ready.
Watch from 07:00 to 08:09. The process involves applying a YAML file and then checking the status of both the pods in the kube-system namespace and the nodes.
To install Calico, run the following command. This fetches the manifest directly from the Calico project's official source and applies it.
kubectl apply -f https://raw.githubusercontent.com/projectcalico/calico/v3.28.0/manifests/calico.yaml
This command creates several resources, including a DaemonSet that ensures a Calico agent (calico-node) runs on every node in the cluster.
5. Verifying Cluster Status
Once you've applied the Calico manifest, the CNI components will start up as Pods in the kube-system namespace. You can watch this happen:
# Watch the pods in the kube-system namespace
kubectl get pods -n kube-system -w
You will see pods like calico-node-xxxxx and calico-kube-controllers-xxxxx in the ContainerCreating and then Running state. You'll also see the coredns-xxxxx pods, which were stuck in Pending, now start up because the network is available.
After a minute or two, once the Calico pods are running, check the node status again:
kubectl get nodes
This time, the status should have changed to Ready!
NAME           STATUS   ROLES           AGE   VERSION
controlplane   Ready    control-plane   5m    v1.30.x
Congratulations! You have successfully bootstrapped a functional, single-node Kubernetes cluster.
Conclusion
In this lesson, you took a fully prepared Linux node and transformed it into a working Kubernetes control plane.
Here are the key takeaways:
- The
kubeadm initcommand automates the complex process of setting up control plane components like the API server, etcd, scheduler, and controller-manager. - Critical flags like
--apiserver-advertise-addressand--pod-network-cidrare essential for a correct initialization. - A cluster is not functional until a Pod network (CNI) is installed. The CNI provides the networking fabric for Pods to communicate.
- You can verify the cluster's health by checking the status of nodes (
kubectl get nodes) and control plane pods (kubectl get pods -n kube-system).
Your cluster is now running, but it's a bit lonely with only a control-plane node. In the next lesson, we will use the kubeadm join command you saved to add worker nodes, expanding your cluster's capacity to run applications.