Welcome back! In our last session, you successfully built a multi-node Kubernetes cluster by joining a worker node to the control plane. You've used kubectl on the control-plane node to verify the status, but in real-world operations, you'll almost always manage your cluster from a remote workstation.
This lesson bridges that gap. We will focus on configuring kubectl on your local machine to securely communicate with the cluster you just built. You will learn what a kubeconfig file is, understand its structure, and use it to establish a remote connection. Mastering this is a fundamental step toward professional Kubernetes administration.
By the end of this lesson, you will be able to connect to your Kubernetes cluster from any machine, setting the stage for managing cluster resources in the lessons to come.
1. Understanding the kubeconfig File
Whenever you run a kubectl command, how does it know which cluster to talk to and how to authenticate? The answer lies in a special configuration file called a kubeconfig file. It's a YAML file that contains all the necessary information to find and authenticate with a cluster's API server.
To get a clear overview of why this file is so important, let's start with a short conceptual video.
Demystifying kubeconfig file | kubeconfig file explained
This video from the "Techworld with Rajendra" channel explains the fundamental role of the kubeconfig file. It answers the question of how kubectl knows which cluster to target and how it authenticates.
Watch the first 1 minute and 39 seconds of the video. Focus on understanding the problem that the kubeconfig file solves in the interaction between kubectl and the API server.
2. The Anatomy of a kubeconfig File
A kubeconfig file is organized into three main sections. Understanding this structure is key to managing cluster access effectively, especially when you need to connect to multiple clusters.
The three core sections are:
- Clusters: Defines a list of Kubernetes clusters. Each entry specifies a name, the API server's URL, and the cluster's certificate authority (CA) data needed to verify the server's identity.
- Users: Defines a list of users. A "user" here is an identity for authentication. Each entry specifies a name and the client's credentials, which are typically a client certificate and a private key.
- Contexts: This is the "glue" that connects the other two sections. Each context is a triplet that defines a
(cluster, user, namespace). It essentially says: "To access this cluster, use the credentials of this user, and operate within this namespace by default."
The kubeconfig file also specifies a current-context, which tells kubectl which context to use if one isn't specified in the command.
The following video provides an excellent breakdown of these three sections.
Demystifying kubeconfig file | kubeconfig file explained
Continuing with the same video, this next segment walks through the structure of a typical kubeconfig file, explaining the clusters, users, and contexts sections.
Watch from 01:39 to 05:45. Pay close attention to how a context entry combines a cluster and a user to create a complete access profile.
To reinforce this, here is a visual breakdown of a kubeconfig file's structure.

3. Hands-On: Connecting Your Workstation to the Cluster
When you initialized your cluster with kubeadm, a kubeconfig file with administrative privileges was automatically generated. Our task is to securely copy this file to your local workstation so you can use kubectl from there.
Step 1: Locate the Kubeconfig File on the Control Plane
The administrative kubeconfig file is created at /etc/kubernetes/admin.conf on your control-plane node. When you ran kubectl commands as the root user (or with sudo) on the control plane, kubeadm had already configured the environment to use this file.
Step 2: Copy the admin.conf File to Your Local Machine
You need to transfer the contents of /etc/kubernetes/admin.conf from your control-plane node to your local workstation. A common way to do this if you have SSH access is using scp (secure copy). From your local machine's terminal, run:
# Replace <user> and <control-plane-ip> with your details
scp <user>@<control-plane-ip>:/etc/kubernetes/admin.conf .
This command copies the file to your current directory. You will likely need to provide your SSH password.
Alternatively, you can SSH into the control-plane node, display the file's contents with sudo cat /etc/kubernetes/admin.conf, and then copy-paste the output into a new file on your local machine.
Step 3: Place the Kubeconfig in the Default Location
kubectl looks for a configuration file at a default location: $HOME/.kube/config. Let's move the file you just copied into place.
On your local machine, run the following commands:
# Create the .kube directory if it doesn't exist
mkdir -p $HOME/.kube

# Move the copied file to the default location
mv admin.conf $HOME/.kube/config
Step 4: Verify the Connection
Now, from your local workstation, run a kubectl command to verify that you can connect to your cluster:
kubectl get nodes
You should see the list of your control-plane and worker nodes, just as you did when you ran the command directly on the control plane. Success! You are now managing your cluster remotely.
The following video demonstrates this exact process.
Setup Kubernetes Cluster Using Kubeadm [Multi-node]
This clip from DevopsCube shows the practical steps of copying the admin.conf file from the master node to a local workstation's .kube directory to enable remote kubectl access.
Watch from 14:43 to 16:08. The demonstrator copies the content of admin.conf and pastes it into the local config file, achieving the same result as our scp and mv commands.
4. How kubectl Finds and Merges Configuration
You now know the default location for the kubeconfig file, but kubectl is more flexible than that. It uses a specific order of precedence to find its configuration:
--kubeconfigflag: If you provide this command-line flag (e.g.,kubectl --kubeconfig=my-custom-config.yaml get pods), it will always be used first.KUBECONFIGenvironment variable: If the flag is not set,kubectlchecks for an environment variable namedKUBECONFIG. This variable can contain a list of paths to multiple kubeconfig files (colon-separated on Linux/macOS, semicolon-separated on Windows).kubectlmerges these files to create a single effective configuration.- Default location: If neither of the above is set,
kubectlfalls back to using$HOME/.kube/config.
This hierarchy is essential for managing access to different environments, such as development, staging, and production clusters, without overwriting your primary config file.
Configure Access to Multiple Clusters
The official Kubernetes documentation provides the authoritative explanation on managing access, including how the KUBECONFIG environment variable works.
Read the sections "Set the KUBECONFIG environment variable" and "Explore the $HOME/.kube directory". Focus on understanding how KUBECONFIG allows you to reference one or more configuration files.
5. Managing Multiple Contexts
As a DevOps professional, you will inevitably work with multiple Kubernetes clusters. A single kubeconfig file can hold the connection details for all of them. You can switch between them easily using contexts.
The following kubectl config subcommands are your primary tools for this:
kubectl config view: Displays the merged kubeconfig settings.kubectl config get-contexts: Lists all defined contexts. The current one is marked with an asterisk (*).kubectl config current-context: Shows the name of the current context.kubectl config use-context <context-name>: Switches the current context to the one specified.
This is a core workflow for anyone managing more than one cluster.
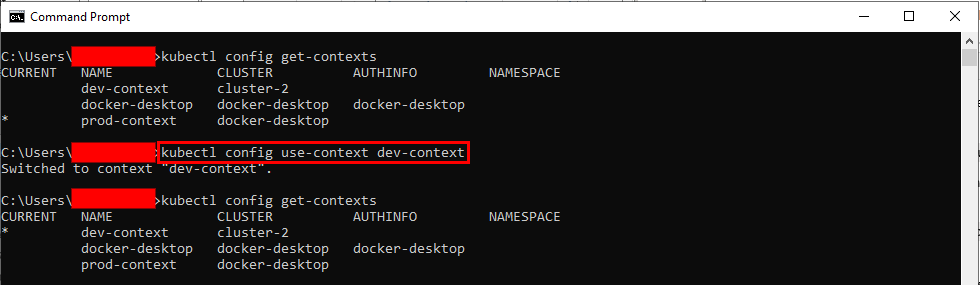
The next video gives a live demonstration of creating a second cluster and then switching between the two using contexts.
Demystifying kubeconfig file | kubeconfig file explained
This final segment from "Techworld with Rajendra" demonstrates the power of contexts by creating a second cluster and using kubectl config commands to list and switch between the two environments seamlessly.
Watch from 05:45 to 11:25. Observe how the get-contexts and use-context commands are used to manage connections to two different clusters from the same terminal.
Test your understanding!
You are managing two clusters: prod-cluster and staging-cluster. Your current context is prod-cluster. You need to run a single kubectl command to list pods in the staging-cluster without changing your current context from prod-cluster. Which of the following commands would you use?
kubectl use-context staging-cluster && kubectl get podskubectl get pods --context staging-clusterkubectl get podsKUBECONFIG=staging.yaml kubectl get pods
Show answer
The correct answer is 2. kubectl get pods --context staging-cluster.
The --context flag allows you to override the current context for a single command, which is exactly what the scenario requires. Option 1 would permanently switch your context, which is not what was asked. Option 3 would query the prod-cluster. Option 4 might work if you had a separate file for staging, but the --context flag is the most direct way to achieve this when contexts are defined in your merged configuration.
Conclusion
In this lesson, you've taken a crucial step from being a cluster builder to a cluster operator. You now have your local development environment configured to manage your Kubernetes cluster remotely, which is the standard industry practice.
Here are the key takeaways:
- The kubeconfig file is a YAML file that tells
kubectlwhere to find a cluster and how to authenticate. - It is structured into clusters (server endpoints), users (client credentials), and contexts (a named binding of a cluster, a user, and a default namespace).
- For
kubeadmclusters, the administrative config is located at/etc/kubernetes/admin.conf. You can copy this to your local machine at$HOME/.kube/configto enable remote access. - You can manage connections to multiple clusters using
kubectl configcommands, withkubectl config use-context <context-name>being the primary way to switch between them.
With kubectl now configured on your workstation, you are ready to start interacting with your cluster and inspecting its resources. In our next lesson, we will dive into the most fundamental kubectl commands: get and describe, which allow you to inspect the state of your cluster and its various components.