Hello! Welcome back to our course.
In our last lesson, we explored the critical difference between layout (reflow) and repaint, focusing on how expensive layout operations can be and how "layout thrashing" can severely harm your application's performance. We saw that repeatedly checking an element's position during a scroll event is a classic performance anti-pattern.
Today, we'll dive into the modern browser's solution to this very problem. This lesson directly addresses the learning outcome: Describe how the Intersection Observer API efficiently tracks element visibility without polling. We'll break down how this powerful API allows you to monitor when an element enters or leaves the viewport (or another scrollable element) in a highly performant, asynchronous way, completely avoiding the pitfalls of manual polling.
The Problem with Traditional Visibility Checks
Before we explore the solution, let's solidify our understanding of the problem. For years, if a developer wanted to implement features like lazy-loading images or infinite scrolling, the approach was to listen to the scroll event.
// The "old" and inefficient way
const images = document.querySelectorAll('img[data-src]');

window.addEventListener('scroll', () => {
  for (const image of images) {
    const rect = image.getBoundingClientRect(); // This forces a reflow!
    if (rect.top < window.innerHeight && rect.bottom >= 0) {
      // Image is in the viewport, load it...
    }
  }
});
As we learned in the previous lesson, this pattern is highly inefficient for two main reasons:
- The
scrollevent can fire dozens of times per second, executing our code far more often than necessary. - Calling
getBoundingClientRect()inside the event handler forces the browser to perform a synchronous layout (reflow) to give you the element's exact position. Doing this for multiple elements in a high-frequency event handler is a textbook example of layout thrashing, which leads to jank and a poor user experience.
Fundamentally, we don't care about the scroll event itself; we only care about the result: is an element visible or not?
The Solution: The Intersection Observer API
The Intersection Observer API provides a way to asynchronously observe changes in the intersection of a target element with an ancestor element or with the top-level document's viewport.
Instead of us constantly asking the browser "Where are you now?", we tell the browser, "Let me know when this element is 50% visible." The browser does the hard work of tracking positions efficiently behind the scenes (often off the main thread) and only invokes our callback function when the specified condition is met.
Intersection Observer & Infinite Scroll in a Visual Way
To start, let's watch this video from Lucas Paganini. It does an excellent job of visually contrasting the old scroll-event method with the more declarative and performant Intersection Observer approach.
Watch from 04:46 to 07:58. Focus on the core idea: instead of listening to scroll events, we can directly listen for when an element intersects the viewport. Pay attention to the visual explanations of the key configuration options: threshold, rootMargin, and root.
How to Use the Intersection Observer
Using the API involves two main steps: creating an observer with a configuration and then telling it which element(s) to watch.
// 1. Define the callback function that runs when an intersection changes
const callback = (entries, observer) => {
  entries.forEach(entry => {
    // Each entry describes an intersection change for one observed target
    if (entry.isIntersecting) {
      console.log(`${entry.target.id} is now visible!`);
      // Example: lazy-load an image or start an animation
    } else {
      console.log(`${entry.target.id} is no longer visible.`);
    }
  });
};

// 2. Create the observer with the callback and optional configuration
const options = {
  // options will be discussed below
};
const observer = new IntersectionObserver(callback, options);

// 3. Tell the observer which element to watch
const target = document.querySelector('#my-element');
observer.observe(target);
Let's watch a practical demonstration of how to build this out.
Learn Intersection Observer In 15 Minutes
This video from Web Dev Simplified provides a clear, code-along walkthrough of creating an observer and using its main features. It's a great way to see the API in action.
Watch from 01:23 to 04:54. The video explains how to instantiate an IntersectionObserver, what the entries array contains, and how to use the crucial isIntersecting property to toggle a class.
Dissecting the API
Now let's break down the key components you've just seen.
The IntersectionObserverEntry Object
The callback function receives an array of IntersectionObserverEntry objects. Each entry contains the details of a single intersection change. The most important properties are:
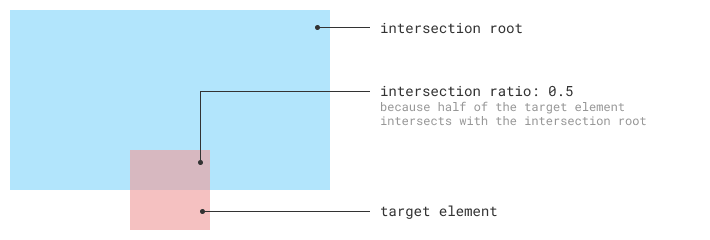
isIntersecting: A boolean value which istrueif the target element intersects with the root.target: The element being observed.intersectionRatio: A number between 0.0 and 1.0 indicating what percentage of the target is visible. A value of1.0means the element is fully visible.boundingClientRect: The bounding box of the target element (same as callingelement.getBoundingClientRect()).intersectionRect: The rectangular area of the target that is currently visible within the root.rootBounds: The bounding box of the root element.
The options Object
The real power of the API comes from the options object you pass to the constructor.
root: The element that is used as the viewport for checking intersection. It must be an ancestor of the target. Ifnullor not specified, it defaults to the browser's viewport. This is useful for checking visibility within a scrollablediv, for example.threshold: A number or an array of numbers between 0.0 and 1.0. The callback will be triggered each time theintersectionRatiocrosses one of these values (in either direction).threshold: 0(default): triggers as soon as a single pixel becomes visible.threshold: 1.0: triggers only when the element is 100% visible.threshold: [0, 0.25, 0.5, 0.75, 1.0]: triggers every time visibility crosses the 0%, 25%, 50%, 75%, and 100% marks.
rootMargin: A string with CSSmargin-like syntax (e.g.,"10px 20px 30px 40px"or"100px"). This allows you to effectively grow or shrink theroot's bounding box for intersection calculations. A positive margin makes the root "larger," causing the callback to fire before the element is physically visible. This is ideal for pre-loading images or data to ensure they are ready by the time the user scrolls to them.
Let's see how these options work in practice.
Learn Intersection Observer In 15 Minutes
Let's return to the Web Dev Simplified video to see how threshold and rootMargin are used.
First, watch from 05:33 to 07:08 to understand the threshold option. Then, watch from 08:21 to 10:08 to see a demonstration of rootMargin and its use case for pre-loading content.
Managing Observers
For performance, it's often best to stop observing an element once you're done with it. For example, after an image has been lazy-loaded, there's no need to keep tracking its visibility.
observer.unobserve(targetElement): Tells the observer to stop watching a specific element.observer.disconnect(): Stops the observer from watching all of its target elements.
Learn Intersection Observer In 15 Minutes
The unobserve method is essential for cleaning up and optimizing performance. Let's see how it's used.
Watch the segment from 07:08 to 08:21. Notice how unobserve is called inside the callback once an element becomes intersecting, preventing the animation from re-triggering.
Under the Hood: Why is it Efficient?
Given your interest in the underlying mechanics, it's important to understand why this API is so performant. The official W3C specification gives us the clues.
Intersection Observer - W3C Specification
The W3C specification is the ultimate source of truth. Reading the introduction will clarify the core problems the API was designed to solve, which directly relate to our previous lesson.
Read the 'Abstract' and the 'Introduction' sections. Focus on the explanation of why traditional position calculation is expensive and how the Intersection Observer's asynchronous nature solves this problem.
As you read, the key is its asynchronous delivery.
- Observation is decoupled from notification: The browser performs the complex intersection calculations internally, highly optimized and often off the main thread.
- Callbacks are queued: When a threshold is crossed, the browser doesn't immediately stop everything to run your code. Instead, it queues a task to execute your callback on the main thread's event loop when it is idle.
- No forced synchronous layout: Because you aren't calling a method like
getBoundingClientRect()and demanding an immediate answer, you never force the browser to perform a synchronous layout. The entire process respects the browser's rendering pipeline, preventing jank.
This architecture allows the browser to batch notifications and schedule the work efficiently, providing a huge performance win over manual polling.
Performance Best Practice: One Observer to Rule Them All?
A common question is whether it's better to create one IntersectionObserver per element or a single, shared observer for many elements. For an application with hundreds of list items you want to animate in, this is a critical consideration.
IntersectionObserver API Performance: Many vs. Shared
This article by Ben Nadel presents an excellent experiment comparing the performance of using many observers versus a single shared observer within an Angular application. The core findings are framework-agnostic and highly valuable.
Read the section that starts with 'Now, if we open this up in the browser' and examine the performance graphs. Pay close attention to the flame graphs and the author's analysis. Most importantly, read the comments section, especially the insightful comment from Stefan Zager, the author of the IntersectionObserver implementation in Chrome, and the comment from 'Gareth' about memory leaks.
The takeaway is clear: using a single, shared IntersectionObserver to watch multiple elements is significantly more performant.
The browser can batch all intersection calculations for a single observer more efficiently. Furthermore, when the callback is invoked, you receive an array of all entries that have changed, allowing you to process all DOM updates in a single batch. This is especially important in frameworks like React or Angular, as it can help you consolidate state updates and trigger a single re-render, rather than many separate ones.
Conclusion
The Intersection Observer API is a fundamental tool for modern web development, providing a declarative and highly performant mechanism for tracking element visibility. It elegantly solves the problems of layout thrashing and inefficiency inherent in older, poll-based techniques.
Key Takeaways:
- The Intersection Observer API tracks the visibility of a
targetelement relative to arootelement (or the viewport). - It is asynchronous and non-blocking, delegating the expensive work of position tracking to the browser and invoking a callback only when necessary.
- This avoids the performance pitfall of forcing synchronous layouts (reflows) by calling
getBoundingClientRect()inside ascrollevent listener. - Configuration via the
optionsobject (root,rootMargin,threshold) provides precise control over when the callback is triggered. - For optimal performance, especially when observing many elements, it's best practice to use a single, shared
IntersectionObserverinstance.
What's Next?
We've just seen how to efficiently react to an element's positional changes in the DOM. But what if we need to react to structural changes? For example, what if we need to know when a new node is added to a specific part of the DOM by an external script? In our next lesson, we will explore the MutationObserver API, which allows us to do just that by observing changes to the DOM tree itself.